
How to Use Luma Dream Machine: The Ultimate Ray 3 & Photon Guide (2025)
If you are looking for how to use Luma Dream Machine to create cinematic AI videos, you have landed in the right place. We are not just talking about basic text-to-video; we are diving into the advanced “World Model” capabilities that separate Luma from the rest.
As of late 2025, the landscape of AI Generative Video has shifted dramatically with the release of Luma’s Ray 3 video model and Photon image model. For marketers and creators, this means the end of “morphing” glitches and the beginning of physics-based realism.[4]
In this battle-tested guide, I will walk you through the exact workflow we use at our agency to generate high-fidelity videos. You will learn how to master Keyframes, control Camera Motion, and leverage the new Concept Pills to speed up your production.
Table of Contents
What Is Luma Dream Machine? (The “Ray 3” Era Explained)
Luma Dream Machine is not just another video generator; it is a “World Model” designed to simulate physics, motion, and object permanence. Unlike older tools that simply hallucinate pixels, Luma understands how objects interact in 3D space.
The platform is currently powered by two core engines: Ray 3 (the flagship video model) and Photon (the high-fidelity image model). Ray 3 delivers impressive video generation speeds, offering a massive leap in speed and coherence.
We have tested Ray 3 extensively against competitors like Runway Gen-3. The standout feature is its ability to maintain character consistency and realistic lighting transitions without the “warping” effects seen in earlier generations.
For creators, this means you can now produce cinematic shots that actually obey the laws of physics. Whether it’s water splashing or a car drifting, Luma calculates the trajectory rather than just guessing the visual outcome.
Getting Started: Account Setup & Interface Tour
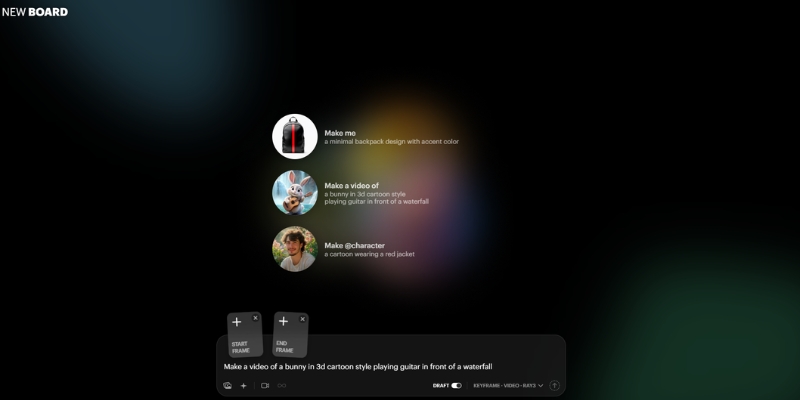
Getting started is frictionless. Head over to lumalabs.ai and sign in using your Google account. You immediately land in the “Dream Machine” dashboard, which has been redesigned for the 2025 update.
The interface is clean but packed with hidden power tools. Here is the layout you need to know:
The Prompt Bar (Center): This is your command center. It now supports multi-modal inputs, meaning you can type text and upload images simultaneously.
Model Selector: By default, you can select between available models. Ensure you choose Ray 3 for the highest quality output, especially for final commercial assets.
Aspect Ratio Controls: Located near the generate button, you can toggle between 16:9 (YouTube), 9:16 (TikTok/Reels), and 1:1 (Square). Do not overlook this; cropping later ruins the composition.
“My Creations” Gallery: Your history is saved below. A new feature here is the “Boards” system, allowing you to organize assets into project folders rather than a messy infinite scroll.[4]
Concept Pills: As you type, you will see clickable keywords pop up. These are “Concept Pills” that suggest lighting, styles, or camera moves. Click them to auto-complete complex prompt structures.
Free Tier Access: Free tier access is available with limited generations. Credit usage is tracked in the top right corner of your dashboard.
Step-by-Step Guide: Creating Your First Text-to-Video
Let’s create your first video using the Ray 3 model. The goal here is to generate a high-realism cinematic shot from scratch.
Step 1: Select Your Model
Ensure “Ray 3” is selected in the model dropdown. This gives you access to the latest physics-based rendering.
Step 2: Craft the Prompt
Do not just type “a cat.” Use our agency formula: [Subject] + [Action] + [Environment] + [Lighting/Style] + [Camera Movement].
Example: “A cybernetic samurai drawing a katana, neon rain-slicked streets of Tokyo, volumetric fog, cinematic lighting, low angle shot, slow motion.”
Step 3: Set Camera Controls
You no longer need to guess camera moves. Type “Camera” in the prompt bar or use the UI controls to select Pan, Orbit, or Zoom. For action shots, try dynamic tracking presets.
Step 4: Enable Loop (Optional)
If this is for a website background or social media, check the “Loop” box. Ray 3 is exceptionally good at creating seamless start-to-end transitions.
Step 5: Generate
Hit the generate button. You will receive your video for review—inspect it for visual quality and physics accuracy before final use.
Mastering Image-to-Video: Using Keyframes for Precise Control
This is where Luma Dream Machine becomes a professional tool. Image-to-Video allows you to upload a reference image so the AI knows exactly what your subject looks like.
Start Frame vs. End Frame (Keyframes):
You can upload a Start Frame (where the video begins) and an End Frame (where it finishes). Luma calculates the pixels in between.[4]
How to Use Keyframes:
Click the image icon to upload reference frames. The first slot defines your starting point, and the second defines your ending point. This is perfect for transitions, like aging a face or moving a car from point A to point B.
Character Consistency:
To keep a character looking the same across multiple videos, use the Photon model to generate your character first. Then, use that image as the “Start Frame” for every video generation.
Enhance Prompt Toggle:
There is a magic wand icon called “Enhance Prompt.” Turn this OFF if you have a very specific vision. Turn it ON if you want Luma to add creative details you didn’t think of.
Advanced Features: Modify, Extend, and Reframe
Rarely is the first generation perfect. Luma’s post-production tools allow you to fix videos without burning credits on a fresh start.[4]
Modify with Instructions:
This is essentially “In-painting” for video. Highlight a region (like a shirt) and type “change to red leather jacket.” Ray 3 tracks the object through the frames and updates the texture.
Extend Video:
Videos can be extended beyond their initial length. To make longer clips, use the “Extend” feature and provide a new prompt for the continuation (e.g., “the car drives off into the sunset”).[4]
Reframe (Aspect Ratio Conversion):
Did you make a horizontal video but now need it for TikTok? Use the Reframe tool. It intelligently expands the video dimensions to fill different aspect ratios.[4]
Luma Dream Machine Prompt Engineering: The Secret to Hyper-Realism
To get “battle-tested” results, you need to speak the language of the model. Ray 3 responds best to Physics-Based Prompting.
Describe Weight and Texture:
Don’t just say “rain.” Say “heavy rain splashing on pavement, creating ripples.” Describing the interaction triggers the physics engine.
Using Syntax Tags:
Use @character followed by a name (if you have defined one in your Boards) to reference specific assets. Use @style to reference a specific artistic vibe (e.g., “@style cyberpunk”).
Bad vs. Good Prompting:
Bad: “A cat running.”
Good: “Cinematic low-angle shot, a fluffy Maine Coon cat sprinting across wet cobblestones, motion blur, 4k, highly detailed fur texture, rim lighting.”
Text Rendering:
Ray 3 can render text. If you need a sign, put the text in quotes: a neon sign that says “OPEN 24/7”. Results may vary, but modern models handle this much better than earlier versions.
Luma Dream Machine Pricing & Plans: Which Tier Fits Your Workflow?
Luma operates on a credit system. As of November 2025, pricing is designed for both individual creators and teams. Current market rates suggest entry-level options start around $4–9.99/month.[4]
| Plan | Estimated Price (Monthly) | Credits / Features | Best For |
|---|---|---|---|
| Free | $0 | Limited generations Non-commercial |
Testing & Exploration |
| Entry Tier | $4–9.99 | 3,200+ Credits 720p baseline |
Hobbyists & Creators |
| Professional | Varies | Higher credit allowance 4K support Commercial rights |
Freelancers & Agencies |
The Math on Credits:
Video generation costs vary by model and resolution. Standard video generation typically costs between 400–800 credits depending on quality settings.[4] Verify exact pricing on the official Luma Labs website, as rates are subject to change.
Commercial Rights:
Be aware that free tier videos are designated for non-commercial use. Commercial licensing requires a paid subscription tier. Always verify licensing terms on the official site before monetizing any generated content.
💡 Expert Verdict
For any professional workflow involving client work or monetization, a paid subscription is required. Free tier is suitable for experimentation. Always confirm current pricing directly on lumalabs.ai, as pricing structures may be updated regularly in 2025.
Try Luma Dream Machine Today(Disclosure: We recommend verifying all pricing and features directly on the official Luma Labs website before purchase, as terms may have been updated. Links provided for informational purposes.)
Frequently Asked Questions About Luma Dream Machine
Is Luma Dream Machine free?
Yes, Luma offers free tier access with limited generations. However, these are designated for non-commercial use only.
How long can Luma videos be?
Initial video generation produces clips up to 10 seconds in duration.[4] Videos can be extended further using the Extend feature, though longer sequences may experience coherence degradation.
Can I use Luma videos for YouTube monetization?
Commercial usage requires a paid subscription with commercial licensing rights. Free tier content is restricted to non-commercial personal use only.
Luma Dream Machine vs. Runway Gen-3: Which is better?
Ray 3 excels at physics accuracy and character consistency. Runway offers more granular motion control. Choice depends on your specific creative needs. For realistic physics-based shots, Luma is highly competitive.[4]
Read More From AI Generative Video
Explore more tools and comparisons to find the perfect fit for your creative workflow.
- Luma Dream Machine vs Kling AI: The “Sora Killer” Battle
- Pika vs Luma Dream Machine: The New Text-to-Video King?
- How to Write Effective Prompts for AI Video (Prompt Engineering)
last update : 28/11/2025