How to Use Runway ML: The Complete Studio Guide for Creators (2025)
If you have been struggling to integrate AI video into your workflow, learning how to use runway ml is your turning point. This is not just about generating random clips; it is about taking control of a full production studio.
In the current landscape of AI Generative Video, we see creators facing immense performance pressure to produce more content, faster. Runway ML stands out because it combines powerful generation models (Gen-3, Gen-4) with a suite of professional editing tools.
Whether you are a filmmaker needing generative VFX or a marketer looking for automated assets, this guide covers it all. We will walk you through everything from text-to-video generation to advanced camera controls and timeline editing.
Table of Contents
What Is Runway ML? A Quick-Start Guide to The AI Studio
Runway ML is often misunderstood as just another “text-to-video” generator. In reality, it is a comprehensive AI Video Production Studio designed to solve the workflow bottlenecks that professional creators face daily.
At its core, the platform now features multiple generation models including Gen-3 Alpha, Gen-3 Turbo, and Gen-4 alongside a suite of “AI Magic Tools.” This means you do not just generate footage; you can edit, refine, and composite it all within the same browser-based interface.
The system operates entirely on the cloud. You input text, images, or video clips, and Runway’s servers handle the heavy rendering. This allows you to create high-fidelity VFX without needing a $5,000 workstation.
For filmmakers and marketers, the learning curve is medium. It is more complex than simple tools like Pika, but that complexity offers the control required for professional output. It is built for those who value precision over randomness.
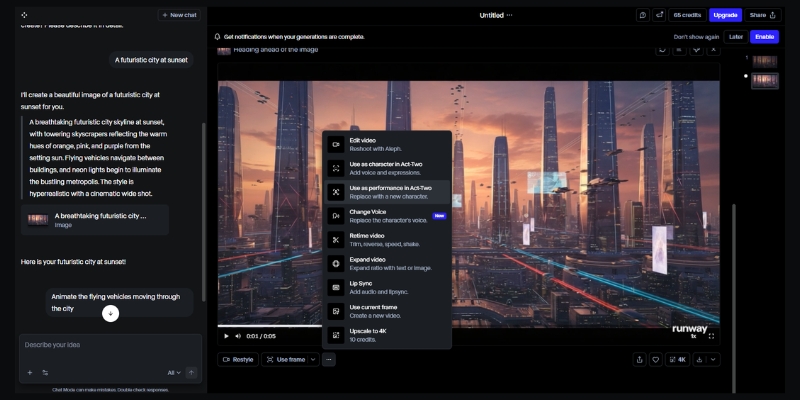
Getting Started: The Runway ML Interface & Dashboard
When you first log in, the dashboard can feel overwhelming. Unlike consumer apps, Runway is built like professional software. We will skip the sign-up basics and focus on the navigation that matters for speed.
The Left Sidebar: This is your command center. Here you can toggle between generation models (Gen-3, Gen-4) and “Video Editing” for post-production. It also houses your “Assets” folder, which is crucial for organization.
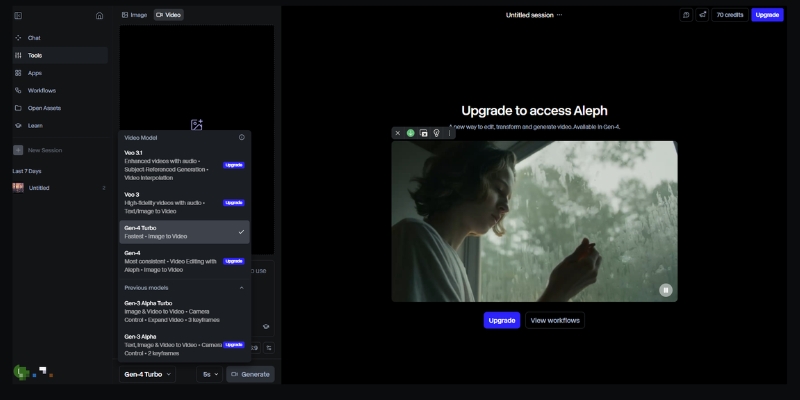
Model Selection: You will see dropdowns for Gen-3 Alpha, Gen-3 Turbo, and Gen-4. For character consistency work, choose Gen-4. For faster iterations, Gen-3 Turbo is adequate. Each model has different credit costs.
Recent Projects: Located in the center, this area saves your workspace states. In our experience, naming your projects immediately is vital, as AI generates dozens of clips that can easily get lost.
Assets Management: Before you generate anything, upload your brand assets here. Having your logos and reference images ready in the cloud speeds up the generative video workflow significantly.
How to Use Runway for Text-to-Video Creation
This is the feature most users come for. Generating video from scratch using Runway’s generation models requires a shift in how you write prompts. Unlike static images, video requires you to describe motion and camera behavior.
Step 1: Select Your Model: From the dashboard, choose between Gen-3 Alpha (higher quality), Gen-3 Turbo (faster), or Gen-4 (character consistency). Gen-4 is recommended for projects requiring the same character across multiple shots.
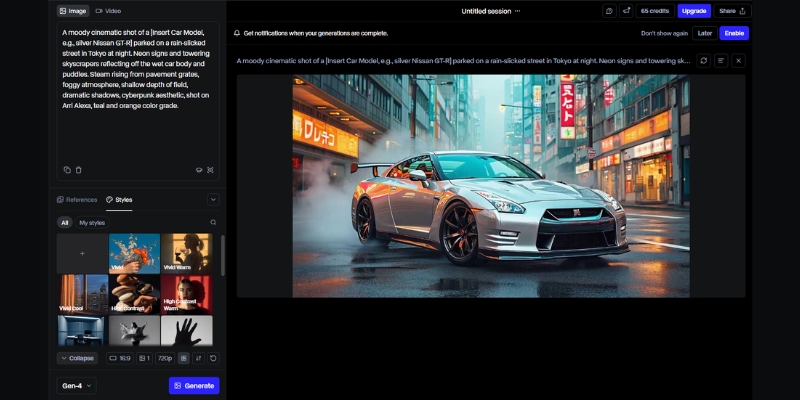
Step 2: Input Your Text Prompt: Be specific. Instead of “a car driving,” write “Cinematic shot, a red sports car driving on a coastal highway, drone view, sunset lighting.” Mention the camera angle (drone, eye-level) and lighting.
Step 3: Adjust Settings: Click the “Settings” icon. Select your desired duration (typically 5-10 seconds). We recommend starting with shorter clips to test your prompt structure before committing credits to longer generations.
Step 4: Generate & Preview: Hit the “Generate” button. Runway typically takes 60-120 seconds depending on the model. Once done, review the clip. If motion isn’t right, refine your prompt rather than regenerating immediately.
Step 5: Upscaling: Once you are happy with the movement, use the upscale option to increase the resolution. This makes the footage usable for social media or client presentations.
Mastering Image-to-Video: Animating Static Assets
For marketers, Image-to-Video is often superior to text-to-video. It allows you to maintain brand consistency by using a specific product shot or character image as the anchor for the generation.
Upload Reference Image: Drag and drop your high-resolution image into the image slot. We find that Midjourney images or professional product photography work best as base layers. Higher resolution inputs yield better results.
Describe the Motion: Even with an image, you must add a text prompt. If you uploaded a coffee cup, your prompt should be “steam rising from cup, subtle camera push in.” This guides the animation direction.
Gen-4 Character References: If using Gen-4, upload a character reference image. The model will maintain that character’s appearance across multiple generations, solving the “random character morphing” problem that plagued earlier AI video tools.
Consistent Branding: By using the same character or product image across multiple generations, you can create a cohesive storyboard. This is essential for brand campaigns requiring visual consistency.
Advanced Camera Controls & Director Mode
To stop your videos from having that nauseating “floating camera” look, you must master the Camera Motion controls. This gives you director-level control over the virtual lens.
Zoom and Pan: Instead of relying solely on text prompts, use the dedicated camera control sliders. Set “Zoom” to create a “dolly in” effect. Use “Pan” to track a subject horizontally across the frame.
Camera Movement Vocabulary: Runway understands professional cinematography terms. Use prompts like “crane up,” “orbit shot,” “rack focus,” or “steadicam follow” for specific camera behaviors that mimic real film techniques.
Using Seed Numbers: Every AI generation has a “Seed” number. If you generate a clip you like but want to change the camera move, copy the seed number. Paste it into the settings for the next run to keep the visual style consistent.
Upscale for Delivery: The native resolution varies by model. Always use the “Upscale” feature before downloading. In our tests, this significantly reduces artifacts and makes the footage ready for YouTube or social platforms.
Using the Runway Timeline for Video Editing
Runway is not just a generator; it is a fully functional non-linear editor. The Timeline UI resembles tools like Premiere Pro or CapCut, making it familiar for most editors to pick up.
Multi-Track Editing: You can drag your generated clips onto multiple video and audio tracks. This is essential for combining different shots into a cohesive narrative with background music and voiceover layers.
Green Screen (Remove Background): This is a massive time-saver. Click a clip, select “Green Screen,” and click on the subject. Runway automatically masks the person, allowing you to place them in any generated environment.
Inpainting (Remove Objects): If a generated video has an unwanted artifact, use the Inpainting tool. Simply brush over the object, and the AI will erase it and fill the background intelligently, frame by frame.
Act-One Motion Capture: This feature allows you to use webcam footage to drive character animations. Record yourself performing an action, and Runway transfers that motion to your generated character for realistic movement.
Runway ML Pricing & ROI: Is It Worth It?
Understanding the credit system is vital for commercial viability. Runway operates on a credit basis, where each second of video generation consumes credits. The cost varies by model chosen. For professionals, the free trial is only for testing.
| Plan | Price | Credits/Month | Best For |
|---|---|---|---|
| Free Basic | $0/mo | 125 (one-time) | Testing interface |
| Standard | $12/mo | 625 credits | Individual creators |
| Pro | $28/mo | 2,250 credits | Freelancers |
| Unlimited | $76/mo | Unlimited (Explore) | Agencies & Studios |
Verdict on ROI: If you are an agency or a freelancer producing content regularly, the Unlimited Plan is the only logical choice. The cost of hiring a VFX artist for a single shot exceeds the monthly subscription, making the ROI incredibly high.
💡 Expert Verdict
We recommend the Pro Plan for individual creators who need access to Gen-4 for character consistency. However, if you rely on “trial and error” to get the perfect shot, the Unlimited Plan prevents “credit anxiety” and lets you iterate freely.
Try Runway ML for Free(Disclosure: If you purchase through links on this page, we may earn a small commission at no extra cost to you. This helps us maintain our “battle-tested” reviews.)
Frequently Asked Questions About Using Runway ML
Is Runway ML free to use?
Runway offers a free tier with 125 one-time credits. This is enough to generate about 25-30 seconds of video using Gen-3 Turbo to test the capabilities, but you cannot export without watermarks on the free plan.
Can I use Runway ML videos commercially?
Yes, if you are on a paid plan (Standard or higher). You own the copyright to the assets you generate. However, free plan users do not have full commercial rights per the Terms of Service.
How does Runway compare to Pika Labs?
Runway offers significantly more control via camera settings and timeline editing tools. Pika is often easier for beginners but lacks the deep “Studio” features for precise editing. Read our full Pika vs Runway ML comparison.
What are the system requirements for Runway ML?
Since it is cloud-based, you do not need a powerful GPU. You just need a stable internet connection (minimum 10 Mbps recommended) and a modern browser like Chrome or Edge. It runs smoothly even on standard laptops.
Read More From AI Generative Video
Explore more guides and comparisons to enhance your AI video production workflow. Check out these related articles:
- Runway ML vs Genmo: The AI Video Editor Battle
- Pika vs Runway ML: New King vs. The Original Studio
- How to Write Effective Prompts for AI Video (Prompt Engineering)
last update : 04/12/2025