How to Use Clueso: The Complete 2025 Guide (Step-by-Step)

Creating engaging product demos, onboarding tutorials, and step-by-step support guides is a constant challenge. It demands time, technical skill, and a significant budget for video editing and content creation. But what if you could automate the entire process, turning a simple screen recording into a polished video and a written guide in minutes? That’s exactly what Clueso promises.
[ez-toc]
What is Clueso?
Clueso is a powerful AI-powered platform designed to automatically transform your screen recordings into studio-quality product videos and comprehensive step-by-step documentation. It eliminates the need for manual video editing, scriptwriting, or voiceover recording, making it a game-changer for busy teams.
Why Use Clueso for Product Onboarding and Training?
Time and cost are the two biggest hurdles in content creation. Clueso tackles both head-on by automating the most labor-intensive tasks. For teams responsible for user onboarding, customer support, and marketing, this means you can:
- Generate videos 10x faster: The AI handles editing, zooms, highlights, and voiceovers.
- Create multiple content formats at once: One recording produces a video, an interactive guide, and a knowledge base article.
- Eliminate the need for editing experience: The platform is built for users of all skill levels.
- Maintain brand consistency: Easily apply your brand colors, logo, and fonts across all content.
Who Should Use This Guide?
This guide is designed for anyone looking to streamline their content creation workflow. If you’re a:
- Product Marketer creating feature announcements and demo videos.
- SaaS Founder building out your initial user onboarding flow.
- Customer Education or Support Team Member developing a library of help-desk articles and tutorials.
- Creator or Trainer producing educational content at scale.
…then you’re in the right place. We’ll walk you through every step, from account creation to exporting your finished project. Dive in and discover the power of the Clueso platform for yourself, and see how it stacks up in our roundup of the best AI video tools.

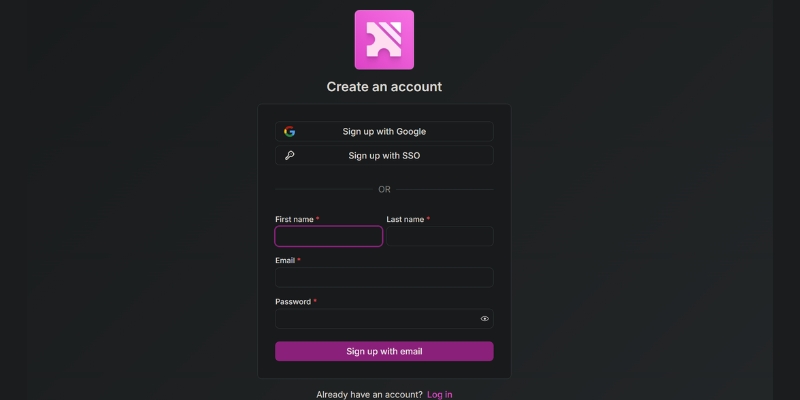
Clueso Setup: Account Creation & First Steps
Getting started with Clueso is straightforward. The platform is designed for a quick and seamless entry.
First, head to the Clueso website and sign up for their free trial. The onboarding process is guided by a helpful wizard that walks you through the initial steps of setting up your workspace. You can explore the core features without any commitment. As your needs grow, Clueso offers various paid plans tailored for individuals, teams, and enterprises, unlocking more advanced capabilities.
Once you’re in, you’ll land on the main dashboard. It features a clean, intuitive interface with clear calls-to-action for recording a new video or managing your existing projects.
For a detailed walkthrough of the initial setup, check out Clueso’s official onboarding guide.
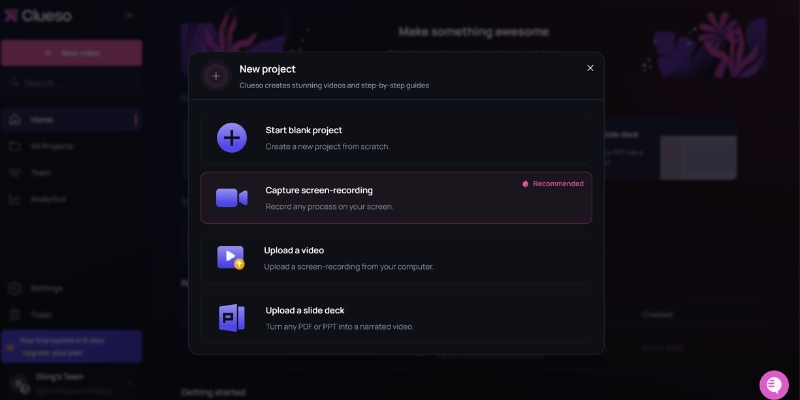
Step 1: Uploading Your Screen Recording
With your account ready, it’s time to add your content. Clueso offers several flexible methods for importing your media.
Supported Methods:
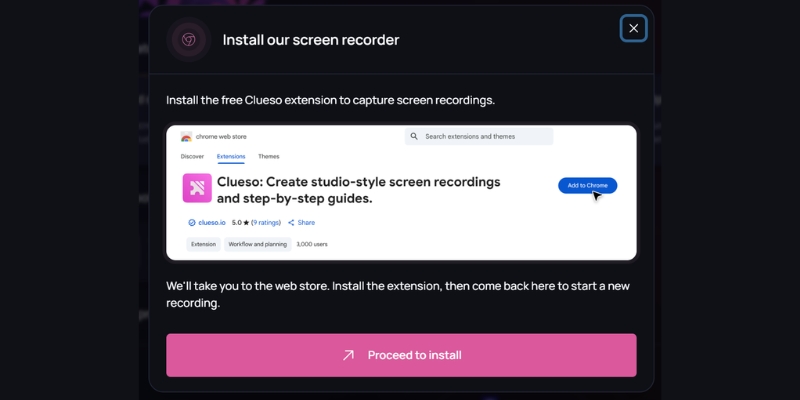
- Record Directly: The easiest way to start is by using the Clueso browser extension. It allows you to capture your screen and workflow directly, ensuring a clean recording from the start.
- Upload from Your Device: If you already have a screen recording, you can upload it directly. Clueso supports standard video formats like MP4 and WebM.
- Import from Cloud Storage: You can also import files using a link from Google Drive or other cloud storage services. This is perfect for collaborative workflows where recordings are shared.
- Integrations: While there isn’t a direct API integration, you can easily upload recordings you’ve made with other popular tools like Zoom or Loom. Simply download the video file from those platforms and upload it to Clueso.
If you run into any issues with file formats or uploads, the Clueso Help Center offers detailed troubleshooting tips.
Step 2: Configuring Your Project Settings
Before the AI gets to work, you can define key settings to ensure the output matches your needs. After uploading your video, Clueso will present you with a settings panel where you can configure:
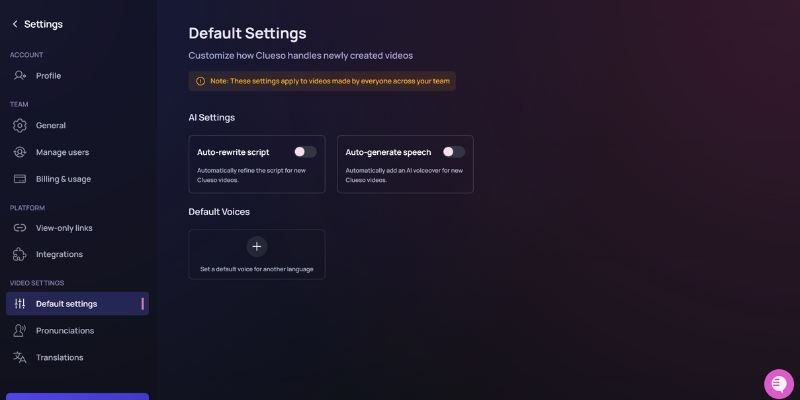
On the Main Dashboard, navigate to Setting -> Video Setting:
Access Default Voice Settings
- As the platform loads, you’ll see a range of options designed to help you personalize your voice preferences.
- Select a new default voice from the available options.
- Tip: If you’re unsure, you can always preview different voices before making your final choice.
- If the settings page displays an error (e.g., “Update Failed”), review the notification to understand what went wrong before proceeding.
Customize Pronunciations
If you need to fine-tune how specific words are spoken, use the Pronunciations section:
- Navigate to the Pronunciations section in the settings menu.
- The Pronunciation Dictionary interface will load, giving you access to existing entries and the ability to customize them.
- Click the New word button to add a term. This is helpful if you want the system to pronounce specific words your way.
- After closing the dialog, you will return to the Pronunciation Dictionary view.
Manage Language Translations
Finally, access the Translation Glossary to manage language-specific terms:
- Select the Translations section.
- The Translation Glossary will appear, allowing you to manage and update language-specific terms.
These pre-processing settings save you significant editing time later on. For a full list of customization options, see the official features overview.
Step 3: Let Clueso’s AI Work Its Magic
This is where Clueso truly shines. Once you’ve confirmed your settings, the AI engine takes over and performs a series of automated actions:
- Analyzes Your Video: It watches your entire recording, identifying every click, scroll, and action you take.
- Generates a Script: It automatically writes a step-by-step script describing your actions.
- Records a Voiceover: It uses your selected AI voice to generate a professional, human-like voiceover based on the script.
- Adds Smart Effects: The AI intelligently adds zoom-and-pan effects to focus on key areas, highlights your cursor, and adds overlays to emphasize important elements.
- Creates Written Documentation: Simultaneously, it converts the video steps into a beautifully formatted written guide, complete with screenshots and annotations.
The result is a polished video and a ready-to-publish document created in a fraction of the time it would take manually.
Watch an official demo video to see this process in action.
Step 4: Editing and Refining Your Project
While Clueso’s AI is incredibly accurate, you always retain full control over the final product. The platform includes a user-friendly editor that allows you to make adjustments easily. The editor is broken down into three main views:
- Transcript View: Edit the video by simply editing the text. Correcting a typo in the script automatically updates the voiceover.
- Storyboard View: Reorder or delete steps using a simple drag-and-drop interface. If the AI missed a step or added an unnecessary one, you can fix it here in seconds.
- Timeline View: For more granular control, you can adjust the timing of effects, add callouts, or insert custom intro/outro clips.
- Background: Choose from a library of backgrounds or you can upload your background from the menu.
- Aspect Ratio: Set the video dimensions to match its intended platform, such as 16:9 for YouTube or 9:16 for Shorts and Reels.
- Insert: Use this menu to add and customize any element you see: from Clips and Images to Text, Music, and visual effects (Zoom, Spotlight, Callout).
This multi-faceted approach ensures that both beginners and advanced users can refine their projects to perfection. For more advanced techniques, explore our in-depth editing tutorial.

Step 5: Enhancing Your Video with Branding and Accessibility Features
To make your content truly yours, Clueso provides a suite of enhancement tools. In the settings or editor, you can:
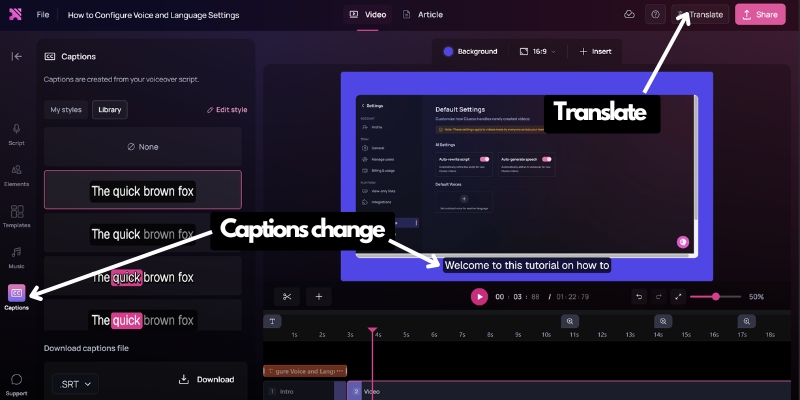
- Add Captions and Translations: Generate accurate captions with one click to improve accessibility. You can also translate both the captions and voiceover into over 35 languages, making your content globally accessible.
- Apply Custom Branding: Upload your logo, set your brand colors, and choose your fonts to create videos that are perfectly aligned with your company’s visual identity on Elements section.
- Add Music: Choose from a library of backgrounds and royalty-free music tracks to add a final layer of polish.
Review & Refine with Article Mode
You can instantly preview your entire project and change the script on a scene-by-scene basis.
AI-Powered Generation
Use the AI section (on the right) to jumpstart your content. Just enter a prompt and let the AI build the foundation for you.

Looking for ideas? Check out this inspiration gallery and instructrion of content created with Clueso.
Step 6: Previewing, Exporting, and Sharing Your Content
Once you’re satisfied with your project, it’s time to share it with the world. Clueso’s export and sharing options are as flexible as its creation tools.
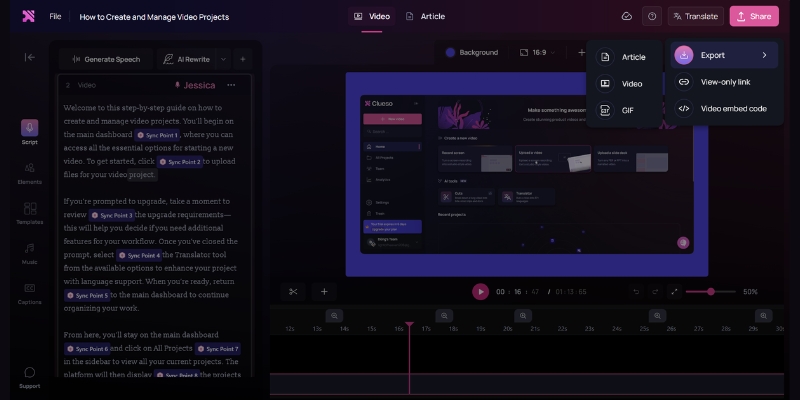
Click the “Share” button to access the sharing menu. You can:
- Export Video Files: Download your video as a high-quality MP4 for use on YouTube, social media, or your website. You can also export short clips as GIFs.
- Share Interactive HTML Guides: Clueso generates a shareable link to an interactive HTML version of your guide. This is perfect for embedding in knowledge bases or sending directly to customers.
- Integrate with Help Desks: Seamlessly push your guides and videos to platforms like Zendesk, Intercom, and Notion to resolve support tickets faster.
For more details on sharing options, refer to the official export support documentation.
Pro Tips & Common Troubleshooting
Get the most out of Clueso with these expert tips:
- Use Smart Blur Liberally: Before processing, use the blur tool to hide any sensitive or irrelevant information on the screen. It’s much faster than doing it manually in a traditional video editor,e you can find ot on Elements -> Effects -> Blur.
- Refine the AI Script: The auto-generated script is a fantastic starting point, but reading it aloud and making small tweaks for tone and clarity can elevate the final narration.
- Manually Correct Missed Steps: While rare, the AI might occasionally miss a very subtle UI interaction. Use the storyboard editor to quickly add a missing step or screenshot.
Pro Tip: Let Clueso’s AI voiceover do the heavy lifting for instant, professional narration. You can always tweak the script afterward for perfect clarity.
Conclusion
Clueso is more than just a video editor; it’s a content automation engine. By transforming a single screen recording into a polished video, an interactive guide, and a written document, it empowers teams to produce high-quality educational and marketing content at unprecedented speed. Whether you’re onboarding new users or supporting existing ones, Clueso removes the friction from content creation, allowing you to focus on what matters most: helping your users succeed.
Ready to reclaim your time? Click here to start your free Clueso trial today and instantly turn your screen recordings into polished videos and guides.
Frequently Asked Questions (FAQ) about Using Clueso in 2025
Here are answers to some of the most common questions users have about getting started with and mastering the Clueso platform.
1. What do I need to get started with Clueso?
All you need is a modern web browser (like Chrome or Firefox) and an internet connection. To create content, you can either use the Clueso browser extension to record your screen directly or upload an existing screen recording file (like an MP4 or WebM) from your computer. No special software or high-end hardware is required.
2. Can I edit the script and voiceover that the AI generates?
Yes, absolutely. Clueso gives you full control. After the AI generates the initial script, you can use the text-based editor to change words, rephrase sentences, or add more detail. Any changes you make to the text automatically regenerate the AI voiceover in real-time, ensuring the audio always matches your script.
3. My screen recordings contain sensitive information. How does Clueso handle privacy?
Clueso is built with privacy in mind. It features a powerful Smart Blur tool that can automatically detect and redact sensitive information like names, email addresses, phone numbers, and API keys. You can review and apply these blurs before the video is even processed, ensuring confidential data never appears in your final content.
4. What happens if the AI misses a step or adds one I don’t need?
While the AI is highly accurate, it’s easy to make corrections. Using the intuitive storyboard editor, you can simply drag and drop to reorder steps, delete unwanted sections, or manually add a new step with your own screenshot and description. This ensures your final guide is perfectly accurate.
5. Can I use my own brand’s colors, logo, and fonts?
Yes. On paid plans, Clueso offers extensive branding options. You can create a brand kit by uploading your logo, defining your primary and secondary colors, and selecting your brand fonts. Clueso will automatically apply this branding to all your videos and documentation for a consistent, professional look.
6. What formats can I export my final project in?
Clueso provides flexible export options for different use cases:
- Video: Download as a high-definition MP4 file for YouTube or social media, or as a GIF for emails and short demos.
- Documentation: Share a direct link to an interactive HTML guide, embed it on your website or in your help center, or integrate it directly with platforms like Notion, Zendesk, and Intercom.
7. Can I translate my content into other languages?
Yes, this is one of Clueso’s standout features. With a single click, you can translate both your video’s voiceover and its captions into over 35 languages. The written documentation is also translated, making it incredibly efficient to create and localize content for a global audience.
8. What’s the main difference between the Free and Pro plans?
The Free plan is designed for you to test the platform’s core functionality and allows you to create one published project, but it will include a Clueso watermark. The Pro plan unlocks the full power of the tool, offering unlimited projects, removal of the watermark, custom branding, access to all premium AI voices, and more advanced features.
Related Guides & Resources
- Wondering if Clueso is the best choice for you? We tested its AI, speed, and overall value. See the final verdict in our unbiased 2025 Clueso Review.
- How does Clueso stack up against popular Loom? Our Loom vs Clueso comparison breaks down the differences.
- Need quick team updates without Clueso’s complexity? Loom offers simple, instant screen recording for async communication.