How to Use Loom in 2025: Complete Step-by-Step Guide for Screen Recording Success

Loom is a cloud-based video messaging platform that records your screen, camera, or both simultaneously for asynchronous communication. With over 25 million users worldwide and AI-powered features that launched in 2024, Loom transforms how teams share knowledge without scheduling endless meetings.
This guide walks you through every feature Loom offers in 2025—from initial setup to advanced AI editing tools. Whether you’re creating tutorial videos for clients, onboarding new employees, or building course content, you’ll learn exactly how to maximize Loom’s capabilities and decide if it’s the right investment for your workflow.
What Makes Loom Different from Traditional Screen Recorders
Loom separates itself from competitors like OBS Studio or Camtasia through instant cloud upload and shareable links. Record a video, and within seconds you have a URL to paste anywhere—no file exports, no upload waits, no storage management.
The platform combines three recording modes in one tool: screen only, camera only, or screen with camera bubble overlay. This flexibility suits multiple scenarios—software demos need screen-only mode, while personalized sales videos benefit from the face-on-screen approach that builds trust.
Since Atlassian’s acquisition in October 2023, Loom integrates seamlessly with Jira, Confluence, and the broader Atlassian ecosystem. Enterprise teams now embed Loom videos directly in project documentation, bug reports, and team spaces without switching platforms.
The 2024 AI revolution introduced features that automatically remove filler words, generate video titles, create chapter markers, and transform recordings into text documents. These enhancements reduce editing time by up to 70% according to Business + AI plan users.
Curious about how Loom stacks up against video messaging competitors in pricing and features? Our comprehensive Loom vs Clueso comparison: which async video tool wins in 2025 breaks down recording quality, AI capabilities, integration ecosystems, and total cost of ownership for teams of all sizes.
Understanding Loom Pricing and Plans Before You Start
Loom offers four distinct tiers designed for different use cases and team sizes. Understanding the differences helps you avoid upgrading mid-project when you hit feature limitations.
Starter Plan (Free): Record up to 25 videos with a 5-minute limit per video for unlimited workspace members. Features include 720p recording quality, screen + camera capture, virtual backgrounds, transcriptions in 50+ languages, and basic viewer analytics. This plan suits testing Loom’s interface and creating short tutorial clips, but the 5-minute restriction prevents longer walkthroughs.
Business Plan ($15/month annually): Removes all recording and video count limits while adding 4K recording resolution, custom branding removal, video uploads, trim and stitch editing, password protection, and detailed engagement analytics. Teams producing regular content—like marketing departments or course creators—need Business minimum to maintain professional output.
Business + AI Plan ($20/month annually): Adds the complete AI suite including auto-generated titles, summaries, and chapter markers; filler word and silence removal; AI-powered workflows that convert videos to documents or Jira tickets; and automatic call-to-action suggestions. Unlike competitors charging per AI use, Loom provides unlimited AI processing for this fixed price.
Enterprise Plan (Custom pricing): Averages $44,000 annually for sales-led contracts according to Vendr data, scaling based on seat count and integrations required. Adds Single Sign-On (SSO), SCIM provisioning, advanced content privacy controls, custom data retention policies, Salesforce deep integration, and dedicated support.
Loom offers a 14-day free trial of Business + AI that reverses to your selected plan afterward rather than blocking access entirely. All new users should activate this trial immediately to test AI features with actual work scenarios before committing.
Still weighing whether Loom deserves a place in your video toolkit? We tested its AI accuracy, recording stability, RAM usage, and real-world performance across 50+ videos. Check out our unbiased Loom review 2025: AI features tested by content creators to see how it performed against Vidyard, Arcade, and Zight in head-to-head comparisons.
Table suggestion:
| Feature | Starter (Free) | Business ($15/mo) | Business + AI ($20/mo) | Enterprise (Custom) |
|---|---|---|---|---|
| Video Limit | 25 videos | Unlimited | Unlimited | Unlimited |
| Max Length | 5 minutes | Unlimited | Unlimited | Unlimited |
| Recording Quality | 720p | 4K | 4K | 4K |
| AI Features | None | None | Full suite | Full suite |
| Custom Branding | No | Yes | Yes | Yes |
| SSO & SCIM | No | No | No | Yes |
Getting Started: Creating Your Loom Account and Installing the Recorder
Setting up Loom takes less than three minutes from account creation to first recording. The platform prioritizes speed—no lengthy onboarding forms or feature tours blocking access to the recorder.
Account Creation Process
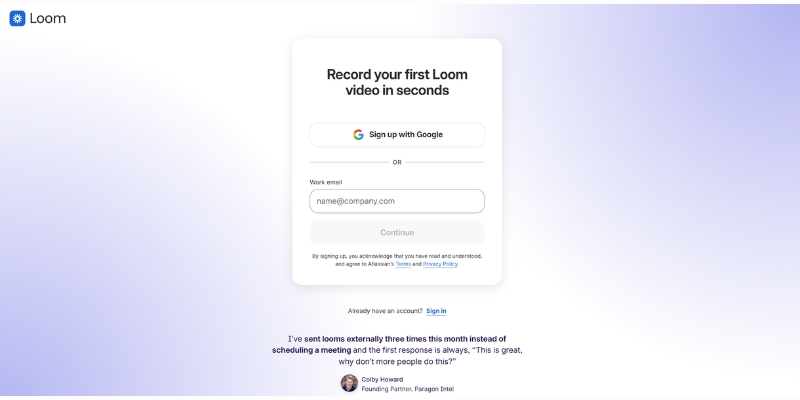
Navigate to loom.com and click the “Get Loom for Free” button located in the top navigation or hero section. Sign up using your Google account for fastest access without managing additional passwords. Work email addresses work equally well if your organization requires specific domain authentication.
After accepting terms, select your primary use case: Work, Education, or Personal Project. This choice customizes the dashboard layout and feature suggestions but doesn’t restrict functionality. Name your workspace using a descriptive identifier like “Marketing Team,” “Client Videos,” or “Course Content” to organize recordings from day one.
Skip the teammate invitation prompt during setup. Add collaborators later once you understand workspace roles and permissions to avoid confusion.
Installation Options: Choose Your Recording Platform
Loom offers multiple ways to start recording, each designed for different workflows and needs.
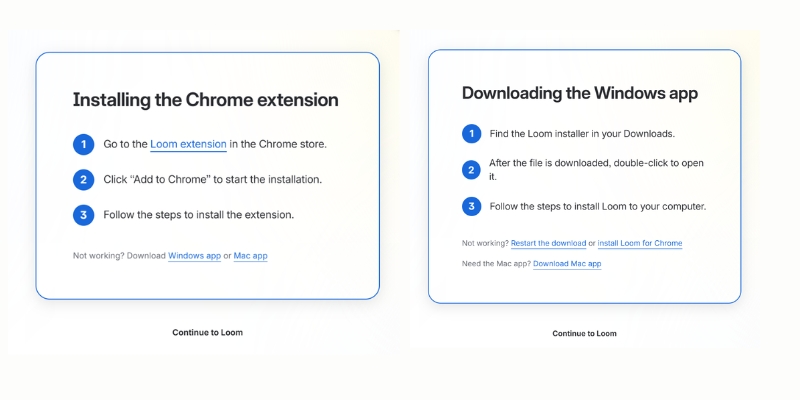
Chrome Extension (Browser-based): Install directly from Chrome Web Store for quick access. Record screen, camera, or both without downloading software. Perfect for occasional users and quick recordings up to 1080p. Works only with Google Chrome browser.
Desktop App (Mac & Windows): Download the full application for advanced capabilities including 4K recording (paid plans), offline recording, drawing tools with color options, speaker notes, and video recovery if processing fails. Recommended for regular users creating longer content.
Mobile Apps (iOS & Android): Record on-the-go with screen-only, camera-only, or audio-only modes. Share directly to Slack, Gmail, and messaging apps from your phone. Ideal for quick updates while traveling.
Quick recommendation: Start with the Chrome extension to test Loom’s workflow. Upgrade to the desktop app if you record frequently, need higher quality, or want advanced features like drawing tools and offline capability.
Navigating Your Loom Dashboard
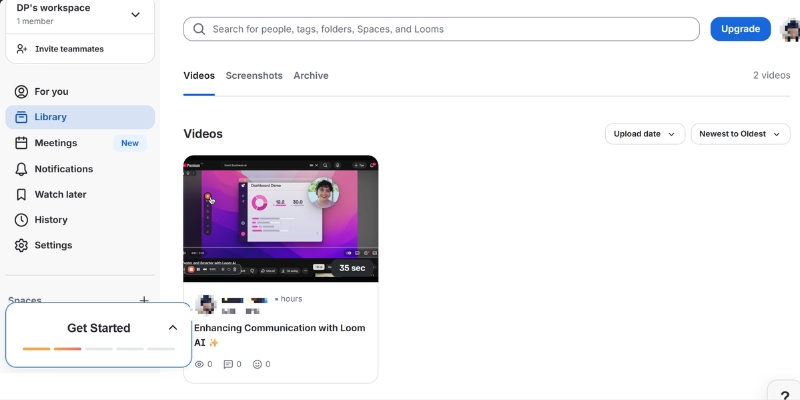
The dashboard centers around five primary sections accessible from the left sidebar :
Home: Displays recent videos, view counts, and the prominent “New Video” recording button. Your most-watched content appears at the top, helping you identify high-performing recordings worth repurposing.
My Library: Houses your complete video archive with search, filters, folders, and organizational tags. Create folders named by project, client, or video type to maintain structure as your library grows past 50 videos.
Notifications: Bell icon alerts show video views, comments, team member activity, and workspace updates. Enable desktop notifications in Settings to track engagement on important videos in real-time.
Spaces: Manages multiple workspaces for different clients, business divisions, or personal versus professional content separation. Switch workspaces using the dropdown menu in the top-left corner.
Settings: Controls personal preferences (profile, password, notifications) and workspace settings (branding, billing, members) depending on your role. Admins access billing and team management here.
Recording Your First Loom Video: Complete Tutorial
Loom’s recording process follows a consistent four-step pattern: configure recording mode, select sources, start capture, and finish. The interface stays identical whether you use the Chrome extension, desktop app, or mobile application.
Configuring Recording Modes and Sources
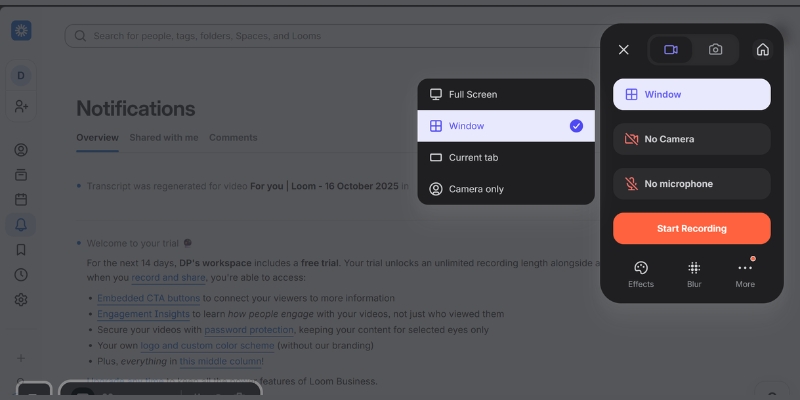
Click the Loom extension icon in your browser toolbar or the “New Video” button in your dashboard to open the recording control panel. Three large buttons display your recording mode options :
Screen + Camera: Shows your face in a circular bubble while recording screen activity. This mode builds trust in sales videos, adds personality to tutorials, and helps viewers follow along with your facial expressions and gestures. Position the camera bubble in any corner by dragging it before recording starts—viewers see it exactly where you place it.
Screen Only: Captures screen activity without camera footage. Choose this for software walkthroughs where your face distracts from the interface, bug reports requiring clean screen captures, or documentation videos focusing purely on process steps.
Camera Only: Records talking-head videos without screen capture. Perfect for announcements, introductions, or personal messages where screen content adds no value.
After selecting a mode, choose your screen capture scope :
- Entire Screen: Captures all monitors in multi-display setups
- Application Window: Records a single program window (Figma, Slack, Chrome)
- Current Browser Tab: Shows only the active Chrome tab, hiding other tabs and bookmarks bar
Select your microphone from the dropdown menu—built-in laptop mics, external USB microphones, or headset mics all appear here. Keep your microphone within 6-12 inches of your mouth for optimal audio clarity.
Optimizing Recording Quality and Setup
Click “more” in the recording panel to access Settings before your first recording. These adjustments dramatically improve video quality and professionalism without requiring expensive equipment.
Video quality: Select your preferred recording resolution from the dropdown menu. Loom defaults to 1080p (Full HD) with “Auto chooses the best available option” enabled, which adjusts quality based on your internet connection and system performance. Business plan subscribers access up to 4K resolution for ultra-high-definition recordings.
Recording countdown: Toggle the 3-second countdown on or off before capture begins. Enable countdown for time to position your cursor, open the correct window, or take a breath before speaking. Disable it for instant recording when capturing time-sensitive content or spontaneous demonstrations.
Recording controls: Show or hide the bottom control bar (pause, finish, rewind buttons) during active recording. Hide controls for cleaner screen captures in final videos, though you’ll need to remember keyboard shortcuts: Cmd/Ctrl + Shift + L to finish recording.
Persist camera bubble location: When enabled, Loom remembers your camera bubble position from previous recordings and places it in the same corner automatically. Disable this if you frequently switch bubble positions for different content types.
Flip camera: Mirrors your camera horizontally if your webcam shows reversed images. Useful when recording with text or branded clothing that appears backward in standard camera orientation.
Enable notifications: Turn on desktop alerts when videos finish processing, receive views, or get new comments. Enable this setting if you need real-time engagement tracking for time-sensitive videos like sales demos or urgent announcements.
Show recording time: Displays an active timer during recording showing elapsed time. Enable this to stay within target video lengths and avoid rambling past your planned duration.
Beyond these technical settings, environment optimization matters more than resolution settings. Record in quiet spaces whenever possible rather than relying entirely on noise suppression. Microphone proximity dramatically affects audio quality—position your laptop mic or external microphone 6-12 inches from your mouth for clear, professional sound. A basic laptop mic close to your mouth outperforms a $200 USB microphone placed 3 feet away.
Natural window light during daytime creates the best camera appearance. Face windows when recording for even, flattering illumination that eliminates harsh shadows. Record during daylight hours whenever your schedule permits.
Script key talking points before recording to reduce filler words, rambling, and re-recording time. Even quick bullet points on a sticky note beside your monitor improve coherence and speaking confidence. This preparation proves more valuable than any video quality setting.
Using Recording Controls During Capture
Click “Start Recording” to begin a 3-second countdown before capture activates. The recording timer appears in the bottom control bar along with five essential buttons :
Pause: Temporarily stops recording without ending the session. Resume when you’re ready to continue—pauses don’t create awkward cuts in the final video. Use pauses to check notes, load new web pages, or handle interruptions without stopping entirely.
Rewind: Chrome extension exclusive feature that undoes the last 10-30 seconds if you make a mistake. This prevents restarting entire recordings for small errors late in long videos. Desktop app users don’t have rewind access.
Finish: Ends recording and opens the editing panel automatically. Loom uploads your video to the cloud immediately—no manual save or export steps required.
Restart: Discards the current recording and begins a fresh take without leaving the recording interface. Use this early in recordings when you realize your framing, audio, or content approach needs adjusting.
Delete: Cancels and permanently removes the current recording attempt. No trace remains in your library.
Blur sensitive content: Click the blur tool icon, drag to select screen areas containing passwords, personal information, or confidential data, then continue recording. Blurred regions remain obscured in the final video permanently.
Drawing annotations: Activate the pen tool to circle, underline, or draw arrows on your screen during recording. Use annotations sparingly—constant drawing distracts viewers from your core message.
Keep videos between 2-5 minutes for maximum engagement. Research shows viewer retention drops 40% after the 5-minute mark in tutorial content. Break longer topics into multi-video series or use chapter markers to let viewers jump to specific sections.
Struggling to decide between Loom and other screen recorders for your specific use case? Our in-depth Loom vs Clueso: screen recorder comparison for 2025 tests all platforms on recording stability, editing features, sharing options, viewer analytics, and value for money based on real projects.
Editing and Enhancing Videos with Loom AI Features
Loom AI transforms raw recordings into polished, professional content without manual editing. The Business + AI plan ($20/month annually) unlocks the complete suite—auto-generated titles, chapter markers, transcript editing, and AI-powered transformations.
AI-Generated Enhancements That Save Hours
After clicking “Finish” on a recording, Loom AI analyzes your transcript and applies enhancements automatically within 30-60 seconds. These features work on recordings captured after subscribing to Business + AI—videos recorded on free plans before upgrading don’t receive retroactive AI processing except for filler word removal and AI workflows.
Auto titles: Loom generates contextual video titles based on transcript content rather than generic “Screen Recording 2025-10-16” defaults. The AI identifies key topics discussed and creates descriptive titles like “How to Configure Salesforce Email Templates” or “Q3 Product Roadmap Review”.
Auto summaries: A 2-3 sentence overview of your video content appears below the title. Use this summary as email descriptions when sharing videos or as video page metadata for SEO.
Auto chapters: Loom divides your video into logical sections with timestamp links. Viewers click chapter markers to jump directly to relevant segments rather than scrubbing through entire recordings searching for specific information. Chapters automatically update if you trim sections—no manual re-timing required.
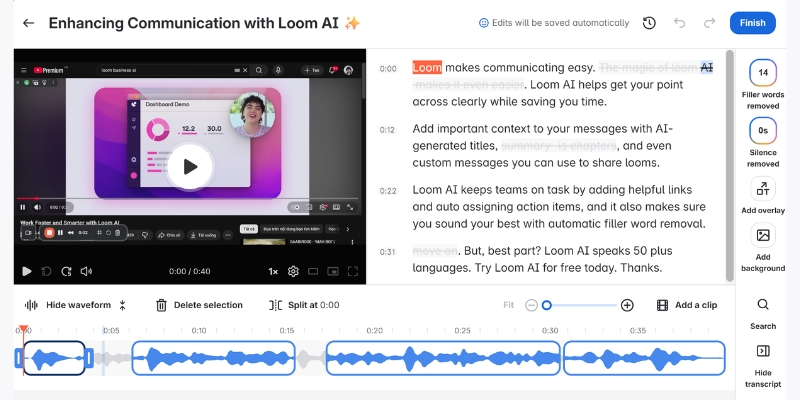
Filler word removal: AI detects and removes “um,” “uh,” “like,” repeated phrases, and verbal stumbles from both audio and transcript. This feature alone justifies the Business + AI upgrade for users who record unscripted videos—it eliminates the unprofessional hesitation that makes videos feel amateur.
Silence removal: Extended pauses longer than 2-3 seconds automatically trim out of recordings. Loom preserves natural breathing pauses but removes awkward dead air when you’re reading notes or loading applications.
AI features toggle on/off in Settings → Video Preferences. Disable specific enhancements if you prefer manual control over titles or want to preserve all pauses for dramatic effect.
Screenshot suggestion: Video editing panel showing AI-generated title, summary, and chapter markers on the right sidebar
Alt text: “Loom AI editing interface displaying auto generated video title summary and chapter timestamps with transcript”
Edit by Transcript: The Fastest Way to Trim Videos
Loom’s transcript-based editing eliminates timeline scrubbing entirely. Your full transcript appears in the right panel with every word timestamped. Select sentences or phrases you want to remove, and Loom deletes the corresponding video segments automatically.
This approach speeds up editing by 80% compared to traditional timeline editors. Identify an off-topic tangent in the transcript, highlight the text, click delete, and it vanishes from your video. No precision dragging, no accidental cuts into adjacent content.
The transcript remains fully editable even after recording. Fix AI transcription errors by clicking words and typing corrections—helpful for industry jargon, product names, or acronyms the AI mishears.
Download transcripts as text files for documentation, blog post drafts, or accessibility compliance. The transcript includes timestamps for every sentence, making it valuable for creating show notes or study guides.
AI Workflows: Transform Videos into Documents
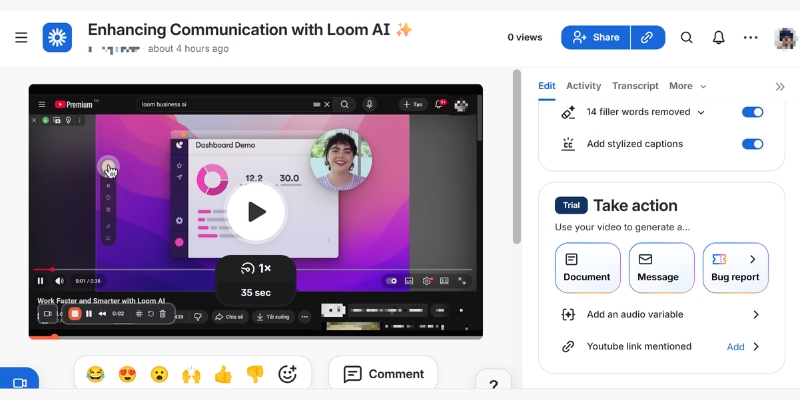
AI workflows convert recorded videos into formatted text documents, Slack messages, or Jira bug reports using the “Write with AI” button. This feature solves a common problem—team members who prefer reading over watching videos.
Click “AI Workflows” and select your desired output format :
Document: Creates a structured article with headings, bullet points, and paragraphs based on your video transcript. Use this for converting training videos into written SOPs or transforming client calls into meeting summaries.
Message: Generates a concise Slack or email message summarizing your video’s key points. Perfect for announcing video content to teams who might not watch immediately.
Bug report: Produces a formatted Jira ticket with steps to reproduce, expected behavior, and actual behavior sections filled from your screen recording. QA teams save 15-20 minutes per bug report using this workflow.
AI workflows work on videos recorded before purchasing Business + AI, unlike auto titles and summaries. This means your existing video library becomes instantly more valuable when you upgrade.
Manual Editing: Trim, Stitch, and Customize
Business plan subscribers access manual editing tools that complement AI features. Click “Trim and Add Clips” in the video sidebar to open the editing timeline.
Trim: Remove content from the beginning, middle, or end of recordings. Drag the timeline handles to mark sections for deletion, preview your cuts, and confirm changes. Trimming is non-destructive—restore deleted sections anytime by clicking “Undo”.
Stitch: Combine multiple video recordings into a single cohesive presentation. Record each tutorial section separately for easier editing, then stitch them together into one master video. This workflow prevents re-recording entire 20-minute tutorials because of mistakes in minute 18.
Custom thumbnails: Upload images or select video frames as thumbnails. Compelling thumbnails increase click-through rates by 35% in email campaigns according to Loom’s internal data. Use text overlays, brand colors, and faces looking at the camera for maximum engagement.
Call-to-action buttons: Add clickable CTAs at video end directing viewers to booking pages, product demos, or next tutorial steps. Auto CTA (Business + AI feature) suggests relevant buttons based on the webpage you recorded.
Video overlays: New 2025 feature adds text boxes, arrows, and highlight shapes after recording. Annotate important UI elements, add step numbers, or circle key information without re-recording.
Tags and descriptions: Organize videos with custom tags like “onboarding,” “sales-demo,” or “Q4-2025” for library filtering. Write detailed descriptions with relevant keywords to make videos searchable within your workspace.
Curious whether Loom’s AI features justify the $5/month upgrade from Business to Business + AI? We ran 30 videos through both plans to measure time savings. See our analysis in Loom Business vs Business AI: is the upgrade worth it in 2025? with exact minute-by-minute comparisons and ROI calculations for different use cases.
Sharing Videos and Tracking Viewer Engagement
Loom eliminates video hosting complexity through instant shareable links and detailed viewer analytics. The moment you finish recording, your video exists at a unique URL ready to paste anywhere.
Sharing Options for Every Use Case
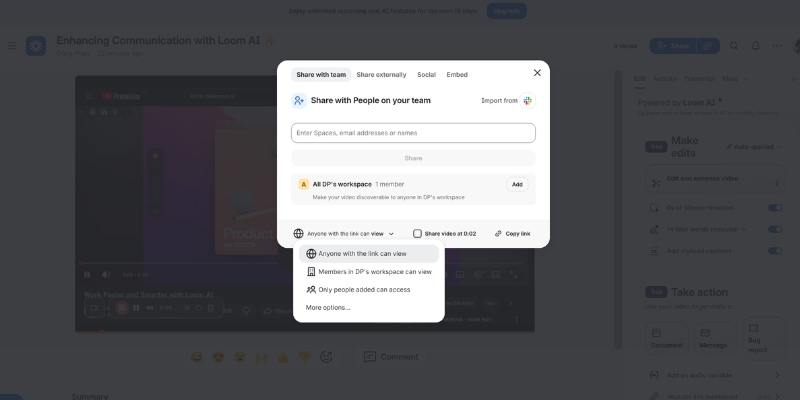
Click the “Share” button immediately after recording or from any video in your library. Loom provides six distribution methods :
Copy link: The default sharing method generates a URL like loom.com/share/abc123. Paste this link in Slack, Microsoft Teams, email, project management tools, or any platform accepting hyperlinks. Recipients click the link and watch instantly without downloads or Loom accounts.
Email with animated GIF thumbnail: Loom embeds a 3-second animated preview in email body text that plays automatically in inboxes. This feature increases video open rates by 300% compared to plain hyperlinks according to Loom’s research. The GIF loops continuously until recipients click to watch the full video.
Embed code: Generates HTML iframe code for embedding videos in websites, blogs, help centers, or learning management systems. The Loom video player appears directly on your page with play controls and chapter markers.
Social sharing: Direct buttons post videos to LinkedIn, Twitter, and Facebook with auto-populated captions and preview images. Loom optimizes video players for each platform’s autoplay and muting rules.
Download video file: Business plan subscribers download MP4 files for offline viewing, archival, or re-uploading to other platforms. Downloaded videos lose interactivity features like CTAs and chapter markers.
Tracking Engagement with Viewer Analytics
Loom provides viewer insights showing who watched your videos (for logged-in users), total views, and unique viewers on all plans, with Business+ plans adding detailed engagement metrics including individual completion rates, view times, and call-to-action conversion tracking through exportable reports
Native Integrations That Connect Loom to Your Workflow
Loom connects with 50+ platforms to embed video communication directly into existing tools. These integrations eliminate context switching—record, share, and collaborate without leaving your primary workspace.
Essential Productivity Integrations
Slack: Send Loom videos directly in Slack channels and DMs using the /loom command. Videos unfurl with animated thumbnails and play buttons inline—team members watch without leaving Slack. Install the Loom Slack app from your Slack workspace’s app directory.
Gmail: Embed Loom videos in emails with one click using the Gmail Chrome extension. Recipients see animated GIF previews in their inbox that play automatically. This integration requires the Loom Chrome extension.
Notion: Paste Loom links into Notion pages and they automatically embed as players with full interactivity. Create video documentation databases where each page contains tutorial videos, text instructions, and related resources.
Jira: Transform screen recordings into formatted bug reports with a single click using AI workflows. Attach Loom videos directly to Jira issues for clearer bug reproduction steps that reduce developer questions by 60%.
Confluence: Embed Loom videos in Confluence documentation pages using the Loom macro. Teams create living knowledge bases where written SOPs link to video walkthroughs demonstrating each process.
See Loom in action—watch our step-by-step tutorial video to master recording in minutes.
CRM and Sales Integrations
Salesforce: Enterprise plan subscribers access deep Salesforce integration that logs video views as activities in contact records. Sales reps see which prospects watched demos and schedule follow-ups automatically based on view completion.
HubSpot: Connect Loom to HubSpot to track video engagement in deal records and trigger workflow automations based on video views. Create sequences that send Loom videos at specific deal stages.
Install integrations from Settings → Integrations or from the individual platform’s app marketplace. Most integrations authenticate through OAuth without requiring API keys.
FAQ: Common Loom Questions Answered
Can I record Loom videos offline?
Only the desktop application records offline. Chrome extension requires internet connection for all recording sessions. Offline recordings upload automatically when connection restores.
Does Loom work on Chromebooks?
Yes, through the Chrome extension. Chromebooks lack desktop app support. Recording quality and features match Windows/Mac Chrome extension functionality.
Can viewers watch Loom videos without accounts?
Videos with Public or password-protected privacy settings play for anyone without Loom accounts. Private videos require viewers to sign in with approved email addresses.
How long does Loom store videos?
All plans include unlimited storage duration. Videos remain accessible permanently until manually deleted. Enterprise plans set custom retention policies.
Can I edit videos after publishing?
Yes, all edits apply retroactively. Trim content, update titles, add CTAs, or enable AI features on existing videos anytime. The video URL remains unchanged—previous shares still work.
Does Loom compress video quality?
Loom preserves original recording resolution. Free plan records at 720p maximum, Business and higher record at 4K resolution. Players stream adaptive quality based on viewer bandwidth.
Making Your Decision: Is Loom the Right Tool for You?
Loom excels for teams prioritizing speed over production quality. Record quick explanations, training updates, and async standups in minutes rather than scheduling meetings or writing lengthy documentation.
The platform’s instant shareable links and zero-friction viewing experience mean higher engagement rates than attachment-based video sharing. Recipients click and watch immediately without downloads or software installations.
AI features on the Business + AI plan justify the investment for users creating 10+ videos monthly. Filler word removal, auto chapters, and transcript editing save 30-45 minutes per video compared to manual editing in traditional software.
Loom’s limitations appear in advanced editing scenarios. Users requiring multi-track editing, motion graphics, complex transitions, or professional color grading need dedicated video editors like DaVinci Resolve or Adobe Premiere. Loom intentionally sacrifices editing depth for recording speed.
The 5-minute free plan limit forces most serious users onto paid plans quickly. Consider the Business plan minimum ($15/month) as the true entry cost for regular use.
Start with the 14-day Business + AI free trial to test AI features with actual work projects. Record client explanations, team updates, and tutorial drafts during the trial to evaluate whether Loom improves your workflow efficiency measurably.
- Wondering if Loom is the best screen recorder for your needs? We tested its AI features, collaboration tools, and pricing for 8 weeks. Read our unbiased 2025 Loom Review to make an informed decision
- Need professional content beyond Loom’s basics? Discover Clueso as the Loom alternative with studio-quality AI features.
- Can’t decide between Loom and Clueso? Our detailed Loom vs Clueso comparison reveals which tool fits your workflow and budget.
