Pika Pricing Plans Explained (2025): Hidden Costs & Credit System

Pika Pricing Plans Explained (2025): Hidden Costs & Credit System

Pika Pricing Plans Explained (2025): Hidden Costs & Credit System

Navigating the complex structure of Pika pricing is crucial for any creator looking to automate video production. As the AI video landscape shifts from simple monthly fees to volatile credit economies, knowing the real cost per second is essential.

In this AI Generative Video guide, we break down the hidden costs behind Pika Art’s credit model, comparing it directly to rivals like Luma and Runway. We ensure you don’t burn your budget on a plan that doesn’t fit your workflow.

If you are ready to find out if the Pro Plan is worth the investment or if the Free tier is just a trap, keep reading. We will analyze the Pika cost structure, commercial rights, and credit consumption in detail.

Table of Contents

Pika Pricing at a Glance: Is It Worth the Investment?

The bottom line is simple: Pika has moved aggressively towards a credit-heavy economy with the release of Pika 2.5 in November 2025. If you are serious about content creation, the monthly subscription fee is just your entry ticket; the real game is managing your Pika credits.

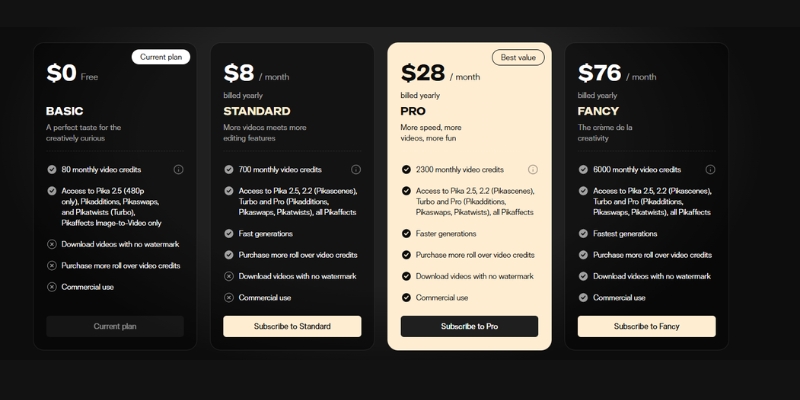
As of November 2025, Pika offers four distinct tiers: Free, Standard, Pro, and Fancy. The critical distinction is that only Pro and Fancy plans grant commercial usage rights, making them the minimum for professional work.

In our testing, the Pro Plan at $35/month is the true “starter” option for anyone needing commercial rights. The Standard plan at $10/month is a “hobbyist trap” that restricts monetization and includes watermarks on all downloads.

Plan Price (Monthly) Credits Commercial Rights Best For
Free $0 80 ❌ No Testing / Fun
Standard $10 700 ❌ No Hobbyists
Pro $35 2,300 ✅ Yes Creators (Minimum)
Fancy $95 6,000 ✅ Yes Agencies

While the Standard plan looks affordable, our comprehensive Pika review shows that the lack of commercial rights and presence of watermarks make it viable only for personal, non-monetized use.

Expert Verdict: Skip the Standard plan if you are a freelancer or content creator monetizing your work. The Pro Plan at $35/month offers the best ROI for clean, commercial-ready video generation with 2,300 monthly credits.

Check Current Prices on Pika.art

(Disclosure: If you purchase through links on this page, we may earn a small commission at no extra cost to you. This helps us maintain our “battle-tested” reviews.)

Understanding the Pika Credit System: The “Real” Cost of Video

Many users misunderstand the Pika subscription cost. You are not paying for “unlimited videos”; you are buying a bucket of credits. Understanding the exchange rate between credits and video seconds is vital for budget planning.

Here is the breakdown of the “Cost per Action” based on our real-world usage with Pika 2.5. These costs are current as of November 2025 and may vary based on model selection.

Standard 5-Second Generation: Creating a basic 5-second clip in 720p quality typically consumes approximately 150 credits. This is your baseline cost unit for planning.

Pika 2.5 Pro Model (1080p): Using the latest Pika 2.5 model at 1080p resolution costs significantly more, consuming around 200-250 credits per 5-second generation due to enhanced realism and physics.

Pikaffects (Special Effects): Applying creative effects like Melt, Squish, or Explode costs additional credits beyond base generation. Budget an extra 50-100 credits per effect application.

Lip Sync Feature: The popular Lip Sync feature that animates characters to match audio is a credit-intensive operation, typically costing 100-150 credits per use on top of base generation.

The Math of Burning Credits:
If you are on the Standard Plan (700 credits), and you generate 4 high-quality 5-second videos (4 × 200 = 800 credits), you have already exceeded your monthly allowance. This doesn’t account for failed generations or iterations.

Critical note: Unused credits on Free and Standard plans do not roll over to the next month. If you don’t use them, they expire at the billing cycle end.

Pika Pricing Tiers Breakdown (Free vs. Paid)

Choosing the right plan depends entirely on your tolerance for limitations and your need for commercial rights. Let’s analyze the best generative video tools pricing model in depth.

Pika pricing plans comparison chart showing Free, Standard, Pro, and Fancy tiers.
A detailed look at Pika’s tiered pricing structure for November 2025.

The Free Plan (The Tech Demo):
This is strictly for testing Pika 2.5’s capabilities. You get 80 monthly credits—enough for roughly 0-1 standard generations. All outputs have prominent watermarks, and you have zero commercial rights. It is useless for professional work but adequate for learning prompting techniques.

The Standard Plan ($10/mo):
This tier is controversial and often misunderstood. While it removes the watermark from some interface displays, all downloaded videos retain watermarks. Most critically, it explicitly denies commercial usage rights. The 700 monthly credits allow approximately 4-5 high-quality generations, suitable only for hobbyist experimentation.

The Pro Plan ($35/mo):
We label this the “Creator’s Minimum”. It unlocks full commercial rights, which is non-negotiable for YouTubers, freelancers, or anyone monetizing content. You get 2,300 credits—enough for approximately 11-15 high-quality videos monthly. It includes guaranteed watermark-free downloads and priority generation queue access.

The Fancy Plan ($95/mo):
This is the agency-tier plan offering 6,000 monthly credits. At this level, you can produce 30-40 high-quality videos monthly. It includes all Pro features plus fastest priority processing speeds, making it ideal for teams running multiple client campaigns simultaneously.

Without commercial rights on Free and Standard tiers, you cannot legally monetize YouTube videos, sell client work, or include outputs in commercial advertising. This is explicitly stated in Pika’s Terms of Service.

Pika vs. Luma Dream Machine & Runway: Cost Comparison

When you compare Pika pricing vs Luma Dream Machine, the differences lie in both credit economics and output specialization. Pika excels at stylized effects while Luma focuses on photorealism.

Pika vs. Luma (Credit Value):
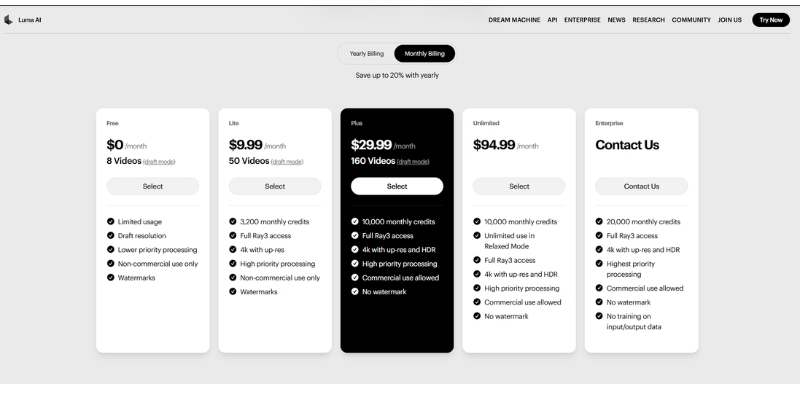
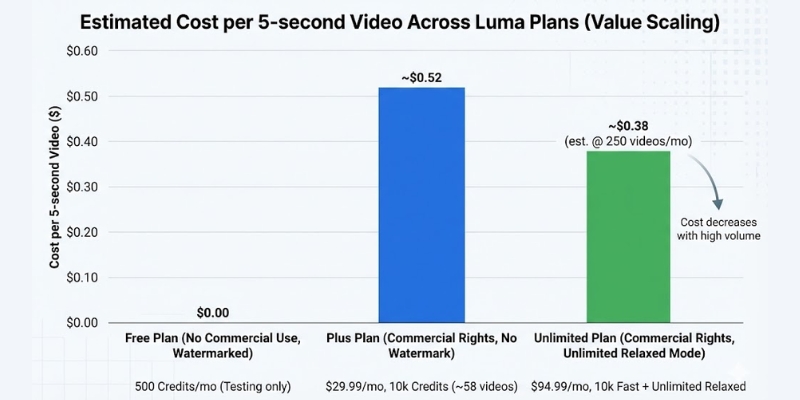
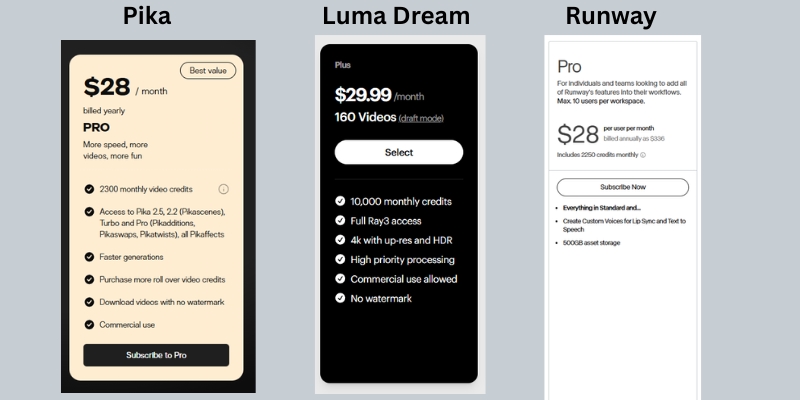
Luma’s Plus plan at $29.99/month offers 10,000 credits—significantly more than Pika’s Pro plan’s 2,300 credits. However, Luma’s credit consumption per video is also higher. For stylized social media content, Pika offers better credit efficiency, while Luma excels at realistic longer-form content.

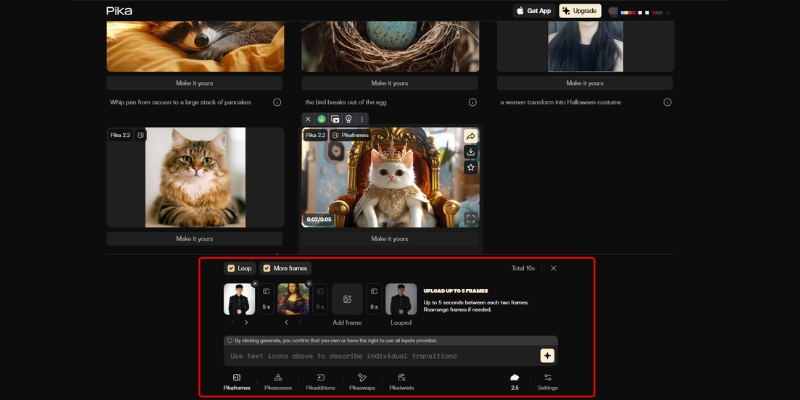
Pika’s Unique Advantage:
Pika 2.5 excels at specific “Pikaffects” like Inflate, Melt, Squish, and creative transformations. These are computationally unique to Pika and make it the go-to tool for viral social media content and meme-style videos that don’t require photorealism.

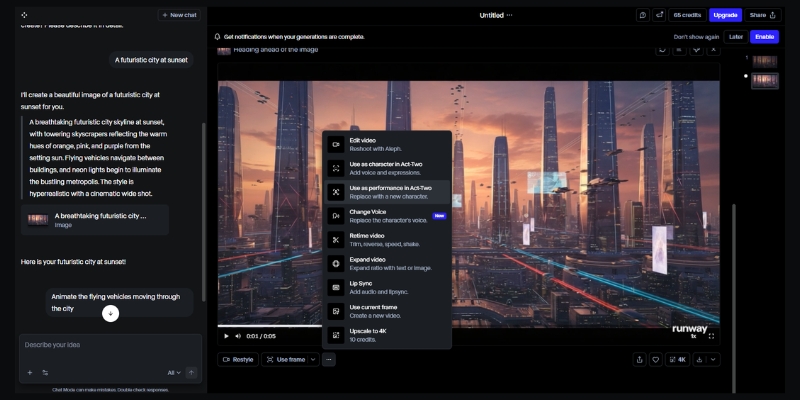
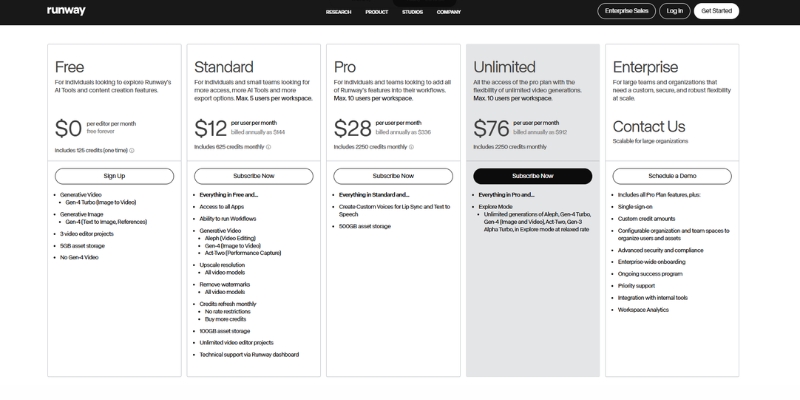
Pika vs. Runway Gen-4:
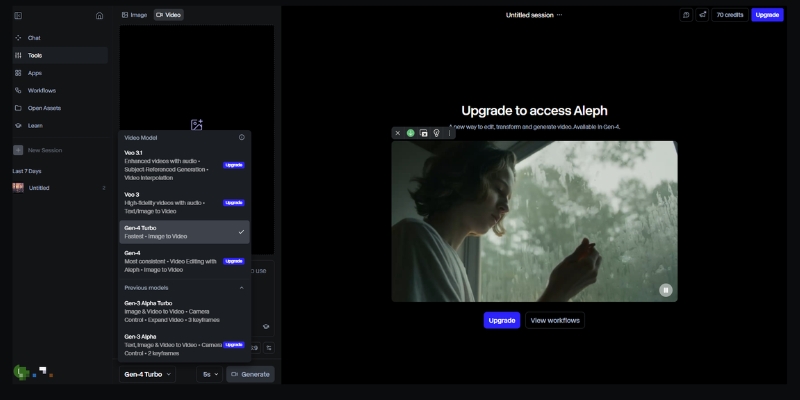
Runway’s Pro plan at $28/month offers 2,250 credits—nearly identical to Pika’s Pro plan credit count. However, Runway focuses on character consistency and cinematic quality, while Pika specializes in rapid stylized generation. Runway is better for narrative filmmaking; Pika wins for social media content creation.

Value Verdict:
If you are making TikTok edits, Instagram Reels, or quick social clips with creative effects, Pika offers the best credit-to-output ratio. If you need photorealistic longer videos or consistent characters across scenes, Luma or Runway justify their higher per-credit costs.

Compare Pika Plans vs Competitors

Hidden Fees & Commercial Rights: Read Before Buying

Before entering your credit card details, you must understand the “Gotchas” that aren’t prominently displayed on the checkout page but can derail your professional workflow.

Commercial Rights Are Pro-Only:
This is the biggest trap. Commercial usage rights are exclusively available on Pro ($35/mo) and Fancy ($95/mo) plans. If you use clips from Free or Standard plans in monetized YouTube videos, sponsored content, or client advertising, you violate Pika’s Terms of Service and risk account termination.

Watermark Removal Requires Pro:
While Standard plan marketing mentions “fewer watermarks,” this is misleading. All Standard plan video downloads include visible watermarks. Only Pro and Fancy plans guarantee completely watermark-free exports suitable for professional delivery.

Credit Costs Vary by Model:
The credit consumption varies dramatically based on which Pika model you select. Pika 2.5 Pro (1080p) costs significantly more per generation than legacy models. Always check the current credit cost before clicking generate to avoid unexpected credit depletion.

No Credit Rollover on Lower Tiers:
Free and Standard plan credits expire monthly. Pro and Fancy plans may offer limited rollover depending on current policy, but this is not guaranteed. Always consume your full allocation before the billing cycle resets to maximize value.

Frequently Asked Questions About Pika Pricing

Is Pika actually free?
Pika operates on a “freemium” model. The Free plan provides 80 monthly credits with watermarks and no commercial rights. It’s a trial for learning the platform, not a sustainable free solution for professional content creation.

Does the Standard Plan remove watermarks?
No. Despite some confusing marketing language, the Standard plan includes watermarks on all downloaded videos. Only Pro and Fancy plans offer watermark-free exports.

Can I use Standard plan videos commercially?
No. Standard plan explicitly denies commercial usage rights. You cannot monetize these videos on YouTube, use them in paid advertising, or deliver them to clients. Pro plan ($35/mo) is the minimum for commercial work.

How many videos can I make with 2,300 credits?
On the Pro plan with 2,300 monthly credits, you can generate approximately 11-15 high-quality 5-second videos using Pika 2.5 Pro model. This assumes standard generation without extensive effect applications or iterations.

Do unused credits roll over?
Generally, no. Free and Standard plan credits expire monthly. Pro and Fancy plans may offer limited rollover, but this varies and is not guaranteed. Always check current terms on the Pika website.

Read More From AI Generative Video

Expand your knowledge on AI video tools and pricing models with our related guides. These articles help you compare features and find the best tool for your budget and workflow.

last update : 06/12/2025

Luma Dream Machine Pricing: Plans, Credits & Hidden Costs (2025)

Luma Dream Machine Pricing: Plans, Credits & Hidden Costs (2025)

Luma Dream Machine Pricing: Plans, Credits & Hidden Costs (2025)

When you investigate Luma Dream Machine pricing, you are not just looking for a number; you are calculating the ROI of your creative time. As an expert in generative AI tools, I know that for marketers and creators, the real cost isn’t just the monthly subscription.

It is about the cost of failed generations, the value of commercial rights, and the speed of your workflow. The industry is under immense performance pressure, and waiting for a render can kill your momentum.

In this battle-tested guide, I will break down the Free Plan, Lite Plan, Plus Plan, and Unlimited Plan to help you decide exactly where to invest your budget.

Table of Contents

Luma Dream Machine Pricing Overview: Is It Worth the Investment?

Luma Dream Machine operates on a freemium model that is becoming the standard in the generative AI space. It uses a credit-based system where every action, from generation to extension, costs credits.

For casual users, the Free tier offers a generous 500 credits monthly to experiment. However, if you are a professional facing tight deadlines, the “Performance Pressure” of watermarks and non-commercial restrictions will quickly push you toward paid tiers.

Below is a quick summary of the current pricing structure updated November 2025. Note that these plans are designed to scale with your production volume, from experimental clips to commercial campaigns.

Plan Tier Price (Monthly) Monthly Credits Key Benefit
Free $0 500 Risk-free testing
Lite $9.99 3,200 Priority Processing
Plus $29.99 10,000 Commercial Rights + No Watermark
Unlimited $94.99 10,000 Fast + Unlimited Relaxed High-Volume Production

Lite Plan ($9.99/mo): This entry tier gives you 3,200 credits with high-priority processing. However, it retains watermarks and is for non-commercial use only, limiting professional applications.

Plus Plan ($29.99/mo): This is the sweet spot for professionals. It removes watermarks, grants full commercial rights, and provides 10,000 monthly credits—enough for consistent content creation.

(Note: Prices are accurate as of November 2025 per Luma Labs official pricing page.)

Luma Dream Machine pricing plans comparison chart showing Free, Lite, Plus, and Unlimited tiers.
A snapshot of the current Luma Dream Machine pricing tiers for 2025.

Breakdown of Luma Dream Machine Pricing Plans (2025 Updated)

Choosing a plan is not about the price; it is about the “Cost per Usable Second.” In this section, I will dissect the specific ROI of each plan for Marketers and Creators based on real-world testing.

The Free Plan: Good for Testing, Not for Pros

The Free Plan provides 500 credits monthly—significantly more generous than previous iterations. This allows for substantial experimentation before committing to a paid plan.

Strict Watermarking: Every video you generate will have a prominent Luma watermark. This renders the footage unusable for professional client work or high-end social media channels where brand consistency matters.

Non-Commercial License: You cannot monetize these assets. If you use a free clip in a monetized YouTube video or a client’s ad campaign, you risk copyright violations per Luma’s Terms of Service.

Standard Queue: Free users are placed in the standard processing queue. While not as slow as some competitors, expect longer wait times during peak hours compared to paid tiers.

The Lite Plan: Priority Processing Without Commercial Rights

At $9.99/month, the Lite Plan offers 3,200 credits—a substantial jump from the free tier. This plan targets hobbyists and students who need faster processing but don’t require commercial licensing.

High Priority Processing: Your generations jump ahead of free users in the queue. This dramatically reduces wait times, allowing for a more efficient creative workflow.

Full Ray3 Access: You gain access to Luma’s advanced Ray3 model, which delivers superior lighting, physics simulation, and overall realism compared to basic models.

4K Upscaling: The ability to upscale to 4K resolution makes your outputs suitable for high-resolution displays and presentations, though watermarks remain.

Non-Commercial Restriction: This is the critical limitation. You cannot use Lite plan outputs for any monetized content, client work, or commercial projects. It’s strictly for personal portfolios and learning.

The Plus Plan: The Professional Standard

For $29.99/month, the Plus Plan is where Luma becomes a professional tool. With 10,000 monthly credits and full commercial rights, this plan serves freelancers, content creators, and small agencies.

No Watermark: Your videos export clean and professional. This is non-negotiable for client deliverables and branded content creation.

Commercial Rights Included: You own the output and can monetize it across all platforms—YouTube ads, client campaigns, paid social media, and commercial products.

10,000 Credits Strategy: In my testing, 10,000 credits translates to approximately 58 video generations (at 170 credits per 5-second clip). With careful planning, this supports 2-3 substantial projects monthly.

4K + HDR: The Plus plan adds HDR (High Dynamic Range) support, giving your videos that cinematic “pop” with enhanced color depth and contrast.

The Unlimited Plan: For High-Volume Creators

At $94.99/month, the Unlimited Plan targets agencies, production studios, and full-time content creators who generate dozens of videos weekly.

10,000 Fast Credits: You still get 10,000 “fast mode” credits for high-priority processing. These work identically to the Plus plan for urgent projects.

Unlimited Relaxed Mode: This is the game-changer. After exhausting your fast credits, you can continue generating videos in “Relaxed Mode”—slower processing but unlimited quantity.

ROI Analysis: If you generate more than 60 videos monthly, the Unlimited plan becomes cost-effective. The relaxed mode removes the anxiety of credit management entirely.

Bar chart showing Luma Dream Machine cost per video across different pricing tiers.
Higher tiers offer better cost-per-video value, especially with Unlimited’s relaxed mode.

How the Luma Dream Machine Credit System Actually Works

Understanding credit consumption is critical for budget planning. Luma charges credits based on video length and processing features, not a flat per-video rate.

5-Second Generation: A standard 5-second clip costs approximately 170 credits. This is your baseline unit for calculating monthly capacity.

10-Second Generation: A 10-second clip consumes around 340 credits—essentially double the 5-second rate. Longer videos scale proportionally.

4K Upscaling: Upscaling a video to 4K resolution costs additional credits beyond the base generation cost. Always factor this into your budget for high-resolution deliverables.

Top-Up Credits: If you exhaust your monthly allocation, you can purchase top-up credits starting at $4 for 1,200 credits. These are valid for 12 months and automatically apply after monthly credits are consumed.

Budgeting Example: For a campaign requiring 10 scenes at 5 seconds each, assume 3 attempts per scene for perfection. That’s 30 generations × 170 credits = 5,100 credits. The Plus plan (10,000 credits) comfortably accommodates this with room for experimentation.

Commercial Rights & Watermarks: What Marketers Must Know

The legal framework surrounding AI-generated content is evolving. Understanding Luma’s licensing structure protects you from potential copyright issues.

Watermark Policy: Free and Lite plans embed a visible Luma watermark in all outputs. Attempting to crop or edit out this watermark violates Terms of Service and is detectable through metadata.

Commercial License Definition: Plus and Unlimited plans grant full commercial rights, meaning you can use outputs in TV commercials, paid advertising, client deliverables, and resalable digital products.

Non-Commercial Restrictions: Lite plan outputs cannot be monetized—this includes YouTube Partner Program videos, sponsored content, and any form of paid promotion. Violations can result in account termination.

Expert Recommendation: If you deliver video content to clients on platforms like Fiverr or Upwork, the Plus plan is the minimum to ensure legal compliance and professional quality.

Luma Dream Machine vs. Competitors: Pricing Comparison

To contextualize Luma’s value proposition, we must compare it against direct competitors in the AI video generation space.

Luma vs. Runway Gen-4: Runway’s Standard plan costs $12/month with 625 credits, while Pro costs $28/month with 2,250 credits. Luma’s Plus plan ($29.99) offers 10,000 credits—significantly more value if you prioritize generation volume.

Luma vs. Pika Labs: Pika’s Pro plan at $35/month provides 2,300 credits with commercial rights. Luma’s Plus plan is cheaper while offering more than 4x the credits, making it more cost-effective for high-volume creators.

Luma vs. Kling AI: Kling’s Premier plan at $28.88/month offers 8,000 credits. Luma’s Plus plan edges ahead with 10,000 credits at a comparable price point, plus superior physics simulation.

Comparison table of AI video generator pricing: Luma vs Runway vs Pika.
Luma Dream Machine’s Plus plan offers exceptional credit value compared to major competitors.

Final Verdict: Which Plan is Best for You?

After extensive testing across all tiers, I have clear recommendations based on your role in the creative ecosystem.

Our Recommendations

The Hobbyist or Student: Start with the Free Plan. 500 credits monthly provides substantial room for learning prompt engineering and understanding AI motion without financial commitment.

The Content Creator (YouTuber/TikTok): Invest in the Plus Plan. The removal of watermarks and commercial rights are non-negotiable for monetized content. 10,000 credits support consistent posting schedules.

The Agency or Studio: The Unlimited Plan is essential. The relaxed mode eliminates credit anxiety during intensive project phases, and the fast credits ensure priority delivery for time-sensitive client work.

Try Luma Dream Machine Now

(Disclosure: If you purchase through links on this page, we may earn a small commission at no extra cost to you. This helps us maintain our “battle-tested” reviews.)

Frequently Asked Questions About Luma Pricing

Here are the answers to the most common questions we get from creators about the billing and credit specifics.

Do unused credits roll over to the next month? No. Monthly credits reset at the end of each billing cycle and do not carry over. However, purchased top-up credits are valid for 12 months and roll over until used.

Can I cancel my subscription anytime? Yes. You can cancel anytime, and you will retain access to your credits and features until the end of the current billing period.

Is there a student discount? Currently, Luma Labs has not announced a specific educational discount program. However, the Lite plan at $9.99/month serves as an affordable entry point for students.

How much do top-up credits cost? Top-up credit packs start at $4 for 1,200 credits. You can purchase multiple packs, and they remain valid for 12 months. They are automatically consumed after monthly credits are exhausted.

Read More From AI Generative Video

Expand your knowledge with these related guides on getting the most out of your AI video tools.

last update : 06/12/2025

How to Use Runway ML (2025): Your Expert Guide to AI Video Creation & Editing

How to Use Runway ML: The Complete Studio Guide for Creators (2025)

How to Use Runway ML: The Complete Studio Guide for Creators (2025)

If you have been struggling to integrate AI video into your workflow, learning how to use runway ml is your turning point. This is not just about generating random clips; it is about taking control of a full production studio.

In the current landscape of AI Generative Video, we see creators facing immense performance pressure to produce more content, faster. Runway ML stands out because it combines powerful generation models (Gen-3, Gen-4) with a suite of professional editing tools.

Whether you are a filmmaker needing generative VFX or a marketer looking for automated assets, this guide covers it all. We will walk you through everything from text-to-video generation to advanced camera controls and timeline editing.

Table of Contents

What Is Runway ML? A Quick-Start Guide to The AI Studio

Runway ML is often misunderstood as just another “text-to-video” generator. In reality, it is a comprehensive AI Video Production Studio designed to solve the workflow bottlenecks that professional creators face daily.

At its core, the platform now features multiple generation models including Gen-3 Alpha, Gen-3 Turbo, and Gen-4 alongside a suite of “AI Magic Tools.” This means you do not just generate footage; you can edit, refine, and composite it all within the same browser-based interface.

The system operates entirely on the cloud. You input text, images, or video clips, and Runway’s servers handle the heavy rendering. This allows you to create high-fidelity VFX without needing a $5,000 workstation.

For filmmakers and marketers, the learning curve is medium. It is more complex than simple tools like Pika, but that complexity offers the control required for professional output. It is built for those who value precision over randomness.

Getting Started: The Runway ML Interface & Dashboard

When you first log in, the dashboard can feel overwhelming. Unlike consumer apps, Runway is built like professional software. We will skip the sign-up basics and focus on the navigation that matters for speed.

The Left Sidebar: This is your command center. Here you can toggle between generation models (Gen-3, Gen-4) and “Video Editing” for post-production. It also houses your “Assets” folder, which is crucial for organization.

Model Selection: You will see dropdowns for Gen-3 Alpha, Gen-3 Turbo, and Gen-4. For character consistency work, choose Gen-4. For faster iterations, Gen-3 Turbo is adequate. Each model has different credit costs.

Recent Projects: Located in the center, this area saves your workspace states. In our experience, naming your projects immediately is vital, as AI generates dozens of clips that can easily get lost.

Assets Management: Before you generate anything, upload your brand assets here. Having your logos and reference images ready in the cloud speeds up the generative video workflow significantly.

Runway ML dashboard interface showing model selection and creation tools.
The Runway Studio Dashboard features multiple generation models including Gen-3 and Gen-4.

How to Use Runway for Text-to-Video Creation

This is the feature most users come for. Generating video from scratch using Runway’s generation models requires a shift in how you write prompts. Unlike static images, video requires you to describe motion and camera behavior.

Step 1: Select Your Model: From the dashboard, choose between Gen-3 Alpha (higher quality), Gen-3 Turbo (faster), or Gen-4 (character consistency). Gen-4 is recommended for projects requiring the same character across multiple shots.

Step 2: Input Your Text Prompt: Be specific. Instead of “a car driving,” write “Cinematic shot, a red sports car driving on a coastal highway, drone view, sunset lighting.” Mention the camera angle (drone, eye-level) and lighting.

Step 3: Adjust Settings: Click the “Settings” icon. Select your desired duration (typically 5-10 seconds). We recommend starting with shorter clips to test your prompt structure before committing credits to longer generations.

Step 4: Generate & Preview: Hit the “Generate” button. Runway typically takes 60-120 seconds depending on the model. Once done, review the clip. If motion isn’t right, refine your prompt rather than regenerating immediately.

Step 5: Upscaling: Once you are happy with the movement, use the upscale option to increase the resolution. This makes the footage usable for social media or client presentations.

Runway text-to-video interface with a prompt for a cinematic car shot
Writing detailed prompts with camera directions is key to high-quality outputs.

Mastering Image-to-Video: Animating Static Assets

For marketers, Image-to-Video is often superior to text-to-video. It allows you to maintain brand consistency by using a specific product shot or character image as the anchor for the generation.

Upload Reference Image: Drag and drop your high-resolution image into the image slot. We find that Midjourney images or professional product photography work best as base layers. Higher resolution inputs yield better results.

Describe the Motion: Even with an image, you must add a text prompt. If you uploaded a coffee cup, your prompt should be “steam rising from cup, subtle camera push in.” This guides the animation direction.

Gen-4 Character References: If using Gen-4, upload a character reference image. The model will maintain that character’s appearance across multiple generations, solving the “random character morphing” problem that plagued earlier AI video tools.

Consistent Branding: By using the same character or product image across multiple generations, you can create a cohesive storyboard. This is essential for brand campaigns requiring visual consistency.

Advanced Camera Controls & Director Mode

To stop your videos from having that nauseating “floating camera” look, you must master the Camera Motion controls. This gives you director-level control over the virtual lens.

Zoom and Pan: Instead of relying solely on text prompts, use the dedicated camera control sliders. Set “Zoom” to create a “dolly in” effect. Use “Pan” to track a subject horizontally across the frame.

Camera Movement Vocabulary: Runway understands professional cinematography terms. Use prompts like “crane up,” “orbit shot,” “rack focus,” or “steadicam follow” for specific camera behaviors that mimic real film techniques.

Using Seed Numbers: Every AI generation has a “Seed” number. If you generate a clip you like but want to change the camera move, copy the seed number. Paste it into the settings for the next run to keep the visual style consistent.

Upscale for Delivery: The native resolution varies by model. Always use the “Upscale” feature before downloading. In our tests, this significantly reduces artifacts and makes the footage ready for YouTube or social platforms.

Using the Runway Timeline for Video Editing

Runway is not just a generator; it is a fully functional non-linear editor. The Timeline UI resembles tools like Premiere Pro or CapCut, making it familiar for most editors to pick up.

Multi-Track Editing: You can drag your generated clips onto multiple video and audio tracks. This is essential for combining different shots into a cohesive narrative with background music and voiceover layers.

Green Screen (Remove Background): This is a massive time-saver. Click a clip, select “Green Screen,” and click on the subject. Runway automatically masks the person, allowing you to place them in any generated environment.

Inpainting (Remove Objects): If a generated video has an unwanted artifact, use the Inpainting tool. Simply brush over the object, and the AI will erase it and fill the background intelligently, frame by frame.

Act-One Motion Capture: This feature allows you to use webcam footage to drive character animations. Record yourself performing an action, and Runway transfers that motion to your generated character for realistic movement.

Runway ML video editing timeline
The Timeline allows you to composite generated clips and use AI tools like Green Screen removal instantly.

Runway ML Pricing & ROI: Is It Worth It?

Understanding the credit system is vital for commercial viability. Runway operates on a credit basis, where each second of video generation consumes credits. The cost varies by model chosen. For professionals, the free trial is only for testing.

Plan Price Credits/Month Best For
Free Basic $0/mo 125 (one-time) Testing interface
Standard $12/mo 625 credits Individual creators
Pro $28/mo 2,250 credits Freelancers
Unlimited $76/mo Unlimited (Explore) Agencies & Studios

Verdict on ROI: If you are an agency or a freelancer producing content regularly, the Unlimited Plan is the only logical choice. The cost of hiring a VFX artist for a single shot exceeds the monthly subscription, making the ROI incredibly high.

💡 Expert Verdict

We recommend the Pro Plan for individual creators who need access to Gen-4 for character consistency. However, if you rely on “trial and error” to get the perfect shot, the Unlimited Plan prevents “credit anxiety” and lets you iterate freely.

Try Runway ML for Free

(Disclosure: If you purchase through links on this page, we may earn a small commission at no extra cost to you. This helps us maintain our “battle-tested” reviews.)

Frequently Asked Questions About Using Runway ML

Is Runway ML free to use?
Runway offers a free tier with 125 one-time credits. This is enough to generate about 25-30 seconds of video using Gen-3 Turbo to test the capabilities, but you cannot export without watermarks on the free plan.

Can I use Runway ML videos commercially?
Yes, if you are on a paid plan (Standard or higher). You own the copyright to the assets you generate. However, free plan users do not have full commercial rights per the Terms of Service.

How does Runway compare to Pika Labs?
Runway offers significantly more control via camera settings and timeline editing tools. Pika is often easier for beginners but lacks the deep “Studio” features for precise editing. Read our full Pika vs Runway ML comparison.

What are the system requirements for Runway ML?
Since it is cloud-based, you do not need a powerful GPU. You just need a stable internet connection (minimum 10 Mbps recommended) and a modern browser like Chrome or Edge. It runs smoothly even on standard laptops.

Read More From AI Generative Video

Explore more guides and comparisons to enhance your AI video production workflow. Check out these related articles:

last update : 04/12/2025

How to Use Pika (2025 Guide): Master Pika 2.5 Features

How to Use Pika 2.5: The Ultimate Guide to AI Video (2025 Update)

How to Use Pika 2.5: The Ultimate Guide to AI Video (2025 Update)

Creating professional animations has reached a new milestone with Pika 2.5. In this comprehensive guide on how to use Pika, we show you exactly how to generate ultra-realistic AI videos with the latest model released in November 2025.

As part of the rapidly evolving generative AI tools landscape, Pika 2.5 introduces enhanced physics, improved prompt adherence, and cinema-grade realism. Whether you are animating static images or creating talking avatars, this version represents a significant leap forward.

This article focuses on the battle-tested Pika 2.5 web interface. We will cover everything from your first prompt to mastering Lip Sync, Pikaframes, and the revolutionary Pikadditions feature.

Table of Contents

What is Pika 2.5 & What’s New in November 2025?

Pika 2.5 is the latest evolution of the Generative AI Video Platform, released in November 2025 after significant development. Unlike previous versions, Pika 2.5 specializes in ultra-realistic generations with dramatically improved physics and temporal consistency.

According to the official release, Pika 2.5 delivers three breakthrough improvements: enhanced physics simulation for natural movement, unmatched prompt adherence for complex multi-part prompts, and cinema-grade camera controls that treat direction as a first-class feature.

Its primary strength lies in Image-to-Video capability combined with extended duration support. You can now generate videos up to 25 seconds in crisp 1080p resolution, with seamless keyframe transitions using Pikaframes.

Compared to competitors like Luma Dream Machine and Runway Gen-4, Pika 2.5 offers unique features such as Pikadditions (add objects/characters to existing videos), Pikaswaps (replace elements within videos), and Lip Sync (automated mouth movements).

Getting Started: Pika.art Web Interface Walkthrough

The Pika.art web interface is the official and most powerful way to use Pika 2.5. The platform has evolved significantly from its early Discord-only days, now offering a professional-grade dashboard.

Accessing the Platform: Navigate to pika.art and sign in using your Google or Discord account. The homepage presents a clean interface with your generation history on the left and the creation panel in the center.

Understanding the Dashboard: The main creation area features a large prompt box, image upload button, and generation settings panel. On the right side, you will find quick access to Pikaframes, Pikadditions, and PikaEffects.

Model Selection: Pika 2.5 is now the default model, but you can still access legacy models (1.5, 2.2) via the settings dropdown. For best results, always use Model 2.5 Pro for 1080p quality.

How to Use Pika 2.5 to Create Your First AI Video (Step-by-Step)

Mastering the Pika 2.5 workflow requires understanding the new parameter structure. Follow these updated steps to generate your first clip with the latest model.

Step 1: Choose Your Generation Mode
Select between Text-to-Video, Image-to-Video, or Pikaframes (keyframe animation). For consistent characters, we strongly recommend Image-to-Video mode. Upload your base image by clicking the attachment icon.

Step 2: Craft an Effective Prompt
Pika 2.5 has dramatically improved prompt adherence. Use the structure: [Subject] + [Action] + [Camera Movement] + [Environment] + [Style]. Example: “Young woman smiling, slow zoom in, golden hour lighting, cinematic depth of field.”

Step 3: Configure Video Parameters
Click the settings gear icon. Set your aspect ratio (16:9 for YouTube, 9:16 for TikTok). Choose video length (5s, 10s, 15s, 20s, or 25s). Select Model 2.5 Pro for 1080p output. Adjust motion intensity slider (2-3 recommended).

Step 4: Generate & Review
Click the “Generate” button. Pika 2.5 typically takes 60-90 seconds to render depending on length. Once complete, review the output in your Library tab. Use the Extend feature to lengthen clips beyond initial duration.

Pro Tip: Leave the prompt empty when using Image-to-Video to let Pika 2.5’s AI decide natural movement, or add simple camera directions like “slow pan right” for subtle control.

Pika 2.5 web interface showing updated dashboard and generation controls.
The redesigned Pika 2.5 dashboard with enhanced controls and model selector.

Mastering Pika 2.5’s Advanced Features: Pikaframes, Pikadditions & Lip Sync

This is where Pika 2.5 truly dominates. The platform now offers professional-grade post-processing tools that were previously only available in expensive VFX software.

Pikaframes: Keyframe Animation System
This revolutionary feature lets you define a start frame and end frame, then Pika generates the smooth transition between them. Upload two images, set duration (1-10 seconds), and let the AI create cinematic morphing animations. Perfect for product reveals and character transformations.

Pikadditions: Scene Element Insertion
Add characters, objects, or creatures to existing videos with automatic color and lighting matching. Click “Pikadditions,” upload your video, then upload the element you want to insert. Pika 2.5 seamlessly integrates it with realistic shadows and perspective.

Pikaswaps: Element Replacement
Replace specific elements in your video without regenerating the entire clip. Select the object you want to swap, describe the replacement, and Pika intelligently replaces it while maintaining scene consistency.

Lip Sync: Automated Talking Avatars
Turn any static character into a talking head. Select your generated video, click “Lip Sync,” upload your audio file (or generate speech from text using integrated ElevenLabs voices). Pika automatically matches mouth movements to audio with surprising accuracy.

PikaEffects: Creative Transformations
Apply physics-based effects like Squish, Melt, Inflate, Explode, Crush, or Cake-ify to any image. These effects are now enhanced in 2.5 with more realistic simulations and better integration with the base footage.

Pikaframes feature demonstrating keyframe animation setup in Pika 2.2.
The Pikaframes interface allows precise control over start and end states for seamless animations.

Pika 2.5 Prompt Engineering: Writing Prompts That Actually Work

Pika 2.5’s enhanced prompt understanding means your prompting strategy should evolve. The model now handles complex, multi-element prompts with high accuracy.

Use this advanced formula: [Subject Details] + [Primary Action] + [Secondary Actions] + [Camera Movement] + [Lighting] + [Environment] + [Style Reference].

Here are production-ready prompt examples optimized for Pika 2.5:

  • Cinematic Realistic: “Professional businesswoman, mid-30s, walking confidently through modern office, slow dolly forward, natural window lighting, depth of field f/2.8, corporate commercial style, 1080p.”
  • Anime Style: “Anime girl with blue hair, tears forming in eyes, slight head tilt down, gentle wind effect, sakura petals falling, studio lighting, Studio Ghibli aesthetic, vibrant colors.”
  • Product Showcase: “Luxury smartwatch rotating 360 degrees, chrome finish reflecting studio lights, clean white background, slow zoom in on display, Apple commercial style, 4k quality.”

Using Negative Prompts
In the advanced settings, add negative prompts to avoid common AI artifacts: “no morphing, no extra limbs, no blurry faces, no text overlays, no watermarks, no unnatural movements.”

Camera Control Language
Pika 2.5 treats camera as first-class. Use specific cinematography terms: “crane up,” “dutch angle,” “whip pan,” “rack focus,” “orbit shot,” “steadicam follow.” The model understands and executes these professional camera movements.

Pika 2.5 Pricing & Plans: Complete Credit Breakdown

Pika has restructured its pricing for the 2.5 release. Understanding the credit cost per video length is essential for budget planning.

Free Plan ($0/month): 80 credits monthly. Videos include watermarks. No commercial use rights. Ideal for testing and personal experimentation only.

Standard Plan ($10/month): 700 credits monthly. Access to all models including 2.5 Pro. Faster generation queue. Note: Still includes watermarks and NO commercial rights. Best for hobbyists.

Pro Plan ($35/month): 2,300 credits monthly. Watermark-free downloads. Full commercial use rights. Priority generation. This is the minimum for professional work.

Fancy Plan ($95/month): 6,000 credits monthly. Fastest generation speeds. All Pro benefits plus rollover credits option. For high-volume content creators.

Credit Costs (Model 2.5 Pro 1080p):

  • 5 seconds: 40 credits
  • 10 seconds: 80 credits
  • 15 seconds: 120 credits
  • 20 seconds: 160 credits
  • 25 seconds: 200 credits
Feature Free Standard ($10) Pro ($35) Fancy ($95)
Monthly Credits 80 700 2,300 6,000
Watermark Yes Yes No No
Commercial Use No No Yes Yes
Model Access 1.5 + Turbo All Models All Models All Models
Action Try Standard Get Pro Get Fancy

(Disclosure: If you purchase through links on this page, we may earn a small commission at no extra cost to you. This helps us maintain our “battle-tested” reviews.)

Our Recommendation: If you need commercial rights for client work, go directly to Pro ($35/month). The Standard plan’s lack of commercial licensing makes it unsuitable for freelancers or agencies.

Our Pika 2.5 Verdict

Pika 2.5 represents a significant evolution in AI video generation. The enhanced physics and prompt adherence bring it much closer to competing with tools like Veo 3 and Runway Gen-4. While cinematic realism still lags behind Luma Dream Machine in some scenarios, the unique features like Pikadditions and Pikaframes make it an essential tool for professional creators.

Try Pika 2.5 for Free

Frequently Asked Questions About Pika 2.5

Can I use Pika 2.5 videos for commercial purposes?
Yes, but only if you subscribe to the Pro plan ($35/month) or higher. The Free and Standard plans explicitly do not grant commercial use rights.

How long can Pika 2.5 videos be?
The base generation supports 5, 10, 15, 20, or 25 seconds. You can use the Extend feature to add additional segments, though temporal consistency may decrease after 30-40 seconds total.

Is Pika 2.5 better than previous versions?
Significantly. The physics simulation, prompt adherence, and motion quality are vastly improved over Pika 2.2. However, some users report that cinematic realism still needs work compared to competitors.

Does Pika 2.5 support Lip Sync?
Yes. Lip Sync remains one of Pika’s signature features. Upload any video and audio file, and Pika automatically syncs mouth movements. It works best with front-facing subjects.

What happened to Modify Region?
The feature has been evolved into Pikaswaps and Pikadditions, which offer more precise control for element replacement and insertion rather than general inpainting.

Read More From AI Generative Video

Expand your knowledge on AI video creation with our related guides and comparisons. These articles dive deeper into the competitive landscape of AI video generation.

last update : 03/12/2025

How to Use Kaiber AI: The Ultimate Guide to Creating Audio-Reactive Music Videos (2025)

How to Use Kaiber AI: The Ultimate Guide to Creating Audio-Reactive Music Videos (2025)

How to Use Kaiber AI: The Ultimate Guide to Creating Audio-Reactive Music Videos (2025)

If you have been wondering how to use Kaiber to create stunning, viral-worthy visuals, you are in the right place. As creatives, we know the struggle of needing high-end animation without a Hollywood budget.

Kaiber has emerged as a powerhouse in the Generative AI space, specifically for its ability to sync visuals directly to audio beats. With the launch of Superstudio in late 2024, it is no longer just a tool—it is an entire creative ecosystem integrating multiple AI models.

In this battle-tested guide, we will move beyond basic features. We will dive deep into creating full Audio-Reactive music videos, mastering the new Superstudio interface, and optimizing prompts for professional results.

Table of Contents

What is Kaiber AI and Superstudio? The Evolution of Creative AI Platforms

Kaiber is a generative AI video platform designed to transform your ideas into animated visual stories. Unlike standard editors, it generates new frames based on text prompts, images, and audio inputs using advanced diffusion models.

In October 2024, Kaiber launched Superstudio—a revolutionary infinite canvas workspace that integrates multiple best-in-class AI models including Luma, Veo, Kling, Minimax, Mochi, and Runway. This positions Kaiber as a unified creative platform rather than a single-model tool.

Its primary strength lies in its Audio-Reactive engine. While other tools focus on realism, Kaiber excels at artistic, stylized interpretations that pulse and evolve dynamically with your music—making it the go-to choice for musicians and visual artists.

We have tested dozens of AI video generators, and Kaiber stands out for audio-visual synchronization. It solves the massive pain point of creating engaging music visualizers affordably and quickly.

Kaiber Superstudio dashboard showing infinite canvas and integrated AI models.
Kaiber’s Superstudio interface brings together image, video, and audio AI models on a single infinite canvas.

Complete Workflow: How to Use Kaiber Superstudio for Audio-Reactive Videos

This is the core Kaiber tutorial you need for 2025. We will walk through the exact process using the new Superstudio interface to generate professional music visualizers. Follow these steps precisely.

Step 1: Access Superstudio Canvas
Log into Kaiber and select “Superstudio” from the main menu. You will see an infinite canvas workspace—this is your creative playground where all elements come together.

Step 2: Upload Your Audio Track
Drag and drop your audio file (MP3 or WAV) onto the canvas. Kaiber’s AI will automatically analyze the beat structure, rhythm, and frequency ranges. This analysis drives the audio-reactive synchronization.

Step 3: Generate Initial Visuals
Click the “+” button to add a video generation node. Choose your preferred AI model (Luma for realism, Kling for stylized animation). In the prompt field, describe what you want to see (e.g., “A futuristic cyberpunk city at night, neon lights pulsing”).

Step 4: Apply Audio Reactivity
Select your video layer and click “Audio Reactivity.” Choose which audio frequency band (Bass, Mid, Treble) drives specific visual parameters like zoom, rotation, or color intensity. For electronic music, link Bass to camera zoom for impactful drops.

Step 5: Refine and Export
Preview your composition on the canvas. Adjust timing, add multiple visual layers, or switch between different AI models for varied aesthetics. Once satisfied, click “Export” to render your final video at up to 4K resolution.

Advanced Audio Reactivity: Mastering Beat Synchronization

To truly understand how to use Kaiber like a pro, you must master the audio reactivity settings. These controls transform random visuals into synchronized experiences that keep your audience engaged.

Understanding Frequency Band Mapping
Kaiber analyzes your audio across Bass (20-250Hz), Mid (250Hz-4kHz), and Treble (4kHz+) frequencies. Map camera zoom to Bass for thump-driven motion, Mid for vocal emphasis, or Treble for hi-hat sparkle effects.

Reactivity Intensity Control
The “Intensity” slider (0-100%) controls how dramatically visuals respond to audio. Low intensity (10-30%) creates subtle breathing effects perfect for ambient tracks. High intensity (70-100%) produces aggressive morphing ideal for EDM drops.

Multi-Layer Audio Sync
In Superstudio, you can have multiple video layers each responding to different frequency bands. Create a background layer reacting to Bass while a foreground character responds to Mids—this layering adds professional depth.

Timing Offset Adjustment
Sometimes visual effects need to slightly precede or follow the beat for optimal impact. Use the “+/- milliseconds” offset to fine-tune synchronization, especially critical for bass-heavy genres where visual anticipation enhances drops.

Kaiber Superstudio audio reactivity settings panel with frequency mapping controls.
Fine-tuning frequency band mappings allows precise control over how visuals sync with different musical elements.

Kaiber Prompt Engineering: Best Practices for Artistic Styles

Your output is only as good as your input. Mastering Kaiber prompt engineering is essential for avoiding generic, blurry results. Here is our internal formula refined through hundreds of generations.

The Perfect Prompt Formula
[Subject] + [Art Style] + [Lighting/Mood] + [Camera Movement].
Example: “A solitary astronaut walking on Mars, vibrant synthwave aesthetic, neon purple and cyan lighting, slow dolly-out camera movement.”

Style Keywords for Musicians
Specific keywords trigger better aesthetics. Try: “Cyberpunk” for electronic music, “Charcoal sketch animation” for indie folk, “Glitch art” for experimental tracks, or “Watercolor dreamscape” for emotional ballads.

Negative Prompts for Quality Control
Always use the negative prompt field to filter unwanted elements. Our standard formula: “blurry, distorted faces, low resolution, watermark, text overlays, extra limbs, poor anatomy, pixelated, artifacts.”

Model-Specific Prompt Optimization
Different AI models in Superstudio respond better to specific prompt structures. Luma excels with photorealistic descriptions, Kling responds well to anime/stylized terms, and Veo handles complex motion prompts more accurately.

Video-to-Video Transformation: Stylizing Real-World Footage

Kaiber isn’t limited to text-to-video generation. The Transform feature allows you to apply AI artistic filters to existing footage, similar to the technique used in Linkin Park’s “Lost” music video.

Uploading Source Footage
Upload a clip of yourself performing, dancing, or acting. Keep it under 2 minutes for manageable rendering times. Source footage with good lighting and clear subject separation yields significantly better AI tracking results.

Style Transfer Intensity
Use the “Transform” strength slider (0-100%) carefully. Lower values (20-40%) maintain your original form while adding artistic flair. Higher values (70-100%) let the AI completely reimagine you as an anime character, robot, or abstract entity.

Trending Use Case: Performance Videos
We recently transformed a simple iPhone concert clip into a 1990s anime aesthetic video. This technique is massively trending on TikTok and Instagram Reels, driving high engagement for musicians without professional video budgets.

Kaiber Superstudio Pricing 2025: Is It Worth the Investment?

For freelancers investigating the ROI, understanding Kaiber’s current pricing is critical. The platform now operates on a credit-based system within a tiered subscription model designed for different creator scales.

Plan Price/Month Credits Best For Action
Flex $0 (Pay-as-you-go) Buy as needed Single projects or testing Try Flex
Creator $29 1,400 Active creators & freelancers Get Creator
Pro $149 7,500 Power users & small studios Go Pro

The Credit System Explained
Credit consumption varies by AI model selected, resolution, and video length. Standard 1080p generation costs approximately 1 credit per second, while 4K upscaling and premium models like Luma or Runway cost significantly more per frame.

Value Analysis for Musicians
Generating a 3-minute music video typically consumes 300-600 credits depending on quality settings and iterations. On the Creator plan ($29/mo with 1,400 credits), you can produce 2-4 high-quality music videos monthly—an incredible value compared to traditional animation costs of $2,000-$5,000 per video.

Commercial Rights & Watermarks
Crucially, all paid plans (Creator and above) grant you full commercial rights to generated content. Free/Flex plan outputs include watermarks and lack monetization rights, making paid plans essential for professional use.

(Disclosure: If you purchase through links on this page, we may earn a small commission at no extra cost to you. This helps us maintain our “battle-tested” reviews.)

Our Verdict

If you are a musician or visual artist needing stylized, audio-reactive content quickly, Kaiber’s Superstudio platform is the current market leader. The integration of multiple AI models on a single canvas dramatically accelerates creative workflows while maintaining artistic quality.

Start Creating with Superstudio

Frequently Asked Questions About Using Kaiber

Is Kaiber free to use?
Kaiber offers a Flex plan (pay-as-you-go) where you purchase credits only when needed, starting from $5 for 300 credits. However, to remove watermarks and gain commercial rights, you need a Creator plan ($29/mo) or higher.

How long can a Kaiber video be?
Video length is limited only by your credit balance. The Creator plan’s 1,400 monthly credits can generate approximately 23 minutes of standard 1080p video, or 4-7 minutes of high-quality 4K content with upscaling.

Can I use my own music in Kaiber?
Yes. The platform is specifically built around this capability. You upload your track, and Kaiber’s AI analyzes the beat structure, rhythm, and frequency content to automatically synchronize visual animations with your audio.

What is the best alternative to Kaiber?

DomoAI vs Kaiber is a strong competitor for anime-style transformations, while Deforum (Stable Diffusion) offers more granular control but requires significantly more technical expertise to use effectively.

Does Kaiber Superstudio work on mobile devices?
Superstudio is optimized for desktop browsers (Chrome, Safari, Edge) due to its complex canvas interface and rendering requirements. While accessible on tablets, the experience is significantly better on laptop or desktop computers with larger screens.

Read More From AI Generative Video

Expand your knowledge with our deep dives into other tools and comparisons in the generative video space.

last update : 30/11/2025

Runway ML Pricing Explained (2025): Costs, Credits & Hidden Fees

Runway ML Pricing Explained (2025): Costs, Credits & Hidden Fees

Runway ML Pricing Explained (2025): Costs, Credits & Hidden Fees

If you are serious about AI filmmaking, understanding the Runway ML pricing structure is the first hurdle you must clear. It is not as simple as paying a flat fee; it is a complex ecosystem of credits, generation models, and tier-specific features.

In this guide, we dive deep into the Generative AI market’s most comprehensive subscription model. We have spent thousands of dollars on credits to determine if the “Unlimited Plan” is a genuine bargain or a marketing gimmick.

We will break down the math behind the credit system, compare the Standard vs. Pro tiers, and reveal exactly how much a minute of Gen-3 or Gen-4 video truly costs. Here is everything you need to know about Runway ML costs before you swipe your card.

Table of Contents

Runway ML Pricing Overview: Is It Worth the Investment?

Runway ML positions itself as the “Adobe of AI Video,” and its pricing reflects that premium status. It operates on a SaaS pricing model that combines a monthly subscription with a consumption-based credit system.

Unlike basic apps, Runway is a professional video suite. You are paying for advanced features like Gen-4 character consistency, camera controls, timeline editing, and the high-fidelity Gen-3 Alpha model—not just random video generation.

For casual users, the cost might seem steep compared to competitors like Luma or Pika. However, for professionals needing precise control over camera movement, character consistency across scenes, and integrated editing tools, the investment ROI is justified.

QUICK VERDICT:

Buy Immediately if: You are a professional editor, agency, or filmmaker who needs high-resolution output and “Unlimited” relaxed generations for background rendering and iteration.

Wait if: You are just experimenting. The Free Trial with 125 one-time credits is enough to learn the interface and test your workflow before committing to a paid plan.

It is important to note that the Free Plan is not a forever-free tier. It gives you a one-time allocation of 125 credits that never renew. Once they are gone, you must upgrade to continue using the platform’s generation tools.

Try Runway ML Free

(Disclosure: If you purchase through links on this page, we may earn a small commission at no extra cost to you. This helps us maintain our “battle-tested” reviews.)

Runway ML pricing plans overview showing Free, Standard, Pro, and Unlimited tiers.
A snapshot of Runway ML’s current pricing structure for November 2025.

The Runway Credit System Explained: How Much Does Video Actually Cost?

The most confusing part of the Runway ML cost is the credit currency. You do not buy “minutes of video”; you buy “Credits.” Understanding the exchange rate between credits and video seconds is crucial for accurate budgeting.

We have calculated the exact burn rate for the current generation models. Keep in mind that higher quality models like Gen-3 Alpha and Gen-4 consume credits significantly faster than legacy models.

Credit Consumption by Model:
Gen-3 Alpha (High Quality): Approximately 10 credits per second of video generation.
Gen-3 Turbo (Fast Mode): Approximately 5 credits per second—ideal for rapid iteration.
Gen-4 (Character Consistency): Varies by complexity, typically 10-15 credits per second due to advanced processing.

Let’s do a Reality Check on the Standard Plan. You get 625 credits per month. If you exclusively use Gen-3 Alpha, that equals approximately 62 seconds of high-quality footage per month—just over one minute.

This math reveals why professional creators often skip the Standard plan. Sixty seconds of footage is barely enough for a single social media teaser, let alone iterating on a full project with multiple takes.

However, if you strategically use Gen-3 Turbo for testing and iteration, your 625 credits will generate approximately 125 seconds (over 2 minutes) of video. Managing your credit allocation wisely across different models is the key to staying within budget.

Breakdown of Runway ML Pricing Plans (Free vs. Standard vs. Pro vs. Unlimited)

Choosing the right plan depends entirely on your production volume and feature needs. Below is a detailed breakdown of the Runway ML plans, focusing on the hidden limits and perks of each tier.

Free Plan ($0/forever):
This is strictly for testing and learning the interface. You get 125 one-time credits that never renew. You are locked to 720p resolution and cannot access upscaling. Crucially, all videos include a permanent watermark. Use this to verify your workflow before committing financially.

Standard Plan ($12/month):
The entry-level paid tier. It removes the watermark and unlocks 1080p generation and upscaling capabilities. You get 625 credits monthly. This is best for hobbyists creating occasional content who need clean, watermark-free outputs but don’t require high volume.

Pro Plan ($28/month):
This is where professional features unlock. You get 2,250 credits/month—approximately 3.5 minutes of Gen-3 Alpha footage or 7.5 minutes using Gen-3 Turbo. It includes increased cloud storage (500GB) and access to all generation models including Gen-4 for character consistency work.

Unlimited Plan ($76/month):
The “Holy Grail” for high-volume creators and agencies. You get the same 2,250 “Fast Credits” as Pro, but you also gain Unlimited Relaxed Generations. “Relaxed Mode” allows infinite video generation at slower processing speeds without consuming credits—essential for drafting, experimentation, and overnight batch rendering.

Feature Standard Pro Unlimited
Monthly Price $12 $28 $76
Monthly Credits 625 2,250 2,250 + Unlimited Relaxed
Watermark None None None
Gen-4 Access Limited ✅ Full ✅ Full
Action Choose Standard Choose Pro Go Unlimited

Which Runway ML Plan Should You Choose? (Real-World Scenarios)

We have tested these plans across various production workflows. Here is our consultative advice on which tier fits your specific use case, helping you avoid overspending on features you won’t fully utilize.

For the Hobbyist & Explorer:
Stick to the Standard Plan. If you are creating occasional content for TikTok or learning prompt engineering, 625 credits suffices. The key benefit is removing the watermark so your content maintains a professional appearance.

For the Freelancer & Content Creator:
We strongly recommend the Pro Plan. You need the higher credit volume for trial-and-error iteration. More importantly, full access to Gen-4 enables character consistency across scenes, which is essential for branded content and serialized storytelling.

For the Agency & Production Studio:
The Unlimited Plan is mandatory. In a studio environment, you will exhaust 2,250 credits within days during active projects. The “Relaxed Mode” allows overnight batch processing of hundreds of experimental renders without credit costs, dramatically improving workflow efficiency.

Strategic Budgeting Advice:
If you are on the Pro plan and consistently run out of credits, purchasing “Top-up credits” becomes expensive. It is often more cost-effective to upgrade to Unlimited for intensive project months and then downgrade during quieter periods.

Runway ML vs. Competitors: Pricing Comparison (Pika & Luma)

When comparing Runway ML vs Pika or Luma Dream Machine, you must look beyond simple price tags. You are comparing a comprehensive production suite against specialized generation tools.

Runway vs. Pika Labs:
Pika’s Pro plan at $35/month offers 2,300 credits—similar to Runway’s Pro plan credit count. However, Pika lacks Runway’s integrated timeline editor, advanced camera controls, and Gen-4 character consistency. You pay more for Runway to access a complete production ecosystem.

Runway vs. Luma Dream Machine:
Luma’s Plus plan at $29.99/month provides 10,000 credits—significantly more than Runway. However, Luma’s credit consumption per generation is also higher, and it lacks Runway’s professional editing tools. For pure generation volume, Luma wins; for production control, Runway justifies its premium.

The Value Proposition:
If you just need quick, random video generations, Luma or Pika offer better credit-per-dollar ratios. If you need to *direct* shots—controlling camera pan, zoom, character consistency, and timeline compositing—Runway’s feature suite justifies its higher cost per credit.

How to Manage Your Subscription and Save Money

Smart users develop “credit hygiene” habits that can save hundreds of dollars annually. We have developed several strategies through extensive testing.

Strategy 1: Test with Lower-Cost Models:
Never start with Gen-3 Alpha or Gen-4 for initial prompt testing. Use Gen-3 Turbo (half the credit cost) to test composition and motion. Once the prompt works, upgrade to the premium model for the final render.

Strategy 2: Maximize Relaxed Mode:
If you are on the Unlimited plan, reserve “Fast Credits” exclusively for time-sensitive client deliverables. Use Relaxed Mode for all experimentation, iteration, and overnight batch rendering—it costs zero credits.

Strategy 3: The Annual Billing Discount:
Runway offers approximately 20% savings on annual billing. If you know you will use the tool for at least 8 months, the Annual Billing option pays for itself and provides budget predictability.

Cancellation Policy:
Monthly plan credits typically do not roll over upon cancellation. Always exhaust your remaining credit balance before canceling to avoid wasting purchased credits. Top-up credits may have different expiration terms.

Frequently Asked Questions About Runway ML Costs

Do unused credits roll over to the next month?
Monthly subscription credits generally do not roll over. However, separately purchased “Top-up” credits typically have longer validity periods. Always check your account dashboard for specific credit expiration dates.

Can I upgrade my plan mid-month?
Yes. If you start on Standard and realize you need more capacity, you can perform an immediate plan upgrade. Runway typically prorates the cost difference or starts a new billing cycle depending on timing.

Is there a student or educational discount?
Runway has offered educational pricing programs in the past. We recommend contacting their support team directly with your .edu email address to inquire about current student discount availability before subscribing.

Does the Free plan reset every month?
No. This is a common misconception. The Free plan provides a one-time allocation of 125 credits that never renew. Once exhausted, you must subscribe to a paid plan to continue generating videos.

Read More From AI Generative Video

Expand your knowledge on AI video tools with our detailed comparisons and tutorials. These guides help you maximize the potential of your creative software stack.

last update : 30/11/2025

DomoAI Pricing Explained (2025): Costs, Credits, & Hidden Limits

DomoAI Pricing Explained (2025): Costs, Credits, & Hidden Limits

DomoAI Pricing Explained (2025): Costs, Credits, & Hidden Limits

If you are a creator looking to dive into AI animation, understanding DomoAI pricing is the first step to avoiding budget burnout. Unlike simple flat-fee tools, DomoAI operates on a dynamic credit system that can be confusing for beginners.

I have spent the last six months testing every tier, from the restricted free plan to the high-speed Pro subscription. My goal is to help you navigate the costs of Generative AI without wasting money on credits you don’t need.

In this guide, I will break down the Basic, Standard, and Pro plans, calculate the real “cost per second” of video, and explain why the “Relax Mode” is the secret weapon for savvy marketers.

Table of Contents

What Is DomoAI? (Quick Verdict & Cost Overview)

DomoAI is a specialized AI tool designed for Video-to-Video transformation, allowing creators to turn real footage into anime, cartoons, or 3D animations. It operates primarily via a Credit-Based Subscription model on both Web and Discord platforms.

For most users, the verdict is simple: DomoAI is exceptionally cost-effective if you leverage the “Unlimited Relax Mode” available in higher tiers. This feature sets it apart from competitors that charge for every single second of generation.

The pricing starts at approximately $9.99 per month for the entry-level tier. This is an affordable entry point for hobbyists, but serious creators will quickly outgrow the credit limits of the basic package.

There is a Free Plan available, but it is strictly for testing. It includes watermarks and very limited credits (typically 50-100 one-time credits), which makes it unsuitable for any professional or commercial work.

My “Bottom Line” Verdict: If you plan to make more than 5 videos a month, skip the Basic plan. The Standard Plan is the only option that unlocks the true ROI of DomoAI through unlimited relaxed generation.

Try DomoAI For Free

(Disclosure: If you purchase through links on this page, we may earn a small commission at no extra cost to you. This helps us maintain our “battle-tested” reviews.)

DomoAI Pricing Plans Explained (2025 Updated)

Choosing the right plan depends entirely on your production volume and generation speed requirements. I have analyzed the three main paid tiers—Basic, Standard, and Pro—to show you exactly what you get for your money.

Basic Plan (~$9.99/mo):
This is the starter pack for hobbyists. You get approximately 500 credits per month. It removes the Watermark, but you are stuck with “Fast Mode” only. Once your credits are exhausted, you cannot generate anything else until the next billing cycle.

Standard Plan (~$19.99 – $29.99/mo):
This is the “Best Value” tier for regular creators. It includes approximately 1,000-1,500 monthly credits for urgent Fast Mode tasks. The killer feature here is Unlimited Relax Mode, allowing you to generate infinite videos at slower queue speeds without burning credits.

Pro Plan (~$49.99 – $79.99/mo):
Designed for agencies and power users with high-volume demands. You get a massive 3,000-4,000+ credit allowance and multiple concurrent “Fast Lanes” for parallel processing. Crucially, this plan often unlocks Priority Generation and access to longer video durations.

If you are serious about Commercial Rights, all paid plans cover you. However, the Standard Plan represents the mathematical sweet spot where the cost-per-video drops dramatically due to the unlimited relaxed generation capability.

Plan Price (Monthly) Fast Credits Key Benefit
Basic ~$9.99 500 No Watermark
Standard ~$19.99-$29.99 1,000-1,500 Unlimited Relax Mode
Pro ~$49.99-$79.99 3,000-4,000+ Priority Speed + Multiple Fast Lanes

Note: Exact pricing and credit allocations may vary by region and promotional periods. Always check the official DomoAI website for current rates.

The “Hidden” Currency: How DomoAI Credits Work

To understand the true cost, you must understand the math behind credit consumption. Credits are the fuel for this engine, and video generation burns them at varying rates depending on settings.

Cost Per Generation:
In my extensive testing, credit consumption varies significantly based on video length, resolution, and style complexity. A simple 3-second transformation typically costs approximately 10-20 credits, while a 10-second clip can consume 30-60 credits depending on quality settings.

Fast Mode vs. Relax Mode:
Fast Mode uses your monthly credit allowance to generate videos with priority processing (typically 1-3 minutes). Relax Mode costs zero credits but places you in a slower queue (5-20 minutes depending on server load). This is why the Standard Plan offers superior value.

Math for Marketers:
On the Basic Plan (500 credits), you can generate approximately 8-15 short clips (3-5 seconds each) per month in Fast Mode. For marketers needing 20-30 social media clips monthly, the Standard Plan’s unlimited Relax Mode becomes essential.

Complex transformations with advanced anime styles or high-resolution outputs may consume more credits per second. Always monitor your balance using the `/info` command in Discord or the credit counter on the web dashboard.

DomoAI Discord interface showing credit balance and subscription details via info command.
You can always check your remaining credits using the /info command in Discord or the web dashboard.

DomoAI Free Plan vs. Paid Plans: Should You Upgrade?

Many users ask if the Free Plan is sufficient for their needs. In 2025, the answer is a definitive “No” for professional content creation. The free tier serves strictly as a demo to test the AI’s capabilities.

The Watermark Issue:
The biggest deal-breaker is the persistent Watermark. Every video generated on the free plan displays a visible DomoAI logo. This makes the content unsuitable for client work, professional social media channels, or any monetized content.

Credit Limitations:
Free users typically receive a small one-time credit allocation (approximately 50-100 credits). This allows you to generate perhaps 3-5 short test clips. Once exhausted, you are locked out of generation until you upgrade to a paid plan.

Slower Generation Queue:
Free users are placed at the lowest priority in the generation queue. During peak usage hours, you might experience significantly longer wait times compared to Priority Generation users on paid plans.

Recommendation:
If you are a student exploring AI capabilities or just curious, the Free Plan works for initial testing. If you are a YouTuber, Marketer, or Freelancer creating content for clients or monetization, you must upgrade to at least the Basic plan for watermark removal and commercial rights.

DomoAI vs. Kaiber & Pika: Pricing Comparison

How does DomoAI stack up against established platforms like Kaiber and Pika Labs? I have compared their pricing models to determine which tool offers the best “Cost-to-Output” ratio for different use cases.

DomoAI vs. Kaiber:
Kaiber excels at “Audio Reactivity” for music videos but operates on a stricter credit system without unlimited relaxed mode. DomoAI wins on volume production thanks to Unlimited Relax Mode. If you need to experiment with 50 style variations for a single project, DomoAI proves more economical.

DomoAI vs. Pika:
Pika Labs specializes in “Text-to-Video” generation and cinematic camera controls. However, DomoAI dominates Video-to-Video stylization (transforming live-action footage into anime). For this specific transformation use case, DomoAI offers superior consistency and better cost efficiency per output.

Platform Accessibility:
Both Kaiber and Pika offer polished web applications from the start. DomoAI originated on Discord but now provides a comprehensive web UI. If you prefer avoiding Discord entirely, Kaiber might feel more premium, though you pay a premium price for that streamlined interface.

The Verdict:
Choose DomoAI if your primary workflow involves stylization transformations and high-volume production. Choose Kaiber if you need precise camera movements synchronized to music beats. Choose Pika if you prioritize photorealistic text-to-video generation.

How to Subscribe & Manage Your Subscription

Subscribing to DomoAI is straightforward, but proper account linking is crucial. You can subscribe via the DomoAI Web App or directly inside Discord using the `/subscribe` command.

Syncing Accounts:
Crucially, your subscription is tied to your Discord ID. Ensure you are logged into the correct Discord account before completing payment. This ensures your credits and subscription benefits appear consistently across the mobile app, desktop Discord, and web interface.

Canceling or Upgrading:
You can manage your plan through the “Settings” or “Subscription” tab on your web profile. To Cancel Subscription, you typically need to access the payment provider portal (usually Stripe) linked in your account settings.

Accepted Payment Methods:
DomoAI generally accepts major credit cards (Visa, Mastercard, American Express) and sometimes regional payment methods depending on your location. Be aware that most plans default to Auto-Renewal unless you manually disable it.

Important Warning:
If you cancel, you usually retain your credits and access until the end of the current billing cycle. However, verify the policy on “rollover credits,” as most AI subscription services do not preserve unused credits if you unsubscribe and later resubscribe.

Frequently Asked Questions About DomoAI Cost

Can I roll over unused credits?
Typically, no. DomoAI operates on a monthly reset cycle. If you have 200 Fast Mode credits remaining at the end of your billing period, they usually expire. The strategy is to use them before renewal or rely on Relax Mode for non-urgent projects.

Is the payment monthly or yearly?
You can choose either billing cycle. The Annual Plan usually offers approximately 15-20% savings compared to monthly billing. If you are committed to long-term content creation, the annual Standard tier provides the best financial value.

Does DomoAI offer refunds?
Standard digital goods policies apply. Generally, if you have consumed credits or generated content, refunds are not available. If you accidentally renewed and haven’t used any credits, you might have a case with customer support, but this is not guaranteed.

Is there an Enterprise plan?
Yes, for studios requiring significantly more than Pro plan limits (10,000+ credits monthly), you can contact DomoAI support for custom enterprise pricing. This is uncommon for individual creators but necessary for production houses or agencies with massive output demands.

How do I remove the watermark?
The only method to remove the watermark is subscribing to a Paid Plan (Basic, Standard, or Pro). There is no “pay-per-video” option to remove watermarks on free tier generations—it requires an active subscription.

Read More From AI Generative Video

Explore more guides and comparisons to build your perfect AI video production toolkit and maximize your creative ROI.

last update : 29/11/2025

How to Use DomoAI: The Complete Discord Tutorial for Creators (2025)

How to Use DomoAI: The Complete Discord Tutorial for Creators (2025)

How to Use DomoAI: The Complete Discord Tutorial for Creators (2025)

Mastering how to use domoai is currently the fastest workflow to transform static images into viral anime-style videos. As creators, we constantly seek tools that balance speed with aesthetic quality.

In this guide, I will break down the specific Discord commands and settings you need to master. We move beyond basic prompts to explore the AI Generative Video workflows that professionals use.

Whether you are a marketer animating a logo or a freelancer creating content, this tutorial covers everything from the /animate command to advanced pricing strategies. Let’s dive into the details.

Table of Contents

DomoAI Discord interface showing image-to-video anime transformation.
DomoAI operates entirely within Discord, turning images into video via slash commands.

What Is DomoAI & How Does It Transform Video Creation?

DomoAI is a specialized AI video generator hosted on Discord that focuses on high-quality stylization. It primarily converts static images and text prompts into fluid animations, excelling in Anime and 3D cartoon aesthetics.

Marketers often struggle with the time-intensive process of traditional animation. DomoAI solves this pain point by automating the “motion” layer, allowing you to produce 3-5 seconds of high-frame-rate video in under two minutes.

The tool’s core entity is its Image-to-Video feature. Unlike generalist tools that hallucinate wild details, DomoAI maintains the structural integrity of your source image while applying a consistent “Real-to-Anime” filter.

I have tested dozens of generative tools, and DomoAI operates exclusively via Discord. This platform-based approach allows for community learning but can be a barrier if you are unfamiliar with server navigation.

After using this tool for several campaigns, I found it stands out for its style consistency. If you need a reliable AI Video Generator for social media content, this is a top-tier contender.

Getting Started: How to Join and Navigate the DomoAI Discord

The Discord interface can feel chaotic to non-gamers, but don’t let that stop you. The workflow is actually linear once you know where to click. Here is the streamlined process to get access.

Join the Server
Navigate to the official DomoAI website and click “Join our Discord”. You must have a verified Discord account. Accept the invite to enter their server environment.

Locate the Workspace
On the left sidebar, scroll down to find the “GENERATE VIDEO” section. You will see channels like generate-video, generate-1, or generate-2. Click any of these. Do not type commands in the “general” chat.

Understanding the UI
DomoAI relies on “slash commands”. This means you initiate every action by typing a forward slash (/) in the message bar. A menu will pop up showing available tools like /animate or /video.

How to Use DomoAI Image-to-Video (The /animate Command)

This is the most popular feature for marketers. It takes an existing image—like a product shot or a selfie—and adds movement. Here is the battle-tested workflow for the best results.

Typing the /animate command in DomoAI Discord channel .
The /animate command is the gateway to turning static photos into dynamic videos.

Step 1: Type the Command
Go to a “generate” channel. Click the message bar, type /animate, and press Enter. A specific box will appear requesting an “image” and a “prompt”.

Step 2: Upload Your Image
Click the “image” field and select your file (JPG or PNG). I recommend high-resolution images for the best clarity. This image serves as the visual anchor for the video.

Step 3: Enter the Prompt
The prompt here guides the *motion*, not the content. Type simple instructions like “A man blinking and smiling” or “Wind blowing through hair”. Keep it short and focused.

Step 4: Configure Settings (Crucial)
After hitting Enter, a settings menu pops up. Select your Motion Intensity (Low for portraits, High for action). Choose your Duration (3s, 5s, or 10s) and Aspect Ratio (9:16 for Reels, 16:9 for YouTube).

Step 5: Generate
Click “Start”. The bot will take 1-3 minutes to render depending on server load. Since the chat moves fast, check the “Mentions” tab (the @ symbol) in Discord to find your finished video quickly.

How to Use DomoAI Text-to-Video (The /video Command)

Use the Text-to-Video feature when you do not have a source image. The AI creates the visual and the motion purely from your text description and imagination.

The Command
Type /video in the message bar and hit Enter. This opens the prompt input field specifically for generation from scratch without a reference image.

Prompt Engineering
Since there is no reference image, your prompt must be highly descriptive. Include details about lighting, camera angle, and character appearance (e.g., “Cinematic shot of a cybernetic samurai walking through neon rain, dramatic lighting, 4k anime style”).

Style Selection
A dropdown menu will allow you to pick the visual style. Options usually include Anime, Realism, or 3D Cartoon. Selecting the right style is critical for the final “look and feel” matching your creative vision.

Comparison
Be aware that Text-to-Video offers less control over specific character features than Image-to-Video. It is great for abstract concepts and exploratory work but less reliable for consistent branding across multiple videos.

Mastering DomoAI Prompts & Parameters for Better Results

To move from “average” to “professional” output, you need to master prompt engineering parameters. Small tweaks in your text can drastically change the quality of the anime style transformation.

Style Keywords
Add specific semantic keywords to trigger distinct looks. Use terms like “Ghibli style” for soft, painterly visuals, “Cyberpunk” for neon edges and high contrast, or “Watercolor” for artistic, fluid flair.

Negative Prompts
Use the –no parameter to exclude unwanted elements. For example, adding “–no blur, –no distortion, –no extra fingers, –no watermark” cleans up the final video significantly and prevents common AI artifacts.

Consistency Tips
To keep a character looking the same across multiple generations, always use the same base “seed” or reference image. Describe the character’s clothing and distinctive features clearly in every prompt (e.g., “red jacket, blue eyes, scar on left cheek”).

Example Prompts
Try this structure: “[Subject] doing [Action], [Environment], [Style], [Lighting]”. Example: “A magical cat creating glowing spells with its paws, enchanted forest background, Studio Ghibli anime style, soft volumetric lighting, golden hour”.

For more advanced techniques on controlling video output quality, check our comprehensive guide on prompt engineering for AI video.

DomoAI Pricing & Plans: Is It Worth the Investment?

DomoAI operates on a credit-based subscription model. Understanding the ROI is vital for freelancers and agencies deciding whether to upgrade from the free trial for professional work.

Free Trial
New users receive a small amount of one-time credits (typically around 50-100) upon joining. This is enough for roughly 3-5 short generations to test the capabilities and interface before financial commitment.

Subscription Plans
Paid plans reset credits monthly. The Basic Plan usually starts around $9.99/month, offering approximately 500 credits. The Standard Plan (~$19.99) provides around 1,000 credits, while the Pro Plan offers 3,000+ credits with faster generation speeds.

Commercial Rights
This is critical: you generally own the commercial rights to videos created only while you maintain an active paid subscription. Verify this in their latest Terms of Service if you plan to sell or license the content to clients.

Private Mode
Pro users often get access to “Stealth mode” or private generation channels. This allows you to generate videos in a private bot chat, keeping your client work and creative experiments hidden from the public server—essential for agencies.

Plan Credits / Month Ideal For Action
Basic ~500 Credits Hobbyists & Beginners Check Price
Standard ~1,000 Credits Content Creators Get Started
Pro ~3,000 Credits Agencies & Power Users Go Pro

Verdict
If you are a casual user creating occasional content, stick to the Basic plan. However, for serious DomoAI usage involving client work or high-volume production, the Private Mode and increased credits in the Pro plan are mandatory for professional workflows.

Try DomoAI for Free

(Disclosure: If you purchase through links on this page, we may earn a small commission at no extra cost to you. This helps us maintain our “battle-tested” reviews.)

Frequently Asked Questions About Using DomoAI

Is DomoAI free to use?
It offers free starting credits (typically 50-100) for new accounts, but it is not permanently free. Once you deplete your initial credits, you must subscribe to a monthly plan to continue generating videos.

Can I use DomoAI without Discord?
Currently, DomoAI is primarily Discord-based. While they may develop a standalone web application in the future, the full feature set and community support currently reside entirely within the Discord ecosystem.

How do I delete my video from the server?
You can usually delete your generation by reacting to the bot’s message with the “X” emoji (if available) or by right-clicking the message and selecting “Delete Message”. Note that this only removes it from public view—the bot may retain data server-side.

Why is my generation failing?
Failures often occur due to overly sensitive “NSFW” content filters triggering falsely, server overload during peak hours, or problematic prompt keywords. Try simplifying your prompt, removing potentially sensitive keywords, or waiting a few minutes before retrying.

Read More From AI Generative Video

Expand your knowledge with our latest comparisons and tutorials in the AI video space. These guides are designed to help you choose the right tool for your specific creative workflow.

last update : 29/11/2025

Kaiber Pricing 2025: Plans, Credit Costs & Hidden Fees Explained

Kaiber Pricing 2025: Plans, Credit Costs & Hidden Fees Explained

Kaiber Pricing 2025: Plans, Credit Costs & Hidden Fees Explained

If you are a creator investigating Kaiber pricing, you are likely trying to determine whether the subscription justifies the creative capabilities—especially after the major Superstudio platform launch in late 2024.

I have spent hundreds of dollars testing various AI Generative Video tools, and Kaiber’s credit system has undergone significant changes that fundamentally reshape its value proposition.

Unlike flat-fee tools, Kaiber now operates through Superstudio—an infinite canvas platform integrating multiple AI models—with a flexible credit model where costs vary based on the specific AI engine, resolution, and generation length you choose.

In this guide, I will break down the Flex, Creator, and Pro plans, analyze the real cost per second of video across different AI models, and help you decide which tier maximizes your creative ROI.

Table of Contents

Kaiber Superstudio Pricing at a Glance: The New Value Equation

Kaiber fundamentally restructured its pricing in late 2024 with the launch of Superstudio—shifting from a simple generation tool to a comprehensive creative platform integrating Luma, Veo, Kling, Runway, and other best-in-class AI models.

The platform now operates on a flexible pay-as-you-go model alongside subscription tiers. This means your actual costs depend heavily on which AI models you choose and at what resolution you render.

Here is the current pricing structure for November 2025:

Plan Name Monthly Cost Credits / Month Cost Per Credit Best For
Flex $0 (Pay-as-you-go) Buy as needed Variable Single projects / Testing
Creator $29 / mo 1,400 ~$0.021 Active Creators (Best Value)
Pro $149 / mo 7,500 ~$0.020 Studios / Power Users

The Creator Plan at $29/month represents the sweet spot for most professional content creators. It provides substantial monthly credits while unlocking commercial rights and watermark-free exports.

The Flex Plan (pay-as-you-go) is ideal for occasional users or those testing the platform, though per-credit costs are higher without a subscription. Credit packs typically start at $5 for 300 credits.

Deep Dive into Kaiber Superstudio Plans: Flex vs. Creator vs. Pro

Choosing the right plan requires understanding both your production volume and which AI models you will primarily use. I will analyze each tier to reveal the true value proposition.

Flex Plan ($0/mo): The On-Demand Option

This plan eliminates recurring charges—you only purchase credits when needed. Credit packs start at approximately $5 for 300 credits, scaling up for bulk purchases.

The major limitation is per-credit cost—you pay a premium compared to subscription plans. Additionally, Flex users may not receive priority processing during peak demand periods.

This works well for users creating one-off projects or testing Kaiber’s capabilities before committing to a subscription. However, frequent users quickly find subscriptions more economical.

Creator Plan ($29/mo): The Professional Standard

This is the plan I recommend for serious content creators. With 1,400 monthly credits, you have substantial capacity for multiple music videos, social media content, or audio-reactive visualizations.

Crucially, the Creator Plan grants full commercial rights to all generated content—non-negotiable for freelancers and agencies delivering client work. You also receive watermark-free exports and priority access to new AI models as they integrate into Superstudio.

For musicians creating Spotify Canvas loops or TikTok content, this tier provides the perfect balance of volume and cost-effectiveness. In my testing, 1,400 credits generates approximately 2-4 complete music videos at standard quality settings.

Pro Plan ($149/mo): The Studio Powerhouse

Targeted at production studios and agencies with high-volume demands, this tier provides a massive 7,500 monthly credits. The per-credit cost drops to its lowest level across all plans.

This plan is essential if you are producing multiple client projects simultaneously or generating extensive footage for long-form content. You receive highest-priority processing queues, ensuring faster render times even during platform congestion.

The Pro tier also typically receives earliest access to beta features and experimental AI models before they roll out to lower tiers—valuable for staying ahead of creative trends.

How the Kaiber Superstudio Credit System Actually Works

Understanding credit consumption is critical for accurate budgeting. Unlike the old Kaiber system, Superstudio credits vary significantly based on which AI model you select and your output quality settings.

Here is the approximate credit consumption breakdown based on my extensive testing:

  • Kaiber Native Models (Stylized): Approximately 1 credit per second for standard 1080p generation.
  • Luma Dream Machine Integration: Approximately 1.5-2 credits per second for photorealistic outputs.
  • Runway Gen-3 Integration: Approximately 2-3 credits per second for high-fidelity cinematic generation.
  • 4K Upscaling: Additional 50-100 credits per video depending on length and complexity.
  • Audio-Reactive Processing: Adds approximately 20-30% to base generation costs due to beat analysis overhead.

Do credits roll over?

Yes, on Creator and Pro plans, unused credits roll over month-to-month with no hard expiration. However, there is typically a maximum accumulation cap (usually 2-3x your monthly allowance) to prevent indefinite hoarding.

This rollover policy dramatically improves value—you don’t lose investment during slower creative months. Flex plan credits purchased separately typically have 12-month validity.

Be strategic: complex audio-reactive videos with multiple model integrations consume credits rapidly. Budget approximately 30% more credits than base calculations for iteration and experimentation.

Chart showing Kaiber Superstudio credit consumption rates by AI model.
Premium AI models like Runway consume 2-3x more credits than Kaiber’s native stylized generation engines.

Kaiber Free Trial Explained: Limits and Getting Started

Kaiber’s free tier has evolved significantly with Superstudio. Rather than a traditional “free plan,” they now offer limited trial credits to test the platform before financial commitment.

Trial Credit Allocation

New users typically receive a small allocation of trial credits (approximately 100-150) to explore the interface and test basic generation capabilities across different AI models.

The Watermark Reality

All videos generated on trial credits include visible Kaiber branding watermarks. This makes outputs unsuitable for professional client deliverables or clean social media posts requiring brand consistency.

Feature Access Restrictions

Trial users cannot access 4K upscaling, extended video durations (typically capped at 30 seconds), or commercial licensing rights. You also lack access to premium integrated AI models like Runway Gen-3.

If you are seriously evaluating Kaiber, I recommend the Flex plan approach—purchase a single $5 credit pack to test the full platform capabilities without watermarks before committing to a monthly subscription.

Key Features Behind the Paywall: What Makes Kaiber Worth Paying For

Why invest in Kaiber when free AI tools exist? The answer lies in specialized capabilities unavailable elsewhere—particularly for musicians and visual artists.

Audio-Reactive Synchronization

This remains Kaiber’s signature feature. Paid plans allow you to upload audio tracks, and the AI analyzes beat structure, rhythm, and frequency ranges to pulse visuals in perfect sync.

For musicians creating Spotify Canvas loops or full music videos, this feature alone justifies subscription costs. It automates hours of manual keyframe animation work that would otherwise require professional motion designers.

Multi-Model Integration via Superstudio

Unlike single-model platforms, Superstudio lets you combine outputs from Luma (realism), Kling (stylized animation), and Runway (cinematic quality) on a single infinite canvas—streamlining complex creative workflows.

Commercial Rights Ownership

Trial and Flex users face licensing restrictions. Creator and Pro subscribers receive full commercial copyright to all generated content—essential for agencies, freelancers, and musicians monetizing their work.

This legal safety net is non-negotiable for professional use. Delivering client work with unclear licensing is a liability risk no agency should accept.

Kaiber Cost vs. Competitors: Value Analysis for 2025

How does Kaiber’s Superstudio pricing compare to alternatives in the AI video generation space? Let’s analyze ROI across different use cases.

Kaiber vs. Pika Labs

Pika’s Pro plan at $35/month offers 2,300 credits—comparable to Kaiber’s Creator plan credit allocation. However, Pika specializes in photorealistic motion, while Kaiber excels at stylized, audio-reactive content. For music visualizers, Kaiber offers better value.

Kaiber vs. DomoAI

DomoAI dominates anime-style video transformation. If your sole focus is anime aesthetics, DomoAI may offer better per-minute costs. But Kaiber’s style diversity and audio-sync capabilities provide broader creative flexibility.

Kaiber vs. Runway Gen-3 Direct

Runway’s Pro plan at $28/month offers 2,250 credits but costs significantly more per second of generation. Kaiber’s Superstudio integration lets you access Runway’s models at potentially lower effective costs through credit optimization strategies.

Value Verdict

For realistic cinematic footage, Runway or Luma direct subscriptions may offer better value. For artistic, stylized, and music-synchronized content, Kaiber’s Creator plan provides unmatched cost-per-creative-impact ratio.

Which Plan Should You Choose? Strategic Recommendations by Use Case

To help you decide quickly, here are my recommendations based on specific creative workflows and production demands.

For Musicians & Independent Artists

Go with the Creator Plan. The 1,400 monthly credits support 2-4 complete music videos, and audio-reactive synchronization is the platform’s killer feature for this audience. Commercial rights are essential for Spotify and YouTube monetization.

For Social Media Marketers

The Creator Plan is ideal. It generates dozens of 6-15 second vertical loops for TikTok/Reels—exactly what social strategies demand. The style diversity helps prevent creative fatigue across campaigns.

For Hobbyists & Learners

Start with the Flex Plan. Purchase small credit packs ($5-10) monthly to experiment without recurring charges. Upgrade to Creator once your output frequency justifies subscription economics.

For Production Studios & Agencies

The Pro Plan is non-negotiable. High-volume client work demands the credit capacity, priority processing, and commercial licensing this tier provides. The cost is easily absorbed into client project budgets.

Final Verdict: Is Kaiber Superstudio Worth It?

Yes, especially at the Creator tier ($29/mo). The audio-reactive synchronization alone justifies costs for musicians, and Superstudio’s multi-model integration provides workflow efficiency unavailable elsewhere at this price point.

If you are ready to start creating, current offers are available below:

Get Started with Kaiber Superstudio

(Disclosure: If you purchase through links on this page, we may earn a small commission at no extra cost to you. This helps us maintain our “battle-tested” reviews.)

Frequently Asked Questions About Kaiber Costs

Can I cancel my subscription anytime?

Yes, Kaiber allows cancellation at any time with no penalties. Your credits remain valid through the end of your current billing cycle, and unused rollover credits typically remain accessible for 30 days post-cancellation.

Does Kaiber offer annual billing discounts?

Yes, annual subscriptions typically offer 15-20% savings compared to month-to-month billing. This is ideal for established creators with consistent production schedules who can commit long-term.

How do I buy more credits without upgrading plans?

Both Creator and Pro subscribers can purchase “Top-Up” credit packs as one-time purchases when monthly allocations run low. These typically start at $10 for 600 credits with volume discounts on larger packs.

Is there a student or educational discount?

Educational pricing policies vary. Contact Kaiber support directly with valid student credentials (.edu email) to inquire about current academic discount availability—these are offered periodically but not guaranteed.

What happens if I run out of credits mid-generation?

Generation will fail to initiate if insufficient credits exist. You will receive a notification prompting credit purchase or plan upgrade before proceeding. In-progress generations always complete—credits are only deducted upon successful job submission.

Read More From AI Generative Video

If you found this pricing analysis helpful, explore our other battle-tested guides on AI video platforms:

last update : 29/11/2025

How to Use Luma Dream Machine: The Ultimate Ray 3 & Photon Guide (2025)

How to Use Luma Dream Machine: The Ultimate Ray 3 & Photon Guide (2025)

How to Use Luma Dream Machine: The Ultimate Ray 3 & Photon Guide (2025)

If you are looking for how to use Luma Dream Machine to create cinematic AI videos, you have landed in the right place. We are not just talking about basic text-to-video; we are diving into the advanced “World Model” capabilities that separate Luma from the rest.

As of late 2025, the landscape of AI Generative Video has shifted dramatically with the release of Luma’s Ray 3 video model and Photon image model. For marketers and creators, this means the end of “morphing” glitches and the beginning of physics-based realism.[4]

In this battle-tested guide, I will walk you through the exact workflow we use at our agency to generate high-fidelity videos. You will learn how to master Keyframes, control Camera Motion, and leverage the new Concept Pills to speed up your production.

Table of Contents

What Is Luma Dream Machine? (The “Ray 3” Era Explained)

Luma Dream Machine is not just another video generator; it is a “World Model” designed to simulate physics, motion, and object permanence. Unlike older tools that simply hallucinate pixels, Luma understands how objects interact in 3D space.

The platform is currently powered by two core engines: Ray 3 (the flagship video model) and Photon (the high-fidelity image model). Ray 3 delivers impressive video generation speeds, offering a massive leap in speed and coherence.

We have tested Ray 3 extensively against competitors like Runway Gen-3. The standout feature is its ability to maintain character consistency and realistic lighting transitions without the “warping” effects seen in earlier generations.

For creators, this means you can now produce cinematic shots that actually obey the laws of physics. Whether it’s water splashing or a car drifting, Luma calculates the trajectory rather than just guessing the visual outcome.

Getting Started: Account Setup & Interface Tour

Getting started is frictionless. Head over to lumalabs.ai and sign in using your Google account. You immediately land in the “Dream Machine” dashboard, which has been redesigned for the 2025 update.

The interface is clean but packed with hidden power tools. Here is the layout you need to know:

The Prompt Bar (Center): This is your command center. It now supports multi-modal inputs, meaning you can type text and upload images simultaneously.

Model Selector: By default, you can select between available models. Ensure you choose Ray 3 for the highest quality output, especially for final commercial assets.

Aspect Ratio Controls: Located near the generate button, you can toggle between 16:9 (YouTube), 9:16 (TikTok/Reels), and 1:1 (Square). Do not overlook this; cropping later ruins the composition.

“My Creations” Gallery: Your history is saved below. A new feature here is the “Boards” system, allowing you to organize assets into project folders rather than a messy infinite scroll.[4]

Concept Pills: As you type, you will see clickable keywords pop up. These are “Concept Pills” that suggest lighting, styles, or camera moves. Click them to auto-complete complex prompt structures.

Free Tier Access: Free tier access is available with limited generations. Credit usage is tracked in the top right corner of your dashboard.

Step-by-Step Guide: Creating Your First Text-to-Video

Let’s create your first video using the Ray 3 model. The goal here is to generate a high-realism cinematic shot from scratch.

Step 1: Select Your Model
Ensure “Ray 3” is selected in the model dropdown. This gives you access to the latest physics-based rendering.

Step 2: Craft the Prompt
Do not just type “a cat.” Use our agency formula: [Subject] + [Action] + [Environment] + [Lighting/Style] + [Camera Movement].

Example: “A cybernetic samurai drawing a katana, neon rain-slicked streets of Tokyo, volumetric fog, cinematic lighting, low angle shot, slow motion.”

Step 3: Set Camera Controls
You no longer need to guess camera moves. Type “Camera” in the prompt bar or use the UI controls to select Pan, Orbit, or Zoom. For action shots, try dynamic tracking presets.

Step 4: Enable Loop (Optional)
If this is for a website background or social media, check the “Loop” box. Ray 3 is exceptionally good at creating seamless start-to-end transitions.

Step 5: Generate
Hit the generate button. You will receive your video for review—inspect it for visual quality and physics accuracy before final use.

Mastering Image-to-Video: Using Keyframes for Precise Control

This is where Luma Dream Machine becomes a professional tool. Image-to-Video allows you to upload a reference image so the AI knows exactly what your subject looks like.

Start Frame vs. End Frame (Keyframes):
You can upload a Start Frame (where the video begins) and an End Frame (where it finishes). Luma calculates the pixels in between.[4]

How to Use Keyframes:
Click the image icon to upload reference frames. The first slot defines your starting point, and the second defines your ending point. This is perfect for transitions, like aging a face or moving a car from point A to point B.

Character Consistency:
To keep a character looking the same across multiple videos, use the Photon model to generate your character first. Then, use that image as the “Start Frame” for every video generation.

Enhance Prompt Toggle:
There is a magic wand icon called “Enhance Prompt.” Turn this OFF if you have a very specific vision. Turn it ON if you want Luma to add creative details you didn’t think of.

Luma Dream Machine Keyframes interface showing start and end frame upload slots for precise video control.
The Keyframes feature allows you to control the exact beginning and end of your AI video generation.

Advanced Features: Modify, Extend, and Reframe

Rarely is the first generation perfect. Luma’s post-production tools allow you to fix videos without burning credits on a fresh start.[4]

Modify with Instructions:
This is essentially “In-painting” for video. Highlight a region (like a shirt) and type “change to red leather jacket.” Ray 3 tracks the object through the frames and updates the texture.

Extend Video:
Videos can be extended beyond their initial length. To make longer clips, use the “Extend” feature and provide a new prompt for the continuation (e.g., “the car drives off into the sunset”).[4]

Reframe (Aspect Ratio Conversion):
Did you make a horizontal video but now need it for TikTok? Use the Reframe tool. It intelligently expands the video dimensions to fill different aspect ratios.[4]

Luma Dream Machine Prompt Engineering: The Secret to Hyper-Realism

To get “battle-tested” results, you need to speak the language of the model. Ray 3 responds best to Physics-Based Prompting.

Describe Weight and Texture:
Don’t just say “rain.” Say “heavy rain splashing on pavement, creating ripples.” Describing the interaction triggers the physics engine.

Using Syntax Tags:
Use @character followed by a name (if you have defined one in your Boards) to reference specific assets. Use @style to reference a specific artistic vibe (e.g., “@style cyberpunk”).

Bad vs. Good Prompting:

Bad: “A cat running.”
Good: “Cinematic low-angle shot, a fluffy Maine Coon cat sprinting across wet cobblestones, motion blur, 4k, highly detailed fur texture, rim lighting.”

Text Rendering:
Ray 3 can render text. If you need a sign, put the text in quotes: a neon sign that says “OPEN 24/7”. Results may vary, but modern models handle this much better than earlier versions.

Luma Dream Machine Pricing & Plans: Which Tier Fits Your Workflow?

Luma operates on a credit system. As of November 2025, pricing is designed for both individual creators and teams. Current market rates suggest entry-level options start around $4–9.99/month.[4]

Plan Estimated Price (Monthly) Credits / Features Best For
Free $0 Limited generations
Non-commercial
Testing & Exploration
Entry Tier $4–9.99 3,200+ Credits
720p baseline
Hobbyists & Creators
Professional Varies Higher credit allowance
4K support
Commercial rights
Freelancers & Agencies

The Math on Credits:
Video generation costs vary by model and resolution. Standard video generation typically costs between 400–800 credits depending on quality settings.[4] Verify exact pricing on the official Luma Labs website, as rates are subject to change.

Commercial Rights:
Be aware that free tier videos are designated for non-commercial use. Commercial licensing requires a paid subscription tier. Always verify licensing terms on the official site before monetizing any generated content.

💡 Expert Verdict

For any professional workflow involving client work or monetization, a paid subscription is required. Free tier is suitable for experimentation. Always confirm current pricing directly on lumalabs.ai, as pricing structures may be updated regularly in 2025.

Try Luma Dream Machine Today

(Disclosure: We recommend verifying all pricing and features directly on the official Luma Labs website before purchase, as terms may have been updated. Links provided for informational purposes.)

Frequently Asked Questions About Luma Dream Machine

Is Luma Dream Machine free?
Yes, Luma offers free tier access with limited generations. However, these are designated for non-commercial use only.

How long can Luma videos be?
Initial video generation produces clips up to 10 seconds in duration.[4] Videos can be extended further using the Extend feature, though longer sequences may experience coherence degradation.

Can I use Luma videos for YouTube monetization?
Commercial usage requires a paid subscription with commercial licensing rights. Free tier content is restricted to non-commercial personal use only.

Luma Dream Machine vs. Runway Gen-3: Which is better?
Ray 3 excels at physics accuracy and character consistency. Runway offers more granular motion control. Choice depends on your specific creative needs. For realistic physics-based shots, Luma is highly competitive.[4]

Read More From AI Generative Video

Explore more tools and comparisons to find the perfect fit for your creative workflow.

last update : 28/11/2025

“` —