How to Use D-ID (2025) The Ultimate Guide to AI Video Generation (Studio & API)
How to Use D-ID: The Ultimate Guide to AI Video Generation (Studio & API)
In the high-stakes world of digital marketing, speed is everything. Learning how to use D-ID isn’t just a technical skill; it’s a survival tactic for creators facing immense performance pressure to produce video content at scale.
We aren’t just talking about another video editor. D-ID allows you to automate facial animation, turning static text or audio into professional presenters in minutes.
In this AI Avatar Generator guide, we will break down the exact workflows for both the Creative Reality Studio (for creators) and the API (for developers). By the end, you will know exactly how to transform a single photo into a speaking avatar.
Table of Contents
Getting Started: What Is D-ID and Who Is It For?
D-ID is an AI video generator platform that specializes in deep learning facial animation. Unlike Synthesia which focuses on corporate avatars, D-ID excels at Photo Animation, bringing still images to life.
Our testing confirms that D-ID primarily serves three groups: Marketers needing quick social content, Creators making character-driven videos, and Developers automating workflows via API.
You can access the platform through two main gateways: the Creative Reality Studio (a visual dashboard) and the API (for code-based generation). Both share the same underlying credit system.
Before we dive into the tutorial, here are the key use cases where D-ID shines:
Social Media Content: Create speaking influencers or mascots. E-learning Modules: Turn text courseware into engaging video lessons. Personalized Marketing: Send video emails addressing clients by name.
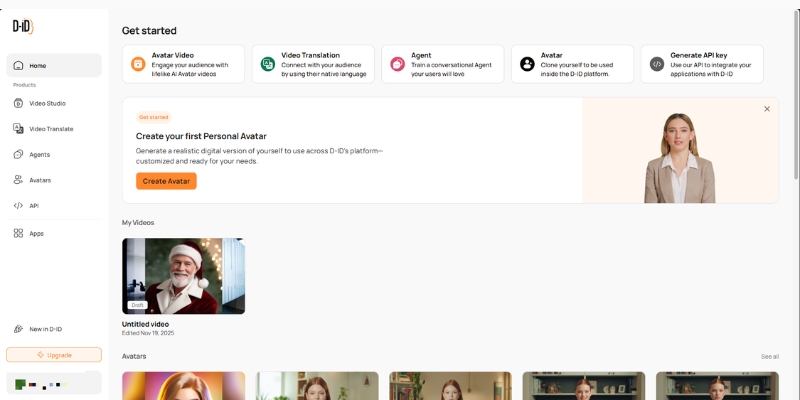
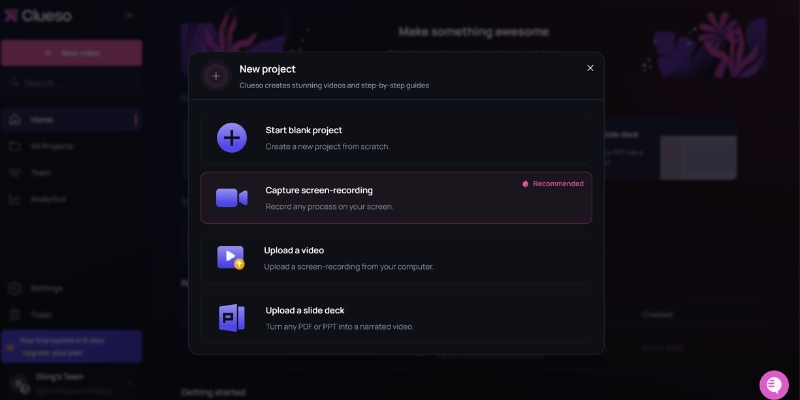
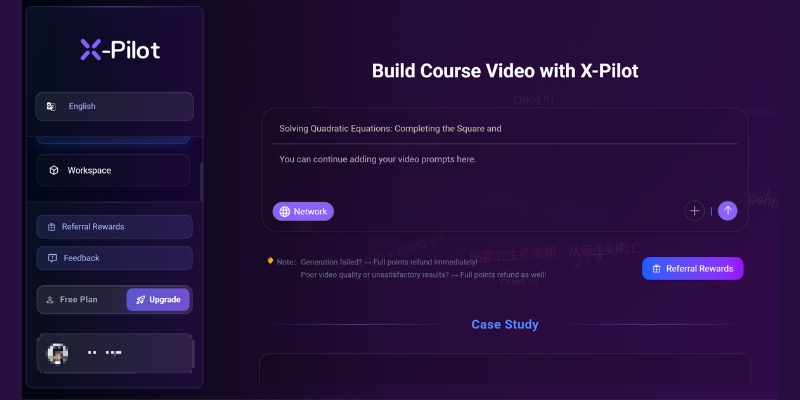
The D-ID dashboard acts as your central hub for creating videos and managing credits.
Step-by-Step Guide: Using D-ID Creative Reality Studio
This section is your battle-tested walkthrough for the Creative Reality Studio. We have stripped away the fluff to focus on the actual logic of the dashboard.
Step 1: Account Setup & Dashboard Navigation
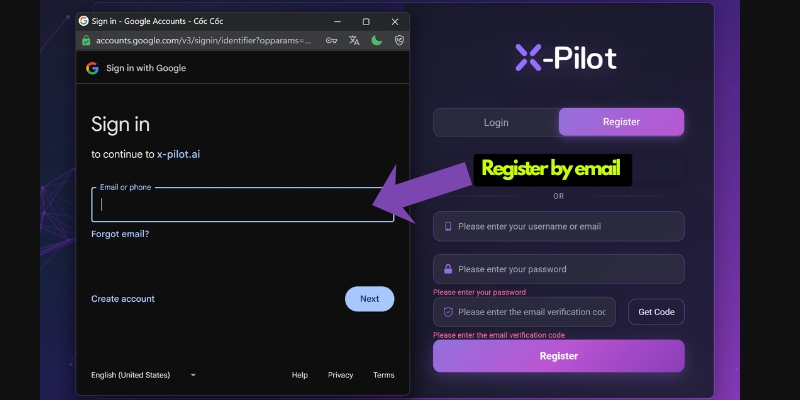
First, head to the D-ID website and sign up for a free trial. Once logged in, locate the purple “Create Video” button on the left sidebar. This initializes the studio interface.
Step 2: Choosing Your Presenter
You have three options here. You can select a standard HQ Avatar (high fidelity), generate a new AI face using a text prompt, or click “Add” to upload your own photo. We recommend starting with a standard avatar to test the waters.
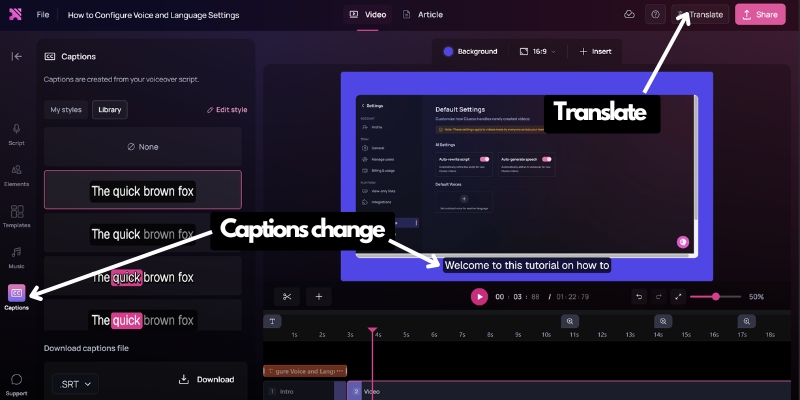
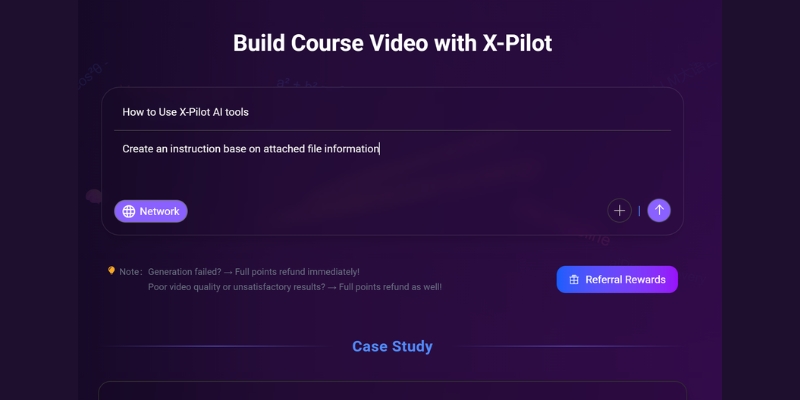
Step 3: Inputting the Script or Audio
On the right panel, you will see the script box. You can type your text directly or use the built-in GPT integration to write it for you. For better lip-sync, we strongly suggest uploading a real human voice recording using the “Audio” tab.
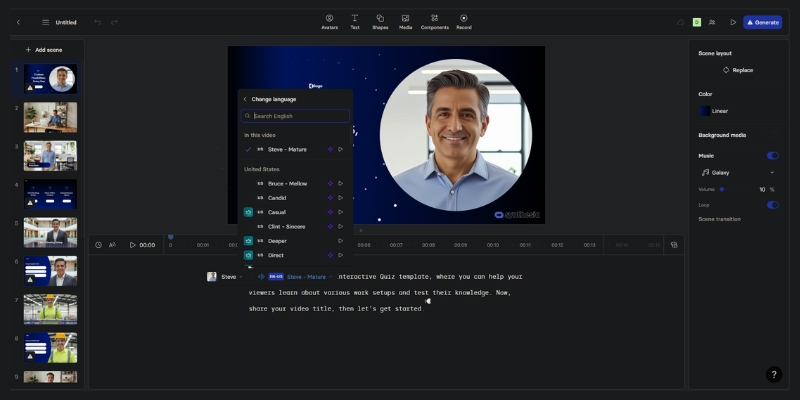
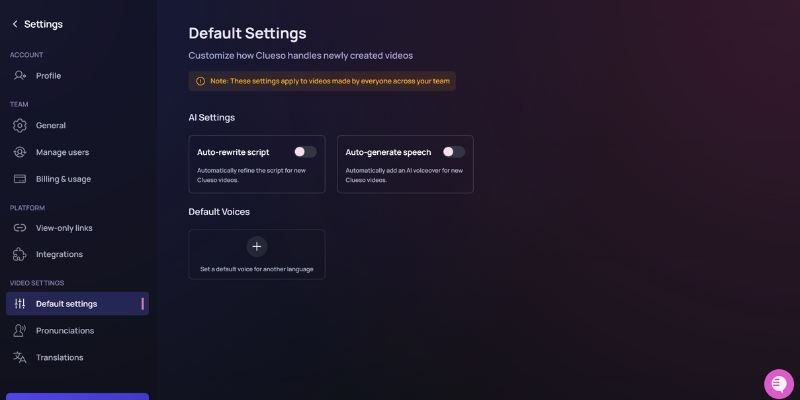
Step 4: Selecting Voice and Language
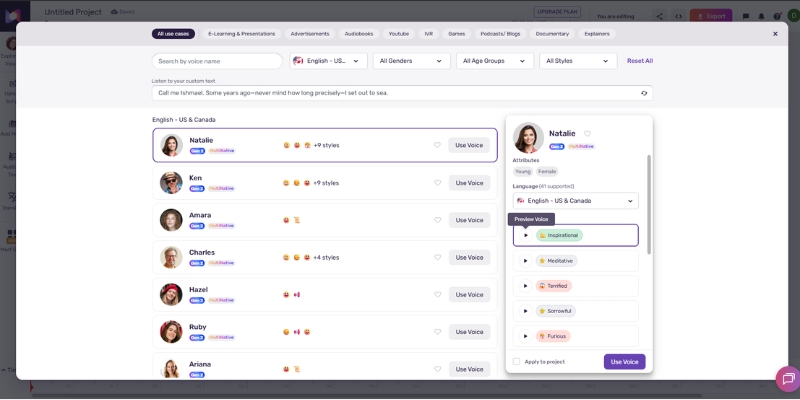
If you use text-to-speech, browse the voice library. You can filter by language, accent, and style (e.g., “Assistant” or “Cheerful”). Listen to previews to ensure the voice matches the avatar’s appearance.
Step 5: Generation and Export
Click “Generate Video” in the top right. A popup will show the credit cost (usually 1 credit per 15 seconds). Confirm the action, wait for the rendering to finish, and then download your MP4 file.
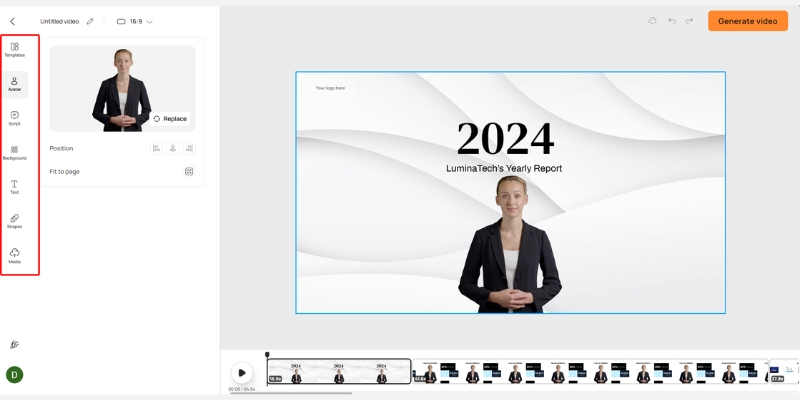
The editor layout allows you to pair scripts with avatars seamlessly.
How to Use D-ID to Animate Static Photos (Custom Avatar)
The most unique feature of D-ID is Photo Animation. This allows you to upload a photo of an ancestor, a historical figure, or a custom mascot and make them speak.
Preparing Your Image
The AI works best with a front-facing photo. Ensure the subject has their mouth closed and eyes open. Avoid images where hands or objects cover parts of the face, as this confuses the animation algorithm.
Uploading to the Studio
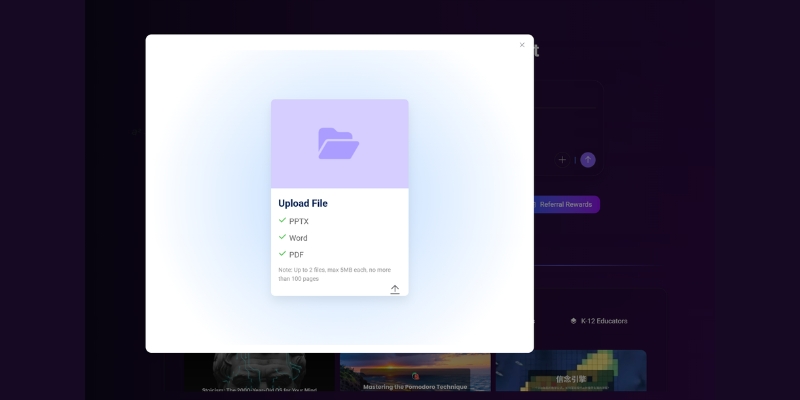
In the “Choose a Presenter” section, click the circular “Add” button. Select your prepared JPEG or PNG file. The system will process the face and add it to your library.
Fine-Tuning the Animation
Once uploaded, select your custom face. Note that the head movement range is limited compared to 3D avatars. It works best for “talking head” videos where the focus is on the message, not complex body language.
D-ID API Tutorial: A Workflow for Developers
For developers building apps, the D-ID API offers a robust way to integrate video generation programmatically. Here is the logical flow you need to implement.
Authentication
First, get your API Key from the “Settings” > “API Key” section of your account. You will use Basic Authentication (combining your API key with your password/secret) for all requests.
Creating a Talk (POST Request)
Send a POST request to the /talks endpoint. You must provide a `source_url` (link to your avatar image) and the `script` (text or audio URL). This initiates the render process.
Retrieving the Result (GET Request)
Video generation is asynchronous. The initial response gives you an ID. You must poll the /talks/{id} endpoint until the status returns “done”. The response will then contain the `result_url` (your video).
Stream API
For real-time applications like AI chatbots, investigate the “Streams” endpoint. This establishes a WebRTC connection, allowing for low-latency video streaming ideal for conversational interfaces.
Integrating D-ID with Canva for Social Media Content
If you design in Canva, you don’t need to switch tabs. D-ID has a native app integration that streamlines the workflow for creators.
Installing the D-ID App in Canva
Open any Canva design and click “Apps” on the left sidebar. Search for “D-ID AI Presenters” and click to install it. You will see the familiar D-ID interface load inside Canva.
Connecting Your Account
You will need to log in to your D-ID account within the Canva window. This links your existing credits to the Canva session.
Generating Inside the Design
Select an avatar, type your text, and click generate. The finished video will appear automatically in your “Uploads” folder in Canva, ready to be dragged onto your Instagram Story or presentation slide.
Battle-Tested Tips for Better D-ID Results
After generating hundreds of videos, we have discovered nuances that separate robotic outputs from professional content. Here is our expert advice.
Optimize Audio Quality
The built-in Text-to-Speech is decent, but uploading a pre-recorded voiceover (using ElevenLabs or your own voice) yields significantly better lip-sync results. Clear audio input drives better animation.
Image Selection Strategy
For custom photos, use a “Mid-shot” (shoulders and up). Close-ups can look distorted when the head moves, while full-body shots often lack facial detail. A passport-style framing is ideal.
Script Pacing
If you must use TTS, add punctuation heavily. Commas and periods create natural pauses. You can also use “break” tags (if supported by the specific voice engine) to control the rhythm of the speech.
The Verdict
D-ID is currently the market leader for animating static photos. While HeyGen might offer slightly better 3D avatars, D-ID’s API flexibility and creative “Photo Animation” feature make it indispensable for unique campaigns.
(Disclosure: If you purchase through links on this page, we may earn a small commission at no extra cost to you. This helps us maintain our “battle-tested” reviews.)
D-ID Pricing and Credit System Explained
Understanding the cost is crucial. D-ID operates on a “credit” model, where 1 credit typically equals up to 15 seconds of video generation.
Free Trial: You get a small number of credits (usually 20) to test the tool. However, videos will have a watermark and cannot be used for commercial purposes.
Lite Plan: This entry-level paid plan removes the watermark. It is best for hobbyists who need clean video but don’t require massive volume.
Pro & Advanced Plans: These tiers unlock commercial rights, higher credit limits, and access to premium voices. If you are an agency, you need the commercial license included here.
Is D-ID free to use?
It offers a free trial with limited credits (usually 5 minutes of video). However, these videos are watermarked. To remove the watermark and gain commercial rights, you must upgrade to a paid plan.
Can I use D-ID videos for YouTube monetization?
Yes, but only if you are on the “Pro” plan or higher. The Lite plan is generally for personal use, and the Trial plan definitely does not convey commercial rights.
How does D-ID compare to HeyGen?
D-ID is superior for animating static images (bringing photos to life). HeyGen is generally considered better for realistic, high-fidelity AI avatars that look like real humans.
Does D-ID support multiple languages?
Yes, the platform supports over 100 languages. The lip-sync technology automatically adjusts the mouth movements to match the phonemes of the selected language.
Read More From AI Avatar Generator
Deepen your knowledge about AI video creation with these related guides and comparisons from our expert hub.
How to Use Murf AI: A Step-by-Step Guide for Professionals (2025)
How to Use Murf AI: A Step-by-Step Guide for Professionals (2025)
Learning how to use Murf AI effectively is the fastest way to scale your audio production without a recording studio. Whether you are creating voiceovers for e-learning modules or narrations for YouTube, mastering this tool connects you directly to a professional Text-to-Speech (TTS) workflow.
As a key player in the AI Avatar Generator and voice synthesis space, Murf offers more than just robotic reading. It provides a complete audio engineering suite in your browser.
In this battle-tested guide, I will walk you through the exact process we use to produce broadcast-ready audio. You will learn to navigate the Murf Studio, master the Voice Changer, and export high-quality content ready for your audience.
Table of Contents
Getting Started with Murf Studio: Interface & Workflow Overview
When I first logged into the Murf Studio, I was relieved to see how clean the layout was compared to traditional audio software. It avoids the clutter of complex DAWs, focusing instead on a drag-and-drop experience tailored for marketers and creators.
The Studio Interface is divided into three logical zones. On the Left Sidebar, you find your asset menu, including the Voice Changer, Stock Media, and Uploads. This is your resource bank.
In the Center Canvas, you interact with your script. Murf treats text as individual “Blocks,” allowing you to manipulate specific paragraphs without affecting the whole project. This is where 90% of your work happens.
At the Bottom Timeline, you will see the audio waveform synced with any video or images you add. It resembles a simplified video editor, making it intuitive for anyone who has used tools like Canva or Premiere Rush.
To begin, you simply click the “Create Project” button in the Dashboard. This launches the studio and prompts you to choose your output format.
The Murf Studio layout is designed for speed, separating assets, script, and timeline into three distinct zones.
Step-by-Step Guide to Creating Your First Voiceover Project
Creating a professional voiceover involves more than just pasting text. We have refined a workflow that ensures consistency and quality every time. Here is the exact path to go from a blank screen to a finished audio file.
Step 1: Start a New Project
From the dashboard, click “Create Project.” You will be asked to name your file and choose a use case. Select “Audio” for podcasts or “Video” if you plan to sync visuals.
Step 2: Enter Your Script
Click on the first Text Block in the center canvas. You can type directly or paste your script. For longer content like e-books, use the “Import Script” feature to upload a Word or .txt file, which Murf automatically splits into manageable blocks.
Step 3: Select a Voice from the Library
Click the circular avatar icon next to your text block. This opens the Voice Library. We recommend using the filters to narrow down by “Language,” “Gender,” and “Use Case” (e.g., Narration vs. Promo) to find the perfect match.
Step 4: Render the Audio
Unlike some tools that stream instantly, Murf requires you to “Build” the audio. Click the small “Play” triangle next to the text block. This triggers the Generate Audio process, converting your text into the selected AI voice.
Step 5: Preview and Build the Timeline
Once rendered, listen to the block. If it sounds good, move to the next paragraph. As you generate each block, they populate the bottom timeline, creating a seamless audio track.
The Voice Library allows you to filter over 120 voices by specific use cases to find the right tone for your project.
Mastering Advanced Editing: Pitch, Speed, and Pauses
Raw AI audio can sometimes sound flat or rushed. To create a truly Natural Sounding voiceover, you need to use Murf’s advanced editing controls. This is where you transform a robotic reading into a human-like performance.
Adjusting Pitch and Speed
Each text block has a “Settings” tab. We often increase the Speed slightly for punchy social media ads, or slow it down for complex training modules. The Pitch slider helps fine-tune the voice to sound younger (higher) or more authoritative (lower).
Adding Strategic Pauses
Don’t rely on commas alone. Use the “Add Pause” button to insert silence between sentences. We prefer the preset durations (Weak, Medium, Strong) because they feel more organic than manually entering 0.5s or 1.0s durations.
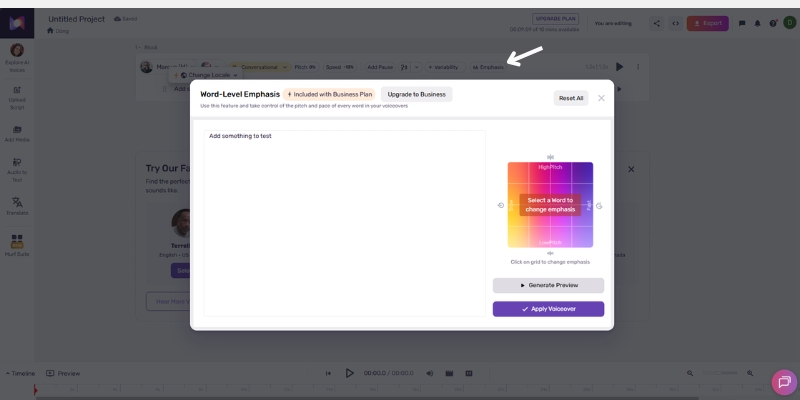
Using the Emphasis Feature
To make a specific point land, highlight the word in your script and click the “Emphasis” graph. You can increase the node to make the AI stress that word, mimicking how a real actor would deliver a key message.
Fixing Pronunciation
If the AI mispronounces a brand name, double-click the word and select “Pronunciation.” You can type the phonetic spelling (e.g., “Murph” instead of “Murf”) to force the correct sound.
The Emphasis feature lets you control the intonation of specific words, breaking the monotonic pattern of standard TTS.
How to Use Murf AI Voice Changer for Custom Content
The Voice Changer is one of Murf’s most powerful yet underused features. It allows you to record a rough draft on your phone and convert it into a studio-quality AI voice, preserving your original timing and emotion.
Step 1: Upload Your Audio
Navigate to the “Voice Changer” tab on the left sidebar. Click “Upload Audio” and select your Home Recording file (MP3 or WAV). This is ideal if you want to direct the pacing yourself.
Step 2: Transcribe the Audio
Murf will automatically analyze your file. Click “Transcribe” to convert your speech into editable text blocks. The system separates the audio into sentences, ready for the AI Voice swap.
Step 3: Select Target Voice
Choose the professional AI voice you want to “wear.” For example, swap your own voice for a professional “Promo” voice actor. The AI will map the new voice onto your original timeline.
Step 4: Sync and Download
The generated audio will match the length of your original clip. This is crucial for video dubbing, as it ensures the new voiceover stays in sync with any existing visuals.
Integrating Media: Syncing Voiceovers with Video and Images
Murf Studio is not just for audio; it functions as a lightweight Video Editor. This integration is perfect for creating explainer videos or social media clips without leaving the platform.
Step 1: Add Visual Assets
Go to the “Media” tab. You can upload your own footage or browse the built-in Stock Media library powered by Pexels. Drag your chosen video or image onto the timeline.
Step 2: Timeline Management
On the bottom timeline, you will see your audio track and video track stacked. Drag the edges of your image blocks to extend their duration so they align perfectly with the corresponding voiceover segment.
Step 3: Preview the Mix
Click the main “Play” button to watch the video with the voiceover. Check for sync issues—does the visual change exactly when the new topic starts? Adjust the block positions if needed.
Step 4: Add Background Music
Open the “Music” tab to find royalty-free tracks. When you add music, Murf automatically applies “Ducking,” which lowers the music volume whenever the voiceover is speaking, ensuring clarity.
You can build complete video projects by stacking voice, video, and background music tracks directly in the timeline.
Exporting High-Quality Audio and Team Collaboration
Once your project is polished, the final step is getting it out of the studio. Murf provides flexible Export Format options suitable for any platform, from Spotify to YouTube.
Export Options
Click the blue “Export” button in the top right. For audio-only projects, select MP3 or WAV (choose WAV for the highest quality). For video projects, select MP4. You can also choose the quality setting; we always recommend “High.”
Splitting Files
If you need each paragraph as a separate file (e.g., for an IVR system), check the “Split by Block” option. Otherwise, leave it as “Single File” to download the complete merged track.
Team Collaboration Features
For agencies, the Team Workspace is a lifesaver. You can create a project and click “Share” to send a link to a colleague. They can enter the studio, edit the script, or change the voice, streamlining the review process.
Expert Verdict
After using Murf for dozens of client projects, I consider it the most “editor-friendly” AI voice tool on the market. While it may not have the extreme voice cloning depth of some competitors, its workflow efficiency is unmatched. It allows you to build a full narrative, sync it with video, and export a finished product in minutes, not hours.
(Disclosure: If you purchase through links on this page, we may earn a small commission at no extra cost to you. This helps us maintain our “battle-tested” reviews.)
Frequently Asked Questions About Using Murf AI
Does Murf AI grant commercial rights?
Yes, but only on paid plans. If you are on the Free Trial, you cannot use the audio for commercial projects like YouTube monetization or ads. You must upgrade to the Starter plan or higher for full rights.
Can I use Murf AI directly in Canva?
Yes, Murf has a dedicated app integration within Canva. You can connect your account and generate voiceovers directly into your Canva video designs without switching tabs.
Is Murf AI hard for beginners?
No, the interface is designed to be intuitive. If you can use a word processor, you can use Murf. The drag-and-drop timeline simplifies the complex parts of audio editing.
How many languages does Murf support?
Murf currently supports over 20 languages, including French, German, Spanish, and Japanese. Each language comes with multiple accents and voice styles to suit different regional markets.
Read More From AI Avatar Generator
Deepen your understanding of AI video tools with our related guides and comparisons. These articles will help you choose the right stack for your content creation needs.
How to Use Vidnoz AI: The Ultimate Beginner’s Guide (2025)
How to Use Vidnoz AI: The Ultimate Beginner’s Guide in 2025 (Free Plan Strategy)
Learning how to use Vidnoz is the secret weapon for marketers who need to produce video content at scale without a Hollywood budget. As the demand for video skyrockets, manual production is becoming impossible to sustain.
You are likely looking for a smart way to automate this process using a free AI Avatar Generator. Whether you are a creator, freelancer, or business owner, you need tools that save time, not consume it.
In this battle-tested guide, I will walk you through exactly how to use Vidnoz for free, from creating your first avatar video to using the viral “Face Swap” feature.
Table of Contents
What Is Vidnoz AI & Why It’s a “Must-Try” for Creators?
Vidnoz AI is a specialized, free-focused AI Video Generator designed to remove the friction from content creation. It allows you to generate professional videos using digital avatars, eliminating the need for cameras, microphones, or actors.
When I first tested Vidnoz, I was skeptical about “free” tools. However, unlike many competitors that lock everything behind a paywall, Vidnoz offers a genuine “freemium” experience that lets you actually test the workflow.
For marketers under performance pressure, this tool is a lifesaver. It drastically reduces production time by allowing you to turn a simple text script into a polished video presentation in minutes.
It is not just about saving money; it is about speed. You can create tutorials, social media clips, and explainer videos without ever showing your face or recording your voice.
By using Vidnoz, you automate the most tedious parts of video production, freeing you up to focus on strategy and creativity.
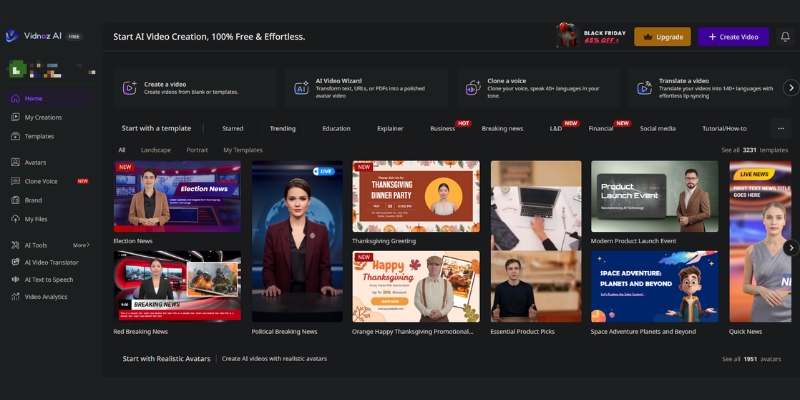
Vidnoz positions itself as a beginner-friendly platform for faceless video creation.
Getting Started: Setting Up Your Free Vidnoz Workspace
Getting access to the Vidnoz dashboard is incredibly straightforward. The platform has removed the biggest barrier to entry: the credit card requirement.
To begin, simply navigate to the site and sign up using your Google account. This instant login saves time and gets you straight to the workspace.
Once inside, you will see a clean, intuitive interface. The dashboard displays your available templates, avatars, and your remaining credits from your monthly allocation.
The “Free Plan” provides up to 60 minutes of video generation per month, plus an additional 1 free minute that refreshes daily. This structure allows you to experiment with multiple short clips consistently while the platform manages server costs.
I recommend familiarizing yourself with the left-hand menu. This is where you will find the “Avatar” library and “Templates” section, which are the building blocks of your first video.
(Disclosure: If you purchase through links on this page, we may earn a small commission at no extra cost to you. This helps us maintain our “battle-tested” reviews.)
Core Tutorial: How to Create Your First AI Avatar Video
This is the core of how to use Vidnoz effectively. We will turn a blank canvas into a speaking AI avatar video in five simple steps.
Step 1: Select a Template or Canvas
Click on “Create Video” in the top right corner. You must decide between “Landscape” (16:9) for YouTube or “Portrait” (9:16) for TikTok and Reels. Choosing the right ratio now saves editing time later.
Step 2: Choose Your AI Avatar
Browse the avatar library to find a “face” that matches your brand. If you are making a business tutorial, pick a professional avatar in a suit. For lifestyle content, choose a casual avatar.
Step 3: Input Your Script
Paste your text into the script box at the bottom. Vidnoz supports multiple languages. Keep your sentences short to ensure the AI delivers them with natural pacing.
Step 4: Customize Voice & Speed
Click the voice icon above the script. Listen to a few samples and select one that sounds natural. I recommend adjusting the speed to “1.0x” or slightly slower for better clarity.
Step 5: Preview & Generate
Hit the “Generate” button. On the free plan, processing might take a few minutes depending on server load. You will receive an email notification when your video is ready to download.
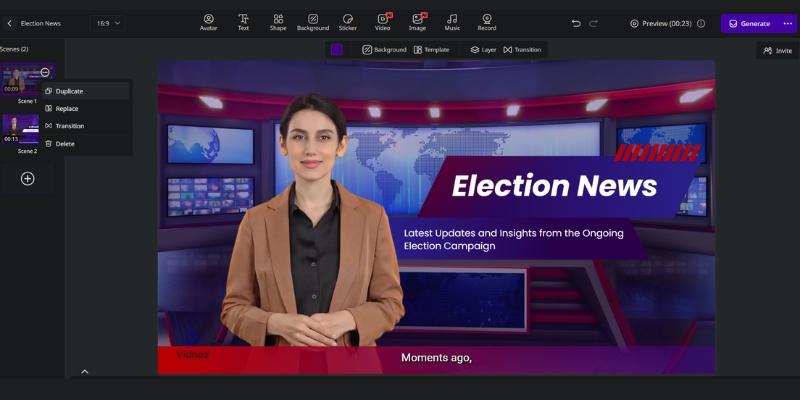
The editor is drag-and-drop simple, making it easy to sync your script with the avatar.
Viral Content Hack: How to Use Vidnoz Face Swap
The Vidnoz Face Swap feature is a favorite among social media creators. It allows you to place any face onto a video or image, perfect for memes or personalized content.
Creators use this to make viral content quickly. It is a fun, high-engagement tool that works differently from the standard avatar generator.
Upload Source Image/Video
Start by uploading the base video or image you want to alter. Movie clips or popular memes work best here. Ensure the file size is within the free limit.
Upload Target Face
Upload the photo of the face you want to swap in. For the best AI mapping results, use a clear, front-facing photo with good lighting. Avoid blurry selfies.
Download Result
Click “Swap Face Now.” This process is usually faster than generating a full avatar video. Download the result and share it directly to TikTok or Instagram.
Bringing Images to Life: How to Use the Talking Photo Feature
Another powerful tool in your arsenal is the Talking Photo feature. Unlike the standard avatars, this lets you animate any static image, such as a historical figure or a mascot.
This is excellent for educational content or unique brand storytelling where a standard human avatar doesn’t fit the narrative. On the free plan, you can generate up to 3 AI Photo Avatar (Talking Photo) creations per day, with the limit resetting automatically.
Upload Photo
Select “Talking Photo” from the dashboard. Upload a high-resolution headshot. The AI needs to clearly see the eyes and mouth to animate them correctly.
Add Script or Audio
You can type a script or, for better realism, upload a real voice recording. Using your own voice with a static photo often creates a more authentic connection.
Generate
The AI will animate the mouth and head movements to match the audio. While not as smooth as the 3D avatars, it is a fantastic tool for short, engaging clips.
Transform static portraits into speaking characters instantly
Maximizing the Free Plan: Limitations & Workarounds
To truly master how to use Vidnoz, you must understand the credit structure and constraints of the free plan. Transparency here is key to managing your expectations.
Understanding the Credit System
The free tier provides up to 60 minutes of video creation per month, plus an additional 1 free minute that refreshes daily. Your monthly 60-minute allocation doesn’t disappear—you can use it all at once or spread it throughout the month. The bonus 1 minute per day is perfect for quick tests and experiments without depleting your main allocation.
Dealing with the Watermark
Every video generated on the free plan will have a floating watermark. There is no “magic tool” to remove this for free. I suggest using these videos for internal drafts or proof-of-concept. The good news is that Vidnoz allows commercial use even with the watermark, making it viable for budget content creators.
Resolution & Duration Limits
Free exports are limited to 720p resolution, which is perfectly suitable for social media platforms like TikTok, Instagram Reels, and YouTube Shorts. Each individual video can be up to 60 minutes long, but your total monthly allocation (60 minutes + daily 1-minute bonuses) will determine how many videos you can create.
Credit Management
Don’t waste your credits on testing tiny changes. Use the “Preview” mode as much as possible before hitting “Generate.” The daily 1-minute bonus is ideal for quick experiments without touching your main 60-minute monthly pool.
Pro Tip: Use the free plan to validate your content idea. If a watermarked video gets good engagement on TikTok, that is your signal to upgrade and produce a high-quality version.
Vidnoz vs. HeyGen: Which Free Tool Should You Use?
When discussing free AI video tools, the comparison often comes down to Vidnoz vs. HeyGen. Both are powerful, but they serve slightly different needs for free users.
HeyGen is known for incredible lip-sync quality and more polished avatars, but their free plan is more restrictive with only 3 videos per month (3 minutes each).
Vidnoz, on the other hand, positions itself as the “Best Free Alternative.” It offers more flexibility with 60 minutes monthly plus daily 1-minute bonuses, making it better for volume testing and consistent daily practice.
If you are a beginner with zero budget looking to learn how to use Vidnoz for social media, Vidnoz is the superior starting point. Its generous monthly allocation (60 minutes) plus daily bonuses (1 minute) allow you to learn by doing consistently, whereas HeyGen’s 3-video monthly limit can stop your learning process too early. For high-volume testing and daily practice, Vidnoz wins.
Is Vidnoz completely free?
Vidnoz operates on a “Freemium” model. The free plan provides up to 60 minutes per month plus 1 additional minute per day, allowing you to create multiple videos consistently. You can use basic features and generate videos for free forever with watermarks, but advanced features and watermark removal require a paid subscription.
How to remove the Vidnoz watermark?
The only official way to remove the watermark is to upgrade to a Pro plan. Cropping the video is a workaround, but it often ruins the framing of your avatar.
Can I use Vidnoz videos for YouTube monetization?
Yes, Vidnoz allows commercial use even on the free plan, but videos will include a watermark. For professional monetized content without watermarks, a paid commercial license is recommended for better presentation quality.
Is Vidnoz safe to use?
Yes, Vidnoz is a legitimate AI platform. They comply with standard data privacy regulations. However, always be cautious about uploading sensitive personal photos to any AI cloud service.
Read More From AI Avatar Generator
Deep dive into our battle-tested comparisons and reviews to find the perfect tool for your specific needs.
How to Use ElevenLabs: The Ultimate Step-by-Step Guide for Beginners (2025)
How to Use ElevenLabs: The Ultimate Step-by-Step Guide for Beginners (2025)
If you are looking for how to use ElevenLabs to transform your content creation workflow, you have landed on the right guide. In the rapidly evolving world of audio synthesis and AI Avatar Generator tools, getting started can often feel overwhelming.
I have spent hundreds of hours testing this tool for my own projects. I know exactly where the hidden settings are and how to avoid common mistakes that lead to robotic-sounding audio.
In this elevenlabs tutorial, we will cover everything from basic Text-to-Speech (TTS) to advanced Voice Cloning. By the end, you will be able to Master the Voice Lab, generate professional voiceovers, and understand the ElevenLabs Pricing structure.
Table of Contents
What Is ElevenLabs? Understanding the Industry-Leading AI Voice Tool
ElevenLabs is a browser-based AI audio research platform capable of generating the most realistic speech, laughter, and emotion. It uses advanced Deep Learning to understand the context of text, not just read it.
In our detailed ElevenLabs review, we found that it consistently outperforms competitors like Murf AI in emotional nuance. It does not just speak; it acts.
The primary use cases for this tool include Video Voiceovers, Audiobooks, and Game Development. It is the engine behind many viral videos you see on TikTok and YouTube today.
Its core value proposition is simple: It solves the “robotic voice” problem. Marketers and Creators can now produce high-quality audio without expensive recording equipment or hiring voice actors.
The clean and intuitive interface of ElevenLabs allows for quick access to TTS and Cloning features.
How to Use Text-to-Speech (Speech Synthesis) in ElevenLabs
For most users, the journey begins with Speech Synthesis. This is the core feature where you turn written text into lifelike audio. Here is the step-by-step guide to ElevenLabs TTS workflow.
Step 1: Select Your Voice
Click on the voice dropdown menu. You will see a library of “Pre-made Voices.” I recommend picking a voice based on the tone you need. Use “Adam” for deep narration or “Bella” for a casual, conversational style.
Step 2: Configure Voice Settings
This is the technical core. Click “Voice Settings.” You will see a “Stability” slider. High stability makes the voice consistent but monotone. Low stability is expressive but can be unstable.
Pro Tip for Beginners:
Start with Stability at 50% and Clarity at 75%. This offers the best balance for general video voiceovers.
Step 3: Choose the Model
Ensure you select the correct AI model. Use “Eleven English v1” for speed, but switch to Eleven Multilingual v2 if you want the highest quality and better accent handling across 29 languages.
Step 4: Input Text & Generate
Paste your script into the text box. Pay attention to the character limit per generation (usually 2,500 to 5,000 characters depending on your plan). Click “Generate” and wait a few seconds.
Step 5: Download
Once the audio plays, check the bottom right corner for the download icon. You can also find all previous generations in the “History” tab if you forget to save immediately.
Fine-tuning Stability and Clarity is the secret to getting a natural, non-robotic performance.
Master the Voice Lab: How to Use ElevenLabs Voice Cloning
The feature that made this tool famous is Voice Cloning. However, you must understand the difference between the two types available in the Voice Lab.
Instant Cloning works with just 10-30 seconds of audio (or 1-5 minutes max for best results). Professional Cloning requires 1-3 hours of studio-quality audio for hyper-realistic results, perfect for creating authentic digital twins.
Accessing the Voice Lab
Navigate to the “Voice Lab” tab in the top menu. This is your command center for managing custom voices.
Add a New Voice
Click the large “+” button (Add Generative or Cloned Voice). From the options, select “Instant Voice Cloning” for quick results.
Uploading Samples
Upload your audio files here. Pro Tip: Upload clear audio without background music or noise. Even 10-30 seconds of high-quality audio is sufficient for impressive Instant Cloning results, though 1-5 minutes provides better quality.
Legal & Verification
You will see a checkbox requiring you to confirm you have the rights to the voice. This is a critical safety measure. Do not clone voices without permission.
Using the Cloned Voice
Once verified, click “Use Voice.” It will immediately appear in your Speech Synthesis dropdown menu, ready for text input.
Choose “Instant Voice Cloning” for speed or “Professional” for the highest fidelity.
How to Use “Projects” for Long-Form Content (Audiobooks)
If you are creating long YouTube videos or audiobooks, the standard window is too limiting. You need to use Projects.
I use this feature constantly because it allows for workflow management rather than just single-clip generation.
Creating a Project
Go to “Projects” and click “Create New Project.” You can import a URL (like a blog post) or upload a document (EPUB, PDF, txt). The AI will automatically layout the text.
Assigning Speakers
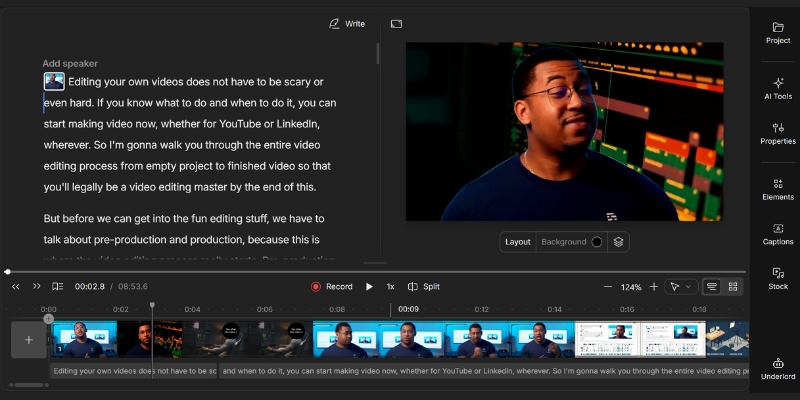
Highlight specific paragraphs and assign different voices to them. This is incredible for creating dialogue between characters in a story without exporting multiple files.
Regenerating Fragments
This is a huge time-saver. You can regenerate just one sentence inside a Project without re-doing the whole file. This saves your character credits and your time.
We use this feature to convert blog posts into full podcast episodes in minutes. It streamlines the entire production pipeline.
How to Use the AI Dubbing Studio for Video Localization
For creators looking to expand globally, the Dubbing Studio is a game-changer. It allows you to translate your content into 29 languages while preserving the original speaker’s voice.
Create a New Dub
Select the “Dubbing” tab from the main dashboard. Click “Create New Dub.”
Select Source & Target Languages
Choose your original language (e.g., English) and your target audience’s language from the 29 available options (e.g., Spanish, German, Japanese).
Upload Video/Link
You can upload an MP4/MOV file directly or paste a YouTube, TikTok, or X (Twitter) link. The system handles the download automatically.
Review & Edit
The AI detects speakers and timestamps. While it is accurate, always verify the translation. You can edit the translated script to correct any context errors.
This is the fastest way for creators to repurpose content for international audiences without hiring expensive voice actors.
ElevenLabs Pricing: Which Plan Is Right for You?
Before you commit, it is vital to check ElevenLabs Pricing to ensure you get the right ROI. Here is a breakdown of the plans.
Free Plan
Great for testing. You get 10,000 credits per month (approximately 20,000 characters for text-to-speech), but you must attribute ElevenLabs and you do not get commercial rights.
Starter Plan ($5/month)
The entry point for creators. You get 30,000 characters and Instant Voice Cloning. Ideal for hobbyists starting out.
Creator Plan ($11/month with 50% off first month)
This is the “Sweet Spot.” It includes 100,000 characters, Professional Voice Cloning, and higher quality audio output (192kbps). This is what most YouTubers use.
ROI Comparison:
Hiring a freelance voice actor on Fiverr can cost $100 per minute. With the Creator plan at $11/month (with 50% off first month), you pay significantly less for roughly 2 hours of audio. The savings are massive.
(Disclosure: If you purchase through links on this page, we may earn a small commission at no extra cost to you. This helps us maintain our “battle-tested” reviews.)
Final Verdict: Is ElevenLabs Worth It?
After using ElevenLabs extensively, I can confidently say it is the best AI voice generator on the market for realism. If you need emotional depth and “human” pauses, this is the tool to use.
For beginners, the learning curve is low. For professionals, the API and Voice Lab offer deep customization. It is an essential tool for any modern content creator.
(Disclosure: If you purchase through links on this page, we may earn a small commission at no extra cost to you. This helps us maintain our “battle-tested” reviews.)
Frequently Asked Questions About Using ElevenLabs
Can I use ElevenLabs for free?
Yes, the Free plan gives you 10,000 credits per month (approximately 20,000 characters for text-to-speech). However, you must credit ElevenLabs in your content, and you cannot use the audio for commercial purposes.
Do I own the commercial rights?
You own the commercial rights to any audio generated on a paid plan (Starter and above). This allows you to monetize YouTube videos and run ads.
Is ElevenLabs safe to use?
Yes. ElevenLabs has implemented strict safety measures. They require voice verification (captcha or text reading) to prevent deepfakes of public figures without permission.
How do I access the ElevenLabs API?
Developers can access the API key by clicking on their profile icon and selecting “Profile + API Key.” This allows you to integrate the TTS engine into your own apps.
How to delete a cloned voice?
Go to the Voice Lab, find the voice you want to remove, click the flask icon or settings detailed view, and select “Delete.” This frees up a slot for a new clone.
Read More From AI Avatar Generator
Explore more guides and comparisons to enhance your AI video production workflow:
How To Use Synthesia: A Step-by-Step Guide For Marketers (2025)
How To Use Synthesia: A Step-by-Step Guide For Marketers (2025)
If you are figuring out how to use Synthesia, you are likely feeling the pressure to produce more video content in less time. Marketers and freelancers today are constantly battling the bottleneck of traditional video production.
Synthesia is an AI Video Generator that solves this by replacing cameras and actors with code. By mastering this tool, you can scale your AI Avatar Generator workflows and reduce production costs significantly.
In this guide, I will walk you through exactly how to use Synthesia from your first login to exporting a professional video, focusing on practical steps that save you hours of work.
Table of Contents
Understanding the Tool: What Is Synthesia & How Does It Work?
Before we dive into the tutorial, it is crucial to understand that Synthesia is an AI Video Generator platform. It does not require you to film anything. It converts text into professional video content.
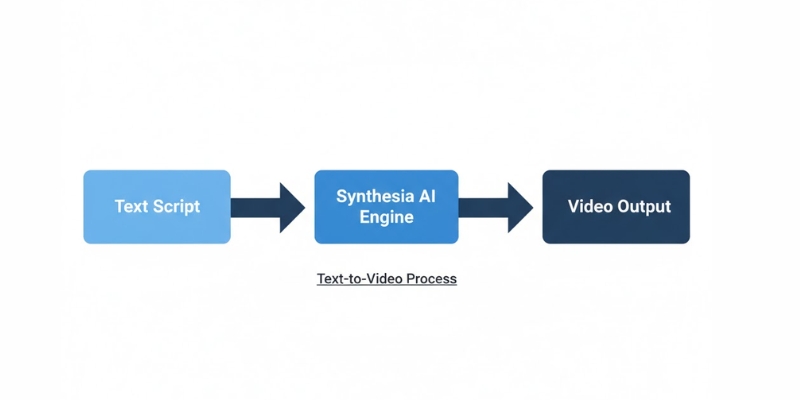
The core mechanism of Synthesia transforms simple text into a fully produced video.
The core technology relies on Text-to-Speech and deep learning algorithms. When you type a script, the AI engine analyzes the phonemes and animates the AI Avatar to sync its lips and facial expressions perfectly.
For us marketers, this means we can bypass the expensive “Video Production” phase entirely. You don’t need a studio, lighting gear, or a microphone. The input is a simple script, and the output is a high-definition video.
I use this tool because it validates the shift from manual labor to automation. The speed is unmatched; what used to take me three days of filming and editing now takes 15 minutes on my laptop.
Getting Started: Navigating the Synthesia Studio Dashboard
When you first log in to the platform, you land on the Studio Dashboard. As a beginner, the interface is clean and intuitive, designed to get you to the “Create Video” stage immediately.
I noticed that the layout is very similar to presentation tools like PowerPoint. This familiarity lowers the learning curve significantly. You don’t need to be a video editor to understand where things are.
The Dashboard Home:
Here you will see your recent videos. At the top right, the most important button is Create Video. This is where your workflow begins.
The Sidebar:
On the left, you have tabs for Templates, Avatars, and your specific Brand Kit. I recommend exploring the Templates tab first to see what is possible.
The Synthesia Studio interface is designed for ease of use, similar to slide deck builders.
The Canvas:
Once you start a project, the center screen is your visual canvas. Below it is the script box where you will type your content. It is a drag-and-drop environment that feels very responsive.
The Core Workflow: How to Use Synthesia to Create a Video in 5 Steps
This is the meat of the process. I have used this exact workflow to generate hundreds of videos for clients. Follow these steps to ensure you get a high-quality result every time.
Step 1: Choose a Professional Template
Never start from scratch if you are new. Click on “Templates” and select a category like “Corporate Training” or “Sales Pitch”. These templates have pre-designed layouts that look professional instantly.
Step 2: Select Your AI Avatar
Click on the avatar in the canvas to swap it. Choose a Stock Avatar that fits your brand’s tone. I usually pick an avatar with “Business Casual” attire for B2B content to build trust.
Step 3: Input Your Script & Select Language
Type or paste your text into the script box at the bottom. Synthesia supports 140+ languages and accents. If you are targeting a global audience, this is where you switch from English to Spanish or French instantly.
The script box is where you control exactly what the AI avatar will say
Step 4: Customize Voice & Add Media
Next to the script, select a Voiceover. You can filter by accent and style (e.g., “Calm” or “Energetic”). I always listen to the voice preview to ensure it matches the avatar’s face.
Step 5: Generate & Export Video
Once you are happy with the scenes, click “Generate”. The AI will render the lip-syncing. After a few minutes, you can Export the video as an MP4 or share a link directly.
Pro Tip: I recommend creating a Short AI Video (under 30 seconds) for your first attempt to understand the rendering speed without using too many credits.
(Disclosure: If you purchase through links on this page, we may earn a small commission at no extra cost to you. This helps us maintain our “battle-tested” reviews.)
Mastering the Script: How to Write for AI Avatars
An AI video is only as good as the Script you feed it. If your text is robotic, the avatar will sound robotic. I have learned that writing for the ear is different from writing for reading.
Control the Pacing:
Use punctuation strategically. Commas create short pauses, and periods create longer stops. If the avatar speaks too fast, I add more commas to slow down the delivery.
Use Phonetic Spelling:
Sometimes the AI mispronounces brand names or acronyms. In these cases, I use phonetic spelling. For example, I might type “Syn-thee-zia” instead of “Synthesia” to get the pronunciation perfect.
Add Gestures:
You can command the avatar to move. In the script editor, you can insert “Gestures” like head nods or eyebrow raises. I use these to emphasize key points in the message.
Beyond the Basics: Using Personal & Studio Custom Avatars
If you are investigating Synthesia for a large brand or personal use, you might want more than stock options. This is where the Custom Avatar features shine, offering two distinct options for different needs.
Creating a Personal Avatar (Quick & Easy):
You can create a Personal Avatar with just 2-3 minutes of webcam footage. No green screen required. Simply record yourself speaking naturally, and the AI will generate your digital twin. This is perfect for individuals and small teams wanting a personalized touch without professional filming equipment.
Studio Avatar (Enterprise-Grade):
For brands requiring the highest quality, Studio Avatars offer professional-grade results. This involves filming with professional equipment and lighting. Studio Avatars cost an additional $1,000 per year and take up to 10 days to process, but deliver unmatched realism and polish for corporate communications.
Voice Cloning Technology (Enterprise Feature):
Paired with custom avatars, Voice Cloning allows the AI to speak with your actual voice in 32 supported languages. This Enterprise-only feature is powerful for maintaining brand consistency across thousands of videos without you recording a single word. The AI can generate new scripts in your voice, perfect for scaling CEO messages or personal brand content globally.
Real-World Applications: When Should You Use Synthesia?
Synthesia is not just a cool toy; it is a business tool. I primarily see Marketers and Freelancers achieving high ROI in three specific areas where traditional video fails.
Corporate Training & Onboarding:
Replace boring PDF manuals with engaging videos. Employees retain information better from video. You can update the script and re-generate the video whenever policies change.
Explainer Videos:
For SaaS companies, creating product demos is tedious. Synthesia allows you to screen record your software and overlay an avatar to explain the features clearly and consistently.
Personalized Sales Outreach:
Sales teams use this to send unique videos to leads. Mentioning a prospect’s name and company in a video dramatically increases response rates compared to cold emails.
Expert Tips: Making Your AI Video Look Less “Robotic”
A common fear is that AI videos look fake. While the tech isn’t 100% human yet, there are expert tricks I use to make the Natural Flow much more convincing.
Add Background Music:
Silence highlights the artificial nature of the voice. Always add a low-volume background track. It fills the “dead air” and adds emotion to the video.
Break Up Long Scenes:
Don’t let the avatar talk for 2 minutes straight in one shot. I use Scene Editing to switch between the avatar and full-screen images or text slides. This keeps the viewer’s eye moving.
Match Voice to Avatar:
Ensure the voice fits the face. A deep, authoritative voice on a young, casual avatar feels jarring. I spend time auditioning voices to find the perfect “Realistic” match.
Breaking up your video into shorter scenes makes the content more engaging and less robotic.
Frequently Asked Questions About Using Synthesia
Is Synthesia hard to learn for beginners?
No, it is designed for non-technical users. If you can use PowerPoint or Canva, you can use Synthesia. The drag-and-drop interface is very forgiving.
Can I use my own voice in Synthesia?
Yes. You can either upload a pre-recorded audio file (and the avatar will lip-sync to it) or use the Voice Cloning feature (Enterprise-only) to generate new audio from text using your voice replica in 32 languages.
How long does it take to render a video?
It depends on your plan and video length. Enterprise users typically see renders under 5 minutes, Creator plans average 8-12 minutes, and Free plans use background processing with no guaranteed timeframe.
Does Synthesia integrate with PowerPoint?
Yes, there is a direct import feature. You can upload a PowerPoint file, and Synthesia will convert the slides into video scenes, placing the avatar automatically.
Is there a free trial?
Yes, Synthesia offers a free plan with 36 minutes per year (3 minutes per month), giving you access to 9 avatars, 140+ languages, and professional templates to fully test the platform. Check our Synthesia Review for the latest details.
Final Verdict
Synthesia is the most robust tool for scaling video production without a camera. It’s perfect for training, explainers, and personalized sales.
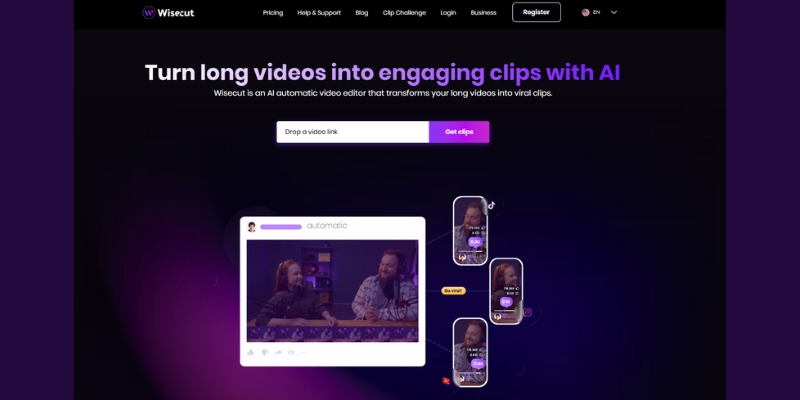
How to Use Loom in 2025: Complete Step-by-Step Guide for Screen Recording Success
Loom homepage hero section with dual CTA options for free signup
Loom is a cloud-based video messaging platform that records your screen, camera, or both simultaneously for asynchronous communication. With over 25 million users worldwide and AI-powered features that launched in 2024, Loom transforms how teams share knowledge without scheduling endless meetings.
This guide walks you through every feature Loom offers in 2025—from initial setup to advanced AI editing tools. Whether you’re creating tutorial videos for clients, onboarding new employees, or building course content, you’ll learn exactly how to maximize Loom’s capabilities and decide if it’s the right investment for your workflow.
[ez-toc]
What Makes Loom Different from Traditional Screen Recorders
Loom separates itself from competitors like OBS Studio or Camtasia through instant cloud upload and shareable links. Record a video, and within seconds you have a URL to paste anywhere—no file exports, no upload waits, no storage management.
The platform combines three recording modes in one tool: screen only, camera only, or screen with camera bubble overlay. This flexibility suits multiple scenarios—software demos need screen-only mode, while personalized sales videos benefit from the face-on-screen approach that builds trust.
Since Atlassian’s acquisition in October 2023, Loom integrates seamlessly with Jira, Confluence, and the broader Atlassian ecosystem. Enterprise teams now embed Loom videos directly in project documentation, bug reports, and team spaces without switching platforms.
The 2024 AI revolution introduced features that automatically remove filler words, generate video titles, create chapter markers, and transform recordings into text documents. These enhancements reduce editing time by up to 70% according to Business + AI plan users.
Curious about how Loom stacks up against video messaging competitors in pricing and features? Our comprehensive Loom vs Clueso comparison: which async video tool wins in 2025 breaks down recording quality, AI capabilities, integration ecosystems, and total cost of ownership for teams of all sizes.
Understanding Loom Pricing and Plans Before You Start
Loom offers four distinct tiers designed for different use cases and team sizes. Understanding the differences helps you avoid upgrading mid-project when you hit feature limitations.
Starter Plan (Free): Record up to 25 videos with a 5-minute limit per video for unlimited workspace members. Features include 720p recording quality, screen + camera capture, virtual backgrounds, transcriptions in 50+ languages, and basic viewer analytics. This plan suits testing Loom’s interface and creating short tutorial clips, but the 5-minute restriction prevents longer walkthroughs.
Business Plan ($15/month annually): Removes all recording and video count limits while adding 4K recording resolution, custom branding removal, video uploads, trim and stitch editing, password protection, and detailed engagement analytics. Teams producing regular content—like marketing departments or course creators—need Business minimum to maintain professional output.
Business + AI Plan ($20/month annually): Adds the complete AI suite including auto-generated titles, summaries, and chapter markers; filler word and silence removal; AI-powered workflows that convert videos to documents or Jira tickets; and automatic call-to-action suggestions. Unlike competitors charging per AI use, Loom provides unlimited AI processing for this fixed price.
Enterprise Plan (Custom pricing): Averages $44,000 annually for sales-led contracts according to Vendr data, scaling based on seat count and integrations required. Adds Single Sign-On (SSO), SCIM provisioning, advanced content privacy controls, custom data retention policies, Salesforce deep integration, and dedicated support.
Loom offers a 14-day free trial of Business + AI that reverses to your selected plan afterward rather than blocking access entirely. All new users should activate this trial immediately to test AI features with actual work scenarios before committing.
Still weighing whether Loom deserves a place in your video toolkit? We tested its AI accuracy, recording stability, RAM usage, and real-world performance across 50+ videos. Check out our unbiased Loom review 2025: AI features tested by content creators to see how it performed against Vidyard, Arcade, and Zight in head-to-head comparisons.
Table suggestion:
Feature
Starter (Free)
Business ($15/mo)
Business + AI ($20/mo)
Enterprise (Custom)
Video Limit
25 videos
Unlimited
Unlimited
Unlimited
Max Length
5 minutes
Unlimited
Unlimited
Unlimited
Recording Quality
720p
4K
4K
4K
AI Features
None
None
Full suite
Full suite
Custom Branding
No
Yes
Yes
Yes
SSO & SCIM
No
No
No
Yes
Getting Started: Creating Your Loom Account and Installing the Recorder
Setting up Loom takes less than three minutes from account creation to first recording. The platform prioritizes speed—no lengthy onboarding forms or feature tours blocking access to the recorder.
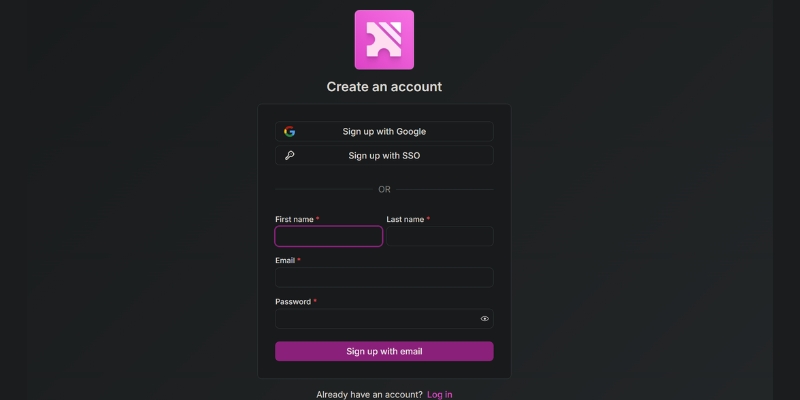
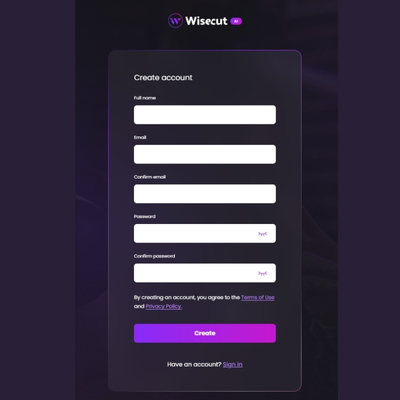
Account Creation Process
Navigate to loom.com and click the “Get Loom for Free” button located in the top navigation or hero section. Sign up using your Google account for fastest access without managing additional passwords. Work email addresses work equally well if your organization requires specific domain authentication.
After accepting terms, select your primary use case: Work, Education, or Personal Project. This choice customizes the dashboard layout and feature suggestions but doesn’t restrict functionality. Name your workspace using a descriptive identifier like “Marketing Team,” “Client Videos,” or “Course Content” to organize recordings from day one.
Skip the teammate invitation prompt during setup. Add collaborators later once you understand workspace roles and permissions to avoid confusion.
Loom account creation interface with Google sign-in option and workspace naming step
Installation Options: Choose Your Recording Platform
Loom offers multiple ways to start recording, each designed for different workflows and needs.
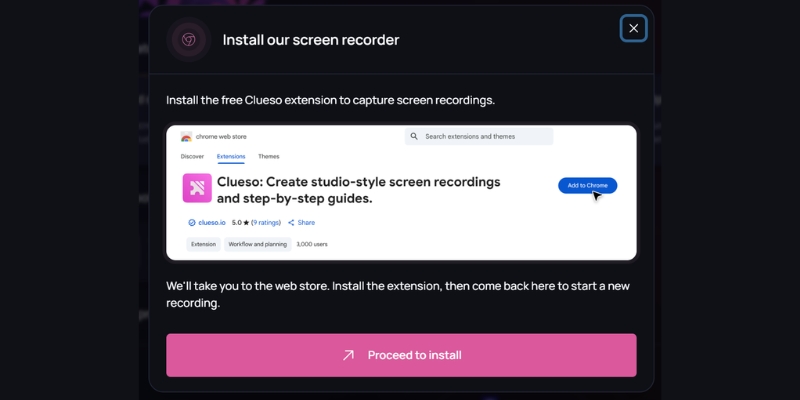
Chrome Extension (Browser-based): Install directly from Chrome Web Store for quick access. Record screen, camera, or both without downloading software. Perfect for occasional users and quick recordings up to 1080p. Works only with Google Chrome browser.
Desktop App (Mac & Windows): Download the full application for advanced capabilities including 4K recording (paid plans), offline recording, drawing tools with color options, speaker notes, and video recovery if processing fails. Recommended for regular users creating longer content.
Mobile Apps (iOS & Android): Record on-the-go with screen-only, camera-only, or audio-only modes. Share directly to Slack, Gmail, and messaging apps from your phone. Ideal for quick updates while traveling.
Quick recommendation: Start with the Chrome extension to test Loom’s workflow. Upgrade to the desktop app if you record frequently, need higher quality, or want advanced features like drawing tools and offline capability.
Loom provides flexible installation options—choose between the Chrome extension or desktop app for Windows and Mac to get started quickly.
Navigating Your Loom Dashboard
The dashboard centers around five primary sections accessible from the left sidebar :
Home: Displays recent videos, view counts, and the prominent “New Video” recording button. Your most-watched content appears at the top, helping you identify high-performing recordings worth repurposing.
My Library: Houses your complete video archive with search, filters, folders, and organizational tags. Create folders named by project, client, or video type to maintain structure as your library grows past 50 videos.
Notifications: Bell icon alerts show video views, comments, team member activity, and workspace updates. Enable desktop notifications in Settings to track engagement on important videos in real-time.
Spaces: Manages multiple workspaces for different clients, business divisions, or personal versus professional content separation. Switch workspaces using the dropdown menu in the top-left corner.
Settings: Controls personal preferences (profile, password, notifications) and workspace settings (branding, billing, members) depending on your role. Admins access billing and team management here.
Loom dashboard home screen
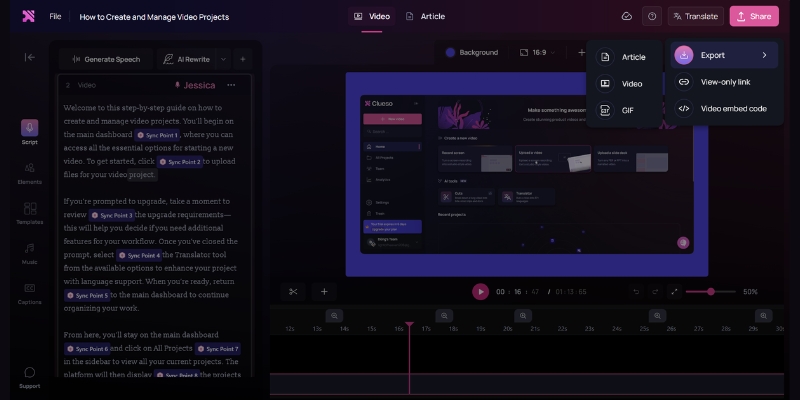
Recording Your First Loom Video: Complete Tutorial
Loom’s recording process follows a consistent four-step pattern: configure recording mode, select sources, start capture, and finish. The interface stays identical whether you use the Chrome extension, desktop app, or mobile application.
Configuring Recording Modes and Sources
Click the Loom extension icon in your browser toolbar or the “New Video” button in your dashboard to open the recording control panel. Three large buttons display your recording mode options :
Screen + Camera: Shows your face in a circular bubble while recording screen activity. This mode builds trust in sales videos, adds personality to tutorials, and helps viewers follow along with your facial expressions and gestures. Position the camera bubble in any corner by dragging it before recording starts—viewers see it exactly where you place it.
Screen Only: Captures screen activity without camera footage. Choose this for software walkthroughs where your face distracts from the interface, bug reports requiring clean screen captures, or documentation videos focusing purely on process steps.
Camera Only: Records talking-head videos without screen capture. Perfect for announcements, introductions, or personal messages where screen content adds no value.
After selecting a mode, choose your screen capture scope :
Entire Screen: Captures all monitors in multi-display setups
Application Window: Records a single program window (Figma, Slack, Chrome)
Current Browser Tab: Shows only the active Chrome tab, hiding other tabs and bookmarks bar
Select your microphone from the dropdown menu—built-in laptop mics, external USB microphones, or headset mics all appear here. Keep your microphone within 6-12 inches of your mouth for optimal audio clarity.
Loom recording mode selection interface showing three recording types screen and camera screen only camera only
Optimizing Recording Quality and Setup
Click “more” in the recording panel to access Settings before your first recording. These adjustments dramatically improve video quality and professionalism without requiring expensive equipment.
Video quality: Select your preferred recording resolution from the dropdown menu. Loom defaults to 1080p (Full HD) with “Auto chooses the best available option” enabled, which adjusts quality based on your internet connection and system performance. Business plan subscribers access up to 4K resolution for ultra-high-definition recordings.
Recording countdown: Toggle the 3-second countdown on or off before capture begins. Enable countdown for time to position your cursor, open the correct window, or take a breath before speaking. Disable it for instant recording when capturing time-sensitive content or spontaneous demonstrations.
Recording controls: Show or hide the bottom control bar (pause, finish, rewind buttons) during active recording. Hide controls for cleaner screen captures in final videos, though you’ll need to remember keyboard shortcuts: Cmd/Ctrl + Shift + L to finish recording.
Persist camera bubble location: When enabled, Loom remembers your camera bubble position from previous recordings and places it in the same corner automatically. Disable this if you frequently switch bubble positions for different content types.
Flip camera: Mirrors your camera horizontally if your webcam shows reversed images. Useful when recording with text or branded clothing that appears backward in standard camera orientation.
Enable notifications: Turn on desktop alerts when videos finish processing, receive views, or get new comments. Enable this setting if you need real-time engagement tracking for time-sensitive videos like sales demos or urgent announcements.
Show recording time: Displays an active timer during recording showing elapsed time. Enable this to stay within target video lengths and avoid rambling past your planned duration.
Beyond these technical settings, environment optimization matters more than resolution settings. Record in quiet spaces whenever possible rather than relying entirely on noise suppression. Microphone proximity dramatically affects audio quality—position your laptop mic or external microphone 6-12 inches from your mouth for clear, professional sound. A basic laptop mic close to your mouth outperforms a $200 USB microphone placed 3 feet away.
Natural window light during daytime creates the best camera appearance. Face windows when recording for even, flattering illumination that eliminates harsh shadows. Record during daylight hours whenever your schedule permits.
Script key talking points before recording to reduce filler words, rambling, and re-recording time. Even quick bullet points on a sticky note beside your monitor improve coherence and speaking confidence. This preparation proves more valuable than any video quality setting.
Using Recording Controls During Capture
Click “Start Recording” to begin a 3-second countdown before capture activates. The recording timer appears in the bottom control bar along with five essential buttons :
Pause: Temporarily stops recording without ending the session. Resume when you’re ready to continue—pauses don’t create awkward cuts in the final video. Use pauses to check notes, load new web pages, or handle interruptions without stopping entirely.
Rewind: Chrome extension exclusive feature that undoes the last 10-30 seconds if you make a mistake. This prevents restarting entire recordings for small errors late in long videos. Desktop app users don’t have rewind access.
Finish: Ends recording and opens the editing panel automatically. Loom uploads your video to the cloud immediately—no manual save or export steps required.
Restart: Discards the current recording and begins a fresh take without leaving the recording interface. Use this early in recordings when you realize your framing, audio, or content approach needs adjusting.
Delete: Cancels and permanently removes the current recording attempt. No trace remains in your library.
Blur sensitive content: Click the blur tool icon, drag to select screen areas containing passwords, personal information, or confidential data, then continue recording. Blurred regions remain obscured in the final video permanently.
Drawing annotations: Activate the pen tool to circle, underline, or draw arrows on your screen during recording. Use annotations sparingly—constant drawing distracts viewers from your core message.
Keep videos between 2-5 minutes for maximum engagement. Research shows viewer retention drops 40% after the 5-minute mark in tutorial content. Break longer topics into multi-video series or use chapter markers to let viewers jump to specific sections.
Struggling to decide between Loom and other screen recorders for your specific use case? Our in-depth Loom vs Clueso: screen recorder comparison for 2025 tests all platforms on recording stability, editing features, sharing options, viewer analytics, and value for money based on real projects.
Editing and Enhancing Videos with Loom AI Features
Loom AI transforms raw recordings into polished, professional content without manual editing. The Business + AI plan ($20/month annually) unlocks the complete suite—auto-generated titles, chapter markers, transcript editing, and AI-powered transformations.
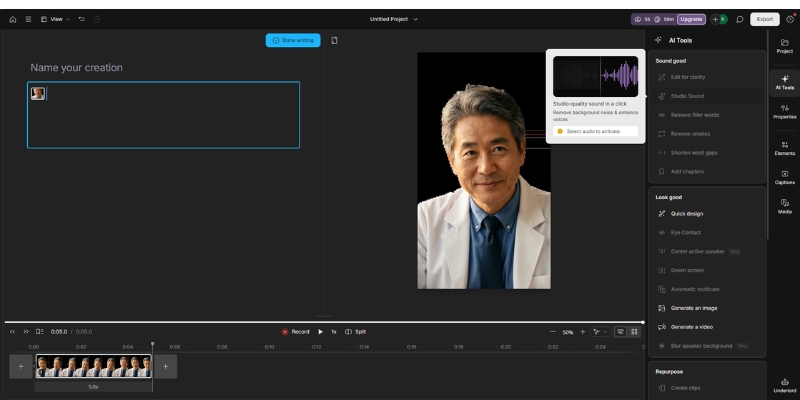
AI-Generated Enhancements That Save Hours
After clicking “Finish” on a recording, Loom AI analyzes your transcript and applies enhancements automatically within 30-60 seconds. These features work on recordings captured after subscribing to Business + AI—videos recorded on free plans before upgrading don’t receive retroactive AI processing except for filler word removal and AI workflows.
Auto titles: Loom generates contextual video titles based on transcript content rather than generic “Screen Recording 2025-10-16” defaults. The AI identifies key topics discussed and creates descriptive titles like “How to Configure Salesforce Email Templates” or “Q3 Product Roadmap Review”.
Auto summaries: A 2-3 sentence overview of your video content appears below the title. Use this summary as email descriptions when sharing videos or as video page metadata for SEO.
Auto chapters: Loom divides your video into logical sections with timestamp links. Viewers click chapter markers to jump directly to relevant segments rather than scrubbing through entire recordings searching for specific information. Chapters automatically update if you trim sections—no manual re-timing required.
Filler word removal: AI detects and removes “um,” “uh,” “like,” repeated phrases, and verbal stumbles from both audio and transcript. This feature alone justifies the Business + AI upgrade for users who record unscripted videos—it eliminates the unprofessional hesitation that makes videos feel amateur.
Silence removal: Extended pauses longer than 2-3 seconds automatically trim out of recordings. Loom preserves natural breathing pauses but removes awkward dead air when you’re reading notes or loading applications.
AI features toggle on/off in Settings → Video Preferences. Disable specific enhancements if you prefer manual control over titles or want to preserve all pauses for dramatic effect.
Screenshot suggestion:Video editing panel showing AI-generated title, summary, and chapter markers on the right sidebar Alt text: “Loom AI editing interface displaying auto generated video title summary and chapter timestamps with transcript”
Edit by Transcript: The Fastest Way to Trim Videos
Loom’s transcript-based editing eliminates timeline scrubbing entirely. Your full transcript appears in the right panel with every word timestamped. Select sentences or phrases you want to remove, and Loom deletes the corresponding video segments automatically.
This approach speeds up editing by 80% compared to traditional timeline editors. Identify an off-topic tangent in the transcript, highlight the text, click delete, and it vanishes from your video. No precision dragging, no accidental cuts into adjacent content.
The transcript remains fully editable even after recording. Fix AI transcription errors by clicking words and typing corrections—helpful for industry jargon, product names, or acronyms the AI mishears.
Download transcripts as text files for documentation, blog post drafts, or accessibility compliance. The transcript includes timestamps for every sentence, making it valuable for creating show notes or study guides.
AI Workflows: Transform Videos into Documents
AI workflows convert recorded videos into formatted text documents, Slack messages, or Jira bug reports using the “Write with AI” button. This feature solves a common problem—team members who prefer reading over watching videos.
Click “AI Workflows” and select your desired output format :
Document: Creates a structured article with headings, bullet points, and paragraphs based on your video transcript. Use this for converting training videos into written SOPs or transforming client calls into meeting summaries.
Message: Generates a concise Slack or email message summarizing your video’s key points. Perfect for announcing video content to teams who might not watch immediately.
Bug report: Produces a formatted Jira ticket with steps to reproduce, expected behavior, and actual behavior sections filled from your screen recording. QA teams save 15-20 minutes per bug report using this workflow.
AI workflows work on videos recorded before purchasing Business + AI, unlike auto titles and summaries. This means your existing video library becomes instantly more valuable when you upgrade.
Loom AI workflows interface offering video to document message or Jira bug report conversion options
Manual Editing: Trim, Stitch, and Customize
Business plan subscribers access manual editing tools that complement AI features. Click “Trim and Add Clips” in the video sidebar to open the editing timeline.
Trim: Remove content from the beginning, middle, or end of recordings. Drag the timeline handles to mark sections for deletion, preview your cuts, and confirm changes. Trimming is non-destructive—restore deleted sections anytime by clicking “Undo”.
Stitch: Combine multiple video recordings into a single cohesive presentation. Record each tutorial section separately for easier editing, then stitch them together into one master video. This workflow prevents re-recording entire 20-minute tutorials because of mistakes in minute 18.
Custom thumbnails: Upload images or select video frames as thumbnails. Compelling thumbnails increase click-through rates by 35% in email campaigns according to Loom’s internal data. Use text overlays, brand colors, and faces looking at the camera for maximum engagement.
Call-to-action buttons: Add clickable CTAs at video end directing viewers to booking pages, product demos, or next tutorial steps. Auto CTA (Business + AI feature) suggests relevant buttons based on the webpage you recorded.
Video overlays: New 2025 feature adds text boxes, arrows, and highlight shapes after recording. Annotate important UI elements, add step numbers, or circle key information without re-recording.
Tags and descriptions: Organize videos with custom tags like “onboarding,” “sales-demo,” or “Q4-2025” for library filtering. Write detailed descriptions with relevant keywords to make videos searchable within your workspace.
Loom video editing interface with timeline trim controls stitch multiple videos feature and thumbnail selection
Curious whether Loom’s AI features justify the $5/month upgrade from Business to Business + AI? We ran 30 videos through both plans to measure time savings. See our analysis in Loom Business vs Business AI: is the upgrade worth it in 2025? with exact minute-by-minute comparisons and ROI calculations for different use cases.
Sharing Videos and Tracking Viewer Engagement
Loom eliminates video hosting complexity through instant shareable links and detailed viewer analytics. The moment you finish recording, your video exists at a unique URL ready to paste anywhere.
Sharing Options for Every Use Case
Click the “Share” button immediately after recording or from any video in your library. Loom provides six distribution methods :
Copy link: The default sharing method generates a URL like loom.com/share/abc123. Paste this link in Slack, Microsoft Teams, email, project management tools, or any platform accepting hyperlinks. Recipients click the link and watch instantly without downloads or Loom accounts.
Email with animated GIF thumbnail: Loom embeds a 3-second animated preview in email body text that plays automatically in inboxes. This feature increases video open rates by 300% compared to plain hyperlinks according to Loom’s research. The GIF loops continuously until recipients click to watch the full video.
Embed code: Generates HTML iframe code for embedding videos in websites, blogs, help centers, or learning management systems. The Loom video player appears directly on your page with play controls and chapter markers.
Social sharing: Direct buttons post videos to LinkedIn, Twitter, and Facebook with auto-populated captions and preview images. Loom optimizes video players for each platform’s autoplay and muting rules.
Loom’s Versatile Sharing Options Let You Collaborate Effortlessly—Share via Link, Email, Embed, or Integrate with Your Team’s Favorite Tools
Download video file: Business plan subscribers download MP4 files for offline viewing, archival, or re-uploading to other platforms. Downloaded videos lose interactivity features like CTAs and chapter markers.
Tracking Engagement with Viewer Analytics
Loom provides viewer insights showing who watched your videos (for logged-in users), total views, and unique viewers on all plans, with Business+ plans adding detailed engagement metrics including individual completion rates, view times, and call-to-action conversion tracking through exportable reports
Native Integrations That Connect Loom to Your Workflow
Loom connects with 50+ platforms to embed video communication directly into existing tools. These integrations eliminate context switching—record, share, and collaborate without leaving your primary workspace.
Essential Productivity Integrations
Slack: Send Loom videos directly in Slack channels and DMs using the /loom command. Videos unfurl with animated thumbnails and play buttons inline—team members watch without leaving Slack. Install the Loom Slack app from your Slack workspace’s app directory.
Gmail: Embed Loom videos in emails with one click using the Gmail Chrome extension. Recipients see animated GIF previews in their inbox that play automatically. This integration requires the Loom Chrome extension.
Notion: Paste Loom links into Notion pages and they automatically embed as players with full interactivity. Create video documentation databases where each page contains tutorial videos, text instructions, and related resources.
Jira: Transform screen recordings into formatted bug reports with a single click using AI workflows. Attach Loom videos directly to Jira issues for clearer bug reproduction steps that reduce developer questions by 60%.
Confluence: Embed Loom videos in Confluence documentation pages using the Loom macro. Teams create living knowledge bases where written SOPs link to video walkthroughs demonstrating each process.
See Loom in action—watch our step-by-step tutorial video to master recording in minutes.
CRM and Sales Integrations
Salesforce: Enterprise plan subscribers access deep Salesforce integration that logs video views as activities in contact records. Sales reps see which prospects watched demos and schedule follow-ups automatically based on view completion.
HubSpot: Connect Loom to HubSpot to track video engagement in deal records and trigger workflow automations based on video views. Create sequences that send Loom videos at specific deal stages.
Install integrations from Settings → Integrations or from the individual platform’s app marketplace. Most integrations authenticate through OAuth without requiring API keys.
FAQ: Common Loom Questions Answered
Can I record Loom videos offline?
Only the desktop application records offline. Chrome extension requires internet connection for all recording sessions. Offline recordings upload automatically when connection restores.
Does Loom work on Chromebooks?
Yes, through the Chrome extension. Chromebooks lack desktop app support. Recording quality and features match Windows/Mac Chrome extension functionality.
Can viewers watch Loom videos without accounts?
Videos with Public or password-protected privacy settings play for anyone without Loom accounts. Private videos require viewers to sign in with approved email addresses.
How long does Loom store videos?
All plans include unlimited storage duration. Videos remain accessible permanently until manually deleted. Enterprise plans set custom retention policies.
Can I edit videos after publishing?
Yes, all edits apply retroactively. Trim content, update titles, add CTAs, or enable AI features on existing videos anytime. The video URL remains unchanged—previous shares still work.
Does Loom compress video quality?
Loom preserves original recording resolution. Free plan records at 720p maximum, Business and higher record at 4K resolution. Players stream adaptive quality based on viewer bandwidth.
Making Your Decision: Is Loom the Right Tool for You?
Loom excels for teams prioritizing speed over production quality. Record quick explanations, training updates, and async standups in minutes rather than scheduling meetings or writing lengthy documentation.
The platform’s instant shareable links and zero-friction viewing experience mean higher engagement rates than attachment-based video sharing. Recipients click and watch immediately without downloads or software installations.
AI features on the Business + AI plan justify the investment for users creating 10+ videos monthly. Filler word removal, auto chapters, and transcript editing save 30-45 minutes per video compared to manual editing in traditional software.
Loom’s limitations appear in advanced editing scenarios. Users requiring multi-track editing, motion graphics, complex transitions, or professional color grading need dedicated video editors like DaVinci Resolve or Adobe Premiere. Loom intentionally sacrifices editing depth for recording speed.
The 5-minute free plan limit forces most serious users onto paid plans quickly. Consider the Business plan minimum ($15/month) as the true entry cost for regular use.
Start with the 14-day Business + AI free trial to test AI features with actual work projects. Record client explanations, team updates, and tutorial drafts during the trial to evaluate whether Loom improves your workflow efficiency measurably.
How to Use Clueso: The Complete 2025 Guide (Step-by-Step)
Creating engaging product demos, onboarding tutorials, and step-by-step support guides is a constant challenge. It demands time, technical skill, and a significant budget for video editing and content creation. But what if you could automate the entire process, turning a simple screen recording into a polished video and a written guide in minutes? That’s exactly what Clueso promises.
[ez-toc]
What is Clueso?
Clueso is a powerful AI-powered platform designed to automatically transform your screen recordings into studio-quality product videos and comprehensive step-by-step documentation. It eliminates the need for manual video editing, scriptwriting, or voiceover recording, making it a game-changer for busy teams.
Why Use Clueso for Product Onboarding and Training?
Time and cost are the two biggest hurdles in content creation. Clueso tackles both head-on by automating the most labor-intensive tasks. For teams responsible for user onboarding, customer support, and marketing, this means you can:
Generate videos 10x faster: The AI handles editing, zooms, highlights, and voiceovers.
Create multiple content formats at once: One recording produces a video, an interactive guide, and a knowledge base article.
Eliminate the need for editing experience: The platform is built for users of all skill levels.
Maintain brand consistency: Easily apply your brand colors, logo, and fonts across all content.
Who Should Use This Guide?
This guide is designed for anyone looking to streamline their content creation workflow. If you’re a:
Product Marketer creating feature announcements and demo videos.
SaaS Founder building out your initial user onboarding flow.
Customer Education or Support Team Member developing a library of help-desk articles and tutorials.
Creator or Trainer producing educational content at scale.
…then you’re in the right place. We’ll walk you through every step, from account creation to exporting your finished project. Dive in and discover the power of the Clueso platform for yourself, and see how it stacks up in our roundup of the best AI video tools.
Clueso Main Working Dashboard
Clueso Setup: Account Creation & First Steps
Getting started with Clueso is straightforward. The platform is designed for a quick and seamless entry.
First, head to the Clueso website and sign up for their free trial. The onboarding process is guided by a helpful wizard that walks you through the initial steps of setting up your workspace. You can explore the core features without any commitment. As your needs grow, Clueso offers various paid plans tailored for individuals, teams, and enterprises, unlocking more advanced capabilities.
Once you’re in, you’ll land on the main dashboard. It features a clean, intuitive interface with clear calls-to-action for recording a new video or managing your existing projects.
The Clueso signup page
For a detailed walkthrough of the initial setup, check out Clueso’s official onboarding guide.
Step 1: Uploading Your Screen Recording
With your account ready, it’s time to add your content. Clueso offers several flexible methods for importing your media.
Supported Methods:
Record Directly: The easiest way to start is by using the Clueso browser extension. It allows you to capture your screen and workflow directly, ensuring a clean recording from the start.
Use Clueso extension to recording your screen
Upload from Your Device: If you already have a screen recording, you can upload it directly. Clueso supports standard video formats like MP4 and WebM.
Import from Cloud Storage: You can also import files using a link from Google Drive or other cloud storage services. This is perfect for collaborative workflows where recordings are shared.
Integrations: While there isn’t a direct API integration, you can easily upload recordings you’ve made with other popular tools like Zoom or Loom. Simply download the video file from those platforms and upload it to Clueso.
Clueso Multiple Upload Options
If you run into any issues with file formats or uploads, theClueso Help Center offers detailed troubleshooting tips.
Step 2: Configuring Your Project Settings
Before the AI gets to work, you can define key settings to ensure the output matches your needs. After uploading your video, Clueso will present you with a settings panel where you can configure:
On the Main Dashboard, navigate to Setting -> Video Setting:
Access Default Voice Settings
As the platform loads, you’ll see a range of options designed to help you personalize your voice preferences.
Select a new default voice from the available options.
Tip: If you’re unsure, you can always preview different voices before making your final choice.
If the settings page displays an error (e.g., “Update Failed”), review the notification to understand what went wrong before proceeding.
Customize Pronunciations
If you need to fine-tune how specific words are spoken, use the Pronunciations section:
Navigate to the Pronunciations section in the settings menu.
The Pronunciation Dictionary interface will load, giving you access to existing entries and the ability to customize them.
Click the New word button to add a term. This is helpful if you want the system to pronounce specific words your way.
After closing the dialog, you will return to the Pronunciation Dictionary view.
Manage Language Translations
Finally, access the Translation Glossary to manage language-specific terms:
Select the Translations section.
The Translation Glossary will appear, allowing you to manage and update language-specific terms.
These pre-processing settings save you significant editing time later on. For a full list of customization options, see the official features overview.
You can setup video settings before starting your project
Step 3: Let Clueso’s AI Work Its Magic
This is where Clueso truly shines. Once you’ve confirmed your settings, the AI engine takes over and performs a series of automated actions:
Analyzes Your Video: It watches your entire recording, identifying every click, scroll, and action you take.
Generates a Script: It automatically writes a step-by-step script describing your actions.
Records a Voiceover: It uses your selected AI voice to generate a professional, human-like voiceover based on the script.
Adds Smart Effects: The AI intelligently adds zoom-and-pan effects to focus on key areas, highlights your cursor, and adds overlays to emphasize important elements.
Creates Written Documentation: Simultaneously, it converts the video steps into a beautifully formatted written guide, complete with screenshots and annotations.
The result is a polished video and a ready-to-publish document created in a fraction of the time it would take manually.
Watch an official demo video to see this process in action.
Step 4: Editing and Refining Your Project
While Clueso’s AI is incredibly accurate, you always retain full control over the final product. The platform includes a user-friendly editor that allows you to make adjustments easily. The editor is broken down into three main views:
Transcript View: Edit the video by simply editing the text. Correcting a typo in the script automatically updates the voiceover.
Storyboard View: Reorder or delete steps using a simple drag-and-drop interface. If the AI missed a step or added an unnecessary one, you can fix it here in seconds.
Timeline View: For more granular control, you can adjust the timing of effects, add callouts, or insert custom intro/outro clips.
Background: Choose from a library of backgrounds or you can upload your background from the menu.
Aspect Ratio: Set the video dimensions to match its intended platform, such as 16:9 for YouTube or 9:16 for Shorts and Reels.
Insert: Use this menu to add and customize any element you see: from Clips and Images to Text, Music, and visual effects (Zoom, Spotlight, Callout).
This multi-faceted approach ensures that both beginners and advanced users can refine their projects to perfection. For more advanced techniques, explore our in-depth editing tutorial.
Editing and timeline view in a Clueso product demo
Step 5: Enhancing Your Video with Branding and Accessibility Features
To make your content truly yours, Clueso provides a suite of enhancement tools. In the settings or editor, you can:
Add Captions and Translations: Generate accurate captions with one click to improve accessibility. You can also translate both the captions and voiceover into over 35 languages, making your content globally accessible.
Apply Custom Branding: Upload your logo, set your brand colors, and choose your fonts to create videos that are perfectly aligned with your company’s visual identity on Elements section.
Add Music: Choose from a library of backgrounds and royalty-free music tracks to add a final layer of polish.
Applying custom branding and multi-language captions in the Clueso
Review & Refine with Article Mode
You can instantly preview your entire project and change the script on a scene-by-scene basis.
AI-Powered Generation
Use the AI section (on the right) to jumpstart your content. Just enter a prompt and let the AI build the foundation for you.
Step 6: Previewing, Exporting, and Sharing Your Content
Once you’re satisfied with your project, it’s time to share it with the world. Clueso’s export and sharing options are as flexible as its creation tools.
Click the “Share” button to access the sharing menu. You can:
Export Video Files: Download your video as a high-quality MP4 for use on YouTube, social media, or your website. You can also export short clips as GIFs.
Share Interactive HTML Guides: Clueso generates a shareable link to an interactive HTML version of your guide. This is perfect for embedding in knowledge bases or sending directly to customers.
Integrate with Help Desks: Seamlessly push your guides and videos to platforms like Zendesk, Intercom, and Notion to resolve support tickets faster.
Get the most out of Clueso with these expert tips:
Use Smart Blur Liberally: Before processing, use the blur tool to hide any sensitive or irrelevant information on the screen. It’s much faster than doing it manually in a traditional video editor,e you can find ot on Elements -> Effects -> Blur.
Refine the AI Script: The auto-generated script is a fantastic starting point, but reading it aloud and making small tweaks for tone and clarity can elevate the final narration.
Manually Correct Missed Steps: While rare, the AI might occasionally miss a very subtle UI interaction. Use the storyboard editor to quickly add a missing step or screenshot.
Pro Tip: Let Clueso’s AI voiceover do the heavy lifting for instant, professional narration. You can always tweak the script afterward for perfect clarity.
Conclusion
Clueso is more than just a video editor; it’s a content automation engine. By transforming a single screen recording into a polished video, an interactive guide, and a written document, it empowers teams to produce high-quality educational and marketing content at unprecedented speed. Whether you’re onboarding new users or supporting existing ones, Clueso removes the friction from content creation, allowing you to focus on what matters most: helping your users succeed.
Frequently Asked Questions (FAQ) about Using Clueso in 2025
Here are answers to some of the most common questions users have about getting started with and mastering the Clueso platform.
1. What do I need to get started with Clueso?
All you need is a modern web browser (like Chrome or Firefox) and an internet connection. To create content, you can either use the Clueso browser extension to record your screen directly or upload an existing screen recording file (like an MP4 or WebM) from your computer. No special software or high-end hardware is required.
2. Can I edit the script and voiceover that the AI generates?
Yes, absolutely. Clueso gives you full control. After the AI generates the initial script, you can use the text-based editor to change words, rephrase sentences, or add more detail. Any changes you make to the text automatically regenerate the AI voiceover in real-time, ensuring the audio always matches your script.
3. My screen recordings contain sensitive information. How does Clueso handle privacy?
Clueso is built with privacy in mind. It features a powerful Smart Blur tool that can automatically detect and redact sensitive information like names, email addresses, phone numbers, and API keys. You can review and apply these blurs before the video is even processed, ensuring confidential data never appears in your final content.
4. What happens if the AI misses a step or adds one I don’t need?
While the AI is highly accurate, it’s easy to make corrections. Using the intuitive storyboard editor, you can simply drag and drop to reorder steps, delete unwanted sections, or manually add a new step with your own screenshot and description. This ensures your final guide is perfectly accurate.
5. Can I use my own brand’s colors, logo, and fonts?
Yes. On paid plans, Clueso offers extensive branding options. You can create a brand kit by uploading your logo, defining your primary and secondary colors, and selecting your brand fonts. Clueso will automatically apply this branding to all your videos and documentation for a consistent, professional look.
6. What formats can I export my final project in?
Clueso provides flexible export options for different use cases:
Video: Download as a high-definition MP4 file for YouTube or social media, or as a GIF for emails and short demos.
Documentation: Share a direct link to an interactive HTML guide, embed it on your website or in your help center, or integrate it directly with platforms like Notion, Zendesk, and Intercom.
7. Can I translate my content into other languages?
Yes, this is one of Clueso’s standout features. With a single click, you can translate both your video’s voiceover and its captions into over 35 languages. The written documentation is also translated, making it incredibly efficient to create and localize content for a global audience.
8. What’s the main difference between the Free and Pro plans?
The Free plan is designed for you to test the platform’s core functionality and allows you to create one published project, but it will include a Clueso watermark. The Pro plan unlocks the full power of the tool, offering unlimited projects, removal of the watermark, custom branding, access to all premium AI voices, and more advanced features.
Related Guides & Resources
Wondering if Clueso is the best choice for you? We tested its AI, speed, and overall value. See the final verdict in our unbiased 2025 Clueso Review.
How to Use X-Pilot AI Video Maker: 2025 Tutorial & Best Practices
X-pilot main page dashboard
Creating professional educational videos no longer requires expensive software or technical editing skills. X-Pilot AI transforms your documents and ideas into animated explainer videos in minutes, making quality video production accessible to educators, trainers, and content creators. This step-by-step tutorial shows you exactly how to use X-Pilot’s Free plan to create your first AI-generated video, with insights into premium features available on paid tiers.
[ez-toc]
What is X-Pilot AI Video Maker?
X-Pilot is an AI-powered video creation platform that automatically converts documents, scripts, and ideas into fully-animated educational videos with professional voiceover and captions. The platform uses intelligent AI agents to analyze your content, generate engaging narration, create complementary visuals, and assemble everything into a cohesive educational video—all without manual editing.
For a comprehensive analysis of X-Pilot’s features, pricing, and competitive positioning, explore our [complete X-Pilot AI review] covering performance testing and user feedback.
Who Should Use This Tutorial?
This guide is perfect for teachers creating online course content, corporate trainers developing employee training materials, instructional designers producing educational videos, content creators building tutorial libraries, and marketing professionals creating explainer videos.
X-Pilot Register Page: Enter your email address and create a password
Free Plan Includes:
3 minutes of video generation per month
720p resolution video output
Standard AI voice narration
Basic editing capabilities
X-Pilot watermark on exports
Understanding X-Pilot Plans
Plan
Monthly Price
Video Minutes
Resolution
Watermark
Free
$0
3 minutes
720p
Yes
Creator
$9
25 minutes
1080p
No
Pro
$29
100 minutes
4K
No
Enterprise
Custom
Unlimited
4K
No
The Free plan is perfect for testing the platform and creating short demo videos, while Creator and Pro plans provide professional output suitable for public distribution. Understanding how X-Pilot’s pricing compares to competing AI video platforms helps determine when upgrading makes sense for your production volume.
Navigating Your Dashboard
After logging in, you’ll see the X-Pilot dashboard with three main areas:
Projects Section displays all your created videos with thumbnails and quick access buttons to edit, duplicate, or delete projects.
Create New Project Button prominently positioned to start generating new videos from your content.
Account Settings accessible from the top menu where you can manage your subscription, check remaining monthly minutes, and adjust platform preferences.
X-Pilot Dashboard
Step 1: Uploading Your Content
Preparing Your Content for Upload
X-Pilot accepts two primary input methods on the Free plan:
Document Upload supports Word documents (DOCX), PowerPoint presentations (PPTX), PDFs, and plain text files (TXT). This works best when you have existing educational materials, lecture notes, or written scripts ready to convert into video format.
Direct Text Input allows you to type or paste content directly into X-Pilot’s input field. This approach works well for creating videos from brief outlines, letting X-Pilot’s AI expand your ideas into full educational narratives.
X-Pilot Upload: For optimal performance, ensure your file size stays under 5MB before uploading
Best Content for AI Video Generation
For optimal results on your first project, prepare content that:
Explains a clear concept or process (300-500 words for 2-3 minute videos)
Uses simple, straightforward language
Includes 3-5 main points or steps
Avoids complex formatting, tables, or embedded images
Focuses on educational or explanatory topics
Example Topic Ideas:
“How Photosynthesis Works: A Simple Explanation”
“5 Email Marketing Best Practices”
“Introduction to Cloud Computing”
“Basic First Aid Steps Everyone Should Know”
“Time Management Tips for Students”
Uploading Your First Project
Click the “Create New Project” or “New Video” button on your dashboard
Choose your input method:
“Upload Document” – Select a file from your computer
“Enter Text” or “Start with Idea” – Type or paste content directly
If uploading a document, click “Choose File” or drag-and-drop it onto the upload area
If using text input, paste your prepared content (300-500 words) or type a simple topic description
Wait 5-10 seconds for upload confirmation and initial content analysis
Enter Text” or “Start with Idea” – Type or paste content directly
Troubleshooting Upload Issues
File too large: The Free plan accepts documents up to 2GB. Compress large files or simplify documents with excessive images.
Upload fails: Try a different browser (Chrome works best), check your internet connection, or convert your document to plain text or PDF format.
Content not recognized: Ensure your document contains actual text content (not just images) and uses standard formatting without complex tables or special characters.
Step 2: Configuring Your Video Settings
Essential Project Settings
After uploading your content, configure these basic settings:
Language Selection determines both the narration language and caption text. The Free plan supports multiple languages including English, Spanish, French, German, and others. Select the language your target audience speaks.
Aspect Ratio controls video dimensions for different platforms:
16:9 (Horizontal) – Best for YouTube, course platforms, and desktop viewing
9:16 (Vertical) – Optimized for TikTok, Instagram Reels, and mobile viewing
1:1 (Square) – Ideal for Instagram feeds and LinkedIn posts
Voice Selection lets you choose from available standard AI voices. Listen to voice previews if available and select one that matches your content’s tone (professional, friendly, energetic, or calm).
Free Plan Limitations
On the Free plan, you’ll work with:
720p resolution (suitable for web viewing but not large displays)
Standard AI voices (professional quality, though not as natural as premium options)
Basic customization options (limited animation and style controls)
These settings provide everything needed to evaluate X-Pilot’s AI capabilities and create functional educational videos for testing purposes.
Step 3: Generating Your AI Video
Understanding the AI Processing Workflow
After clicking “Generate Video” or “Create”, X-Pilot’s AI begins a multi-stage process:
Stage 1: Content Analysis (15-30 seconds) The AI reads your entire document or text, identifies key topics, extracts main concepts, and determines optimal information structure for video presentation.
Stage 2: Script Development (30-60 seconds) X-Pilot’s AI converts your content into natural narration script, adding transitional phrases, explanatory language, and conversational flow suitable for spoken delivery.
Stage 3: Scene Creation (1-2 minutes) The AI divides content into logical scenes, generates visual elements for each segment, creates text overlays, and selects background animations that reinforce your message.
Stage 4: Voice Synthesis (30-45 seconds) Your selected AI voice generates professional narration matching the script with appropriate pacing, emphasis, and natural speech patterns.
Stage 5: Final Assembly (15-30 seconds) All elements combine into a cohesive video with synchronized narration, captions, animations, and transitions.
Total Processing Time: 3-5 minutes for typical 2-3 minute educational videos.
X-Pilot Processing: After you’ve finished entering your prompt and uploading your file, the AI engine automatically begins analyzing and processing your content to generate results
What to Expect During Processing
While X-Pilot generates your video, you’ll see progress indicators showing which stage is currently processing. The platform works entirely in the cloud, so you can close the browser tab and return later—X-Pilot will send an email notification when your video is ready for review.
Step 4: Reviewing & Editing Your Video
The Video Preview Interface
Once processing completes, X-Pilot displays your generated video in the preview interface where you can:
Watch the complete video from start to finish to evaluate AI-generated narration, visual selection, animation quality, and overall flow.
Review individual scenes by clicking through scene thumbnails or using timeline controls to jump to specific segments.
Check caption accuracy ensuring the auto-generated subtitles match the narration correctly without spelling errors or timing issues.
Assess visual elements confirming that backgrounds, text overlays, and animations support rather than distract from your educational message.
Basic Editing on Free Plan
With the Free plan, you can preview your AI-processed videos but won’t be able to make any edits
Upgrading for Advanced Editing
Paid plans (Creator and Pro) unlock additional editing features:
Custom Branding (Creator+) removes the X-Pilot watermark and adds your logo, brand colors, and custom intro/outro sequences for professional-quality output matching your organizational identity.
Animation Controls (Pro) provide detailed adjustments to timing, transition styles, and visual effects for each scene, giving you precise control over pacing and engagement.
Voice Cloning (Pro) replicates your personal voice for authentic narration that maintains consistent brand identity across all your educational content.
Collaboration Tools (Pro) enable team members to review, comment on, and edit projects together with version control and approval workflows.
Step 5: Exporting & Sharing Your Video
Preview Before Export
Before finalizing your video, use the preview function to:
Watch the complete video at full quality
Verify all text appears correctly and remains readable
Confirm narration sounds natural and matches visual pacing
Check that animations enhance rather than overwhelm the content
Ensure the video length fits your target platform requirements
Exporting Your Video (Free Plan)
On the Free plan, follow these steps to export:
Click “Export” or “Download” button in the top toolbar
Download the completed video file to your computer
Free Plan Export Includes:
MP4 video format (universally compatible)
720p resolution (suitable for web and mobile viewing)
X-Pilot watermark in corner (visible throughout video)
Embedded captions (depending on settings)
Demo video for free plans:
X-Pilot Demo Video
Looking to see more real-world applications and success stories? Our comprehensive case study library showcases detailed examples of how businesses and creators are leveraging this tool to achieve their goals
Premium Export Options
Upgrading unlocks professional distribution features:
Creator Plan ($9/mo) removes watermarks and provides 1080p exports suitable for professional course platforms, client deliverables, and public YouTube channels. This represents the minimum tier for commercial use or professional content distribution.
Pro Plan ($29/mo) adds 4K resolution exports for large-screen displays, premium quality presentations, and broadcast-quality output. The Pro tier also includes direct export to PowerPoint (PPT) and PDF formats—a unique X-Pilot feature enabling seamless content repurposing across video, presentation, and print materials.
Enterprise Plan (Custom) provides dedicated rendering resources for priority export processing, bulk export tools, and direct integration with learning management systems for automated content publishing.
Sharing Your Video
After downloading, you can:
Upload to YouTube, Vimeo, or course platforms for student access
Embed in websites or blogs to enhance written content
Share via email or messaging apps for quick preview and feedback
Import to presentation software for hybrid live/recorded presentations
Upload to social media (though watermark may impact professional credibility)
Maximizing Your Free Plan Experience
Getting the Most from 3 Monthly Minutes
Since the Free plan provides only 3 minutes of generation per month, use your allocation strategically:
Test with simple topics first to understand how X-Pilot interprets your content style and generates videos before committing your entire monthly allowance to complex projects.
Create concise, focused videos covering single concepts rather than comprehensive overviews. A 2-3 minute video explaining one specific skill provides more value than a rushed overview of multiple topics.
Evaluate if X-Pilot fits your workflow by testing the complete process from upload through export, assessing AI quality, editing capabilities, and output suitability for your actual use cases.
Plan your upgrade timing by determining whether Creator plan (25 min/$9) or Pro plan (100 min/$29) better matches your projected monthly production volume before investing in paid subscriptions.
When to Upgrade from Free Plan
Consider upgrading to Creator plan when:
You need watermark-free output for professional distribution
1080p resolution is required for quality course content
You’re producing 2-4 short videos monthly (25 minutes allocation)
Students or clients need polished, branded content
Team collaboration features are essential for your workflow
4K output quality is required for large-screen displays
Voice cloning would streamline your narration process
PowerPoint and PDF exports would enhance content repurposing\
Common Questions & Troubleshooting
Why did my video generation fail?
Solution: Check that your content contains at least 200-300 words of text. Very short inputs may not provide enough material for AI processing. Also ensure stable internet connection and try refreshing the page if processing stalls.
The AI narration mispronounced technical terms
Solution: In the editing interface, modify the text spelling to phonetic pronunciation (e.g., “AWS” becomes “A W S” or “sequel” becomes “S Q L”). X-Pilot regenerates voice narration matching your text changes.
My video is shorter/longer than expected
Solution: X-Pilot’s AI determines video length based on content complexity and narration pacing. To adjust length, edit the narration text directly—adding more explanation lengthens videos while condensing text shortens them.
Can I remove the watermark on Free plan?
Solution: No, watermark removal requires upgrading to Creator plan ($9/mo) minimum. The Free plan watermark appears throughout the video and cannot be cropped or edited out.
How do I check remaining monthly minutes?
Solution: Check your account dashboard or settings menu for current usage statistics showing minutes consumed and minutes remaining in your billing cycle.
The video quality looks pixelated
Solution: Free plan output is limited to 720p resolution. For higher quality, upgrade to Creator (1080p) or Pro (4K) plans. Also ensure you’re viewing the exported video at appropriate screen size—720p looks acceptable on mobile and laptop screens but may appear lower quality on large monitors.
Tips for Better X-Pilot Videos
Content Preparation Best Practices
Write clear, simple explanations using straightforward language free from jargon. X-Pilot’s AI performs best with educational content structured for general audiences.
Organize content logically with clear introduction, main body sections, and conclusion. Well-structured input produces better AI scene division and more coherent video flow.
Include specific examples and practical applications rather than only abstract concepts. Concrete examples help X-Pilot’s AI select more relevant visual elements.
Keep paragraphs short (3-5 sentences) to create natural scene breaks. Long, dense paragraphs may result in visually monotonous or overly long individual scenes.
Platform-Specific Optimization
For YouTube tutorials (16:9 horizontal): Use 300-500 words for 2-3 minute videos, structure content with clear steps or sections, and include actionable takeaways viewers can implement immediately.
For social media shorts (9:16 vertical): Focus on single concepts under 250 words, start with an attention-grabbing opening statement, and end with clear call-to-action or key message.
For course platforms (16:9 horizontal): Create module-specific videos (400-600 words), maintain consistent format across series, and reference related lessons for comprehensive learning paths.
What’s Next: Scaling Your Video Production
Building a Content Library with Paid Plans
Once you’ve tested X-Pilot’s Free plan and confirmed it fits your workflow, upgrading enables sustainable content production:
Creator Plan Strategy works well for individual educators producing 2-4 videos weekly. The 25 monthly minutes supports consistent course content creation, YouTube tutorial series, or regular training module updates.
Pro Plan Strategy suits small teams or high-volume solo creators producing daily content. The 100 monthly minutes, collaboration features, and 4K output support professional instructional design operations and multi-creator educational channels.
Enterprise Strategy serves large organizations with dedicated L&D departments, educational institutions producing campus-wide training, or agencies managing multiple client accounts requiring centralized brand control and unlimited production capacity.
Start Creating with X-Pilot AI
Ready to transform your educational content into engaging videos? Begin with X-Pilot’s free tier to experience AI-powered automation firsthand. Follow this tutorial step-by-step to create your first video, then reference our comprehensive X-Pilot AI review for detailed feature analysis, pricing comparisons, and user testimonials from educators and corporate trainers.
How To Use Descript: The Ultimate Text-Based Video Editing Guide (2025)
How To Use Descript: The Ultimate Text-Based Video Editing Guide (2025)
Learning how to use Descript is the single most effective way to speed up your video production workflow if you are a podcaster or marketer. When I first switched from Premiere Pro to Descript, I realized this was not just another editor; it was a fundamental shift in how we create content.
Instead of battling complex timelines, you edit video by editing text, leveraging Text-based editing and the new Underlord AI co-editor to automate tedious work. This approach allows Creators and Freelancers to produce professional content in a fraction of the time, cutting editing time by up to 70%.
In this AI Video Editing guide, we will walk through the entire process step-by-step. You will learn everything from Text-based Editing and Studio Sound to Overdub voice cloning and Exporting your final project.
Table of Contents
What Is Descript & How Does The Text-Based Editing Workflow Work?
If you are used to traditional non-linear editors (NLEs) like Final Cut or Premiere, Descript will feel like magic. It is an all-in-one audio and video editor used by over 6 million creators that operates almost exactly like editing a Google Doc.
The core concept is simple but revolutionary: editing the transcript edits the underlying media automatically. When you delete a sentence in the text editor, Descript automatically cuts that corresponding segment out of the video and audio tracks instantly.
This “Text-based editing” workflow eliminates the need to manually hunt for “ums” and mistakes on a waveform. It is designed specifically for Podcasters and Marketers who need speed and narrative control over complex technical editing skills.
Timeline Editing (Traditional):
You must listen, pause, find the exact frame, use a razor tool to cut, delete the clip, and drag the remaining clips together manually. It is slow and technical, requiring significant experience to master.
Text-Based Editing (Descript):
You read the transcript, highlight the sentence you do not want, and press “Delete” on your keyboard. The video updates instantly without touching the timeline. It is fast, intuitive, and requires no prior editing experience.
The Descript interface connects your script directly to the timeline.
Setting Up Your First Project: Import, Transcribe, and Interface Overview
Getting started with Descript is straightforward even for complete beginners. Unlike heavy software that takes hours to configure, I found the setup process to be incredibly streamlined for new users who just want to start editing.
Downloading and Installing Descript:
Go to the official website and download the desktop app for your operating system. While there is a web version available, I strongly recommend the desktop app for better performance and reliable offline access.
Creating a New Project & Importing Media:
Click “New Project” in the Drive view to begin creating. You can drag and drop your video or audio files directly into the window. Descript supports multicam sequences if you are recording with multiple camera angles simultaneously.
Navigating the Script and Canvas View:
Once your media uploads, Descript will ask to transcribe it using AI. Select the number of speakers for accurate Speaker Detection across 25 supported languages. Your screen is split into three parts: the Script Editor (center), the Canvas (video preview), and the Timeline (bottom).
The transcription is surprisingly accurate, typically hitting 95%+ accuracy right out of the gate for clear recordings. This AI-generated transcript becomes your primary editing interface for the entire project.
How to Use Descript for Basic Editing: The Cut, Copy, and Paste Workflow
This is where the real production work happens. Mastering the Text-based editing workflow is the key to cutting your production time in half or more. Treat your video exactly like a word document you are editing.
Deleting Text to Remove Footage:
Highlight any text you want to remove and press “Backspace” or “Delete” on your keyboard. This is non-destructive editing, meaning you can always recover the footage by dragging the clip edge in the timeline if you change your mind.
Ignoring Text vs. Deleting Text:
Sometimes you want to keep the text visible in the transcript but skip it during playback. Highlight the text and use “Strikethrough” to apply the effect. The text remains visible for reference but is completely ignored during export.
Correcting Transcription Errors:
If the AI misheard a word, do not just delete it because that cuts the audio too. Instead, hold “E” or right-click and select “Correct” from the menu. This changes the text without altering the underlying media file.
Using the Blade Tool (for manual timeline cuts):
For precise cuts that do not align with word boundaries (like silence or breaths), switch to the Timeline view at the bottom. Press “B” for the Blade tool to make manual cuts just like in Premiere Pro.
This workflow is infinitely faster than scrubbing through waveforms looking for mistakes manually. You can visually see the flow of your conversation and edit for content quality, not just technical continuity.
Cleaning Up Audio Instantly: Using Studio Sound and Filler Word Removal
Bad audio kills video retention faster than almost any other factor. Descript’s Studio Sound and Filler Word Removal are the two features that justify the subscription cost alone for most creators.
Applying Studio Sound (One-Click Enhancement):
Select your audio clip (or the entire track) in the timeline. In the properties panel on the right, toggle on “Studio Sound” to activate. This AI feature isolates voices and removes echo and background noise instantly with one click.
Pro Tip: I rarely keep Studio Sound at 100% intensity because it can sound synthetic at maximum. Dial it down to 70-80% to keep some natural room tone while removing the distracting noise.
Automated Filler Word Removal:
Go to the “Actions” bar (the sparkle icon) and search for “Remove Filler Words” in the menu. Descript will find every “um,” “ah,” “like,” and repeated word automatically. You can choose to “Delete” them (closing the gap) or replace them with a “Gap Clip” (silence) to keep natural pacing.
Remove Silence (New 2025 Feature):
Descript 3.7 introduced automatic silence detection and removal in one step. Long, awkward silences might be great for dramatic effect, but if you want a snappy final cut, this feature detects, shortens, or replaces those silent stretches instantly.
Adjust the Studio Sound intensity to avoid a robotic voice effect.
Advanced AI Features: How to Use Overdub to Fix Voice Mistakes
Imagine recording a 30-minute podcast and realizing you said the wrong date or company name. In the past, you had to completely re-record. With Overdub, you can fix it simply by typing the correction.
Creating Your AI Voice Profile:
Before using Overdub, you must train the AI on your voice. Go to the “Voices” tab and read the consent script. In 2025, you can now create an Overdub Voice using existing audio without spending 10-30 minutes reading the full script—just read a brief Voice ID statement and upload your audio.
Using Overdub to Replace Audio:
Once trained, simply highlight the wrong word in your script and type the correct word. Descript’s Text-to-Speech engine will generate the new audio in your voice seamlessly using Generative Adversarial Networks (GANs) technology.
This feature is a lifesaver for correcting minor slips without setting up your microphone and room environment again. It blends surprisingly well with the original audio when used correctly.
Underlord AI Co-Editor (New 2025):
Descript introduced Underlord, an AI-powered co-editor that makes polished edits and helps create videos with just a prompt. It can automatically remove filler words, cut silence, pick best takes, select layouts, center active speakers, and even create viral-worthy clips.
Adding Visual Flair: B-Roll, Captions, and Transitions
Descript is not just for audio editing; it is a fully capable video editor. You can create engaging social media clips by adding B-roll footage and dynamic captions directly to your script timeline.
Inserting B-Roll and Images:
To cover a cut or illustrate a point visually, drag an image or video file onto a specific word in the script. This creates a track layer on top of your main video, effectively acting as professional B-roll coverage.
Adding Dynamic Captions (Karaoke Style):
Select a section of text, click the “T” (Title) icon, and choose “Captions” from the menu. You can customize the font, colors, and animation style (like the popular word-by-word karaoke effect) in the properties panel.
Applying Transitions and Zoom Effects:
Click the transition square between clips on the timeline to add “Cross Dissolves” or swipe effects. You can also use the “Cue” feature to add automatic zooms that emphasize key moments in your content.
I find this “Scenes” workflow (using slashes de>/ in the text to create new scenes) much easier for managing complex visuals than a traditional multi-layer timeline found in other editing software.
Exporting Your Project: Publishing to YouTube and Social Media
Once your edit is polished and ready for your audience, it is time to share it. Descript offers flexible export options depending on whether you are publishing a podcast, a YouTube video, or a Reel.
Video Export Settings:
Click “Publish” in the top right corner of the interface. For video, select “Export” then “Video” from the menu. Choose the MP4 format and ensure your resolution matches your source (1080p for Hobbyist plan, 4K for Creator/Business).
Audio and Transcript Export:
For podcasters, select the “Audio” tab to export a broadcast-quality WAV or MP3 file. You can also export the “Transcript” as a docx, srt, or vtt file for SEO optimization and accessibility requirements.
Batch Export (New 2025 Feature):
Descript 3.7 introduced batch export, allowing you to export audio into discrete chunks divided by line breaks or markers. You can even export every composition in a project in one go, which is perfect for podcast episodes.
Publishing Directly from Descript:
You can publish directly to YouTube, Wistia, or podcast hosting platforms like Buzzsprout without leaving the app. Alternatively, use the web link feature to send a review copy to your team before the final export.
Verdict: Is Descript The Right Tool For You?
After using Descript extensively for Descript Review projects, I can confidently say it is the best tool for “talking head” content. It transforms the tedious technical process of editing into a creative writing process.
Expert Verdict
If you are a Podcaster, Marketer, or Course Creator, Descript is a non-negotiable asset for your workflow. The Text-based editing combined with Underlord AI, Studio Sound, and Overdub will save you hundreds of hours annually. However, if you need complex VFX or cinematic color grading, stick to Premiere Pro.
Best For: Narrative content, Interviews, Podcasts, Social Media Clips.
(Disclosure: If you purchase through links on this page, we may earn a small commission at no extra cost to you. This helps us maintain our “battle-tested” reviews.)
Frequently Asked Questions About Using Descript
Is Descript good for beginners?
Yes, it is significantly easier to learn than Premiere Pro or DaVinci Resolve. The interface resembles a word processor, which everyone already knows how to use. You can start editing within minutes.
Can I use Descript for free?
Yes, the free plan allows you to record, edit, and export content. However, it includes watermarks on video exports and limits media hours and AI credits. See our Descript Pricing Explained guide for details.
Does Descript replace Premiere Pro?
For dialogue-heavy content like podcasts and tutorials, yes it can replace Premiere completely. For music videos, action films, or complex VFX work, no. Many creators start in Descript and finish in Premiere.
How accurate is the transcription?
In my tests, Descript’s transcription achieves over 95% accuracy for clear audio recordings. It handles accents and technical jargon better than most competitors. The White Glove service can achieve up to 99% accuracy.
Can I edit multiple camera angles?
Yes, Descript supports Multicam editing natively. It automatically syncs audio across cameras and lets you switch angles by clicking on the scene in your timeline.
What languages does Descript support?
Descript supports transcription in 25 languages, caption translation in 61 languages, and audio dubbing in 30 languages. Native-sounding AI voices are available in 14 major languages.
Read More From AI Video Editing
Explore more comparisons and tutorials to find the perfect tools for your creative workflow and production needs.
How to Use Wisecut: Step-by-Step Guide for Beginners
Wisecut AI video editor step-by-step tutorial guide for beginners
[ez-toc]
Introduction
Wisecut is an AI-powered video editing platform that automatically transforms long-form videos into polished short clips without requiring technical editing skills or complicated timeline manipulation. The platform uses artificial intelligence to analyze speech patterns, remove silent pauses, detect viral-worthy highlights, generate captions, and optimize content for social media platforms like TikTok, Instagram Reels, and YouTube Shorts—all with minimal manual intervention.
Unlike traditional video editors that require hours of learning and meticulous frame-by-frame editing, Wisecut’s one-click automation approach allows complete beginners to produce professional-quality video clips in under 10 minutes. The platform automatically generates three sections from any uploaded video: AI-selected Highlights (best clips under 59 seconds), All Clips (every generated segment), and Full Content (complete video with enhancements)—eliminating 90% of manual editing work.
This comprehensive guide walks through every step of the 2025 Wisecut workflow, from account creation to final export, with detailed screenshots, troubleshooting advice, and professional tips to help maximize efficiency and output quality.
Already familiar with Wisecut’s features? Read our complete Wisecut AI review comparing pricing, performance, and alternatives.
Who is This Guide For?
This tutorial is designed for content creators repurposing YouTube videos, vlogs, and interviews into social media clips, podcasters converting audio content into video format with captions, marketers creating promotional clips from webinar recordings and product demonstrations, educators transforming lengthy lectures into digestible learning modules, and social media managers maintaining consistent posting schedules across multiple platforms.
Wisecut Setup: Account Creation & First Steps
Signing Up for Wisecut
Navigate to wisecut.ai and click the “Get Started” button prominently displayed on the homepage. Wisecut offers streamlined authentication through Google account integration for instant access, or traditional email registration with password creation.
Wisecut Sign in Window
Enter a valid email address and create a secure password (minimum 8 characters with uppercase, lowercase, and numbers). Verify the account through the confirmation email sent immediately after registration. The entire signup process takes less than 90 seconds.
New users automatically receive access to the Free plan, which includes 1 hour of monthly video processing at 720p resolution with a watermark. This provides sufficient testing capacity to evaluate whether Wisecut’s workflow aligns with specific content needs before committing to paid subscriptions starting at $19/month.
Navigating the Wisecut Dashboard
After successful login, users land on the simplified main dashboard featuring a central upload box with the text “Drop a video link” for starting new projects. The 2025 interface eliminates complex navigation menus in favor of a streamlined workflow: upload, process, edit clips, and export.
Wisecut 2025 dashboard interface
The dashboard’s minimalist design allows users to begin editing within seconds of account creation. Your processing minutes remaining display in the top navigation, along with links to upgrade plans, access help documentation, and view project history.
Uploading Your Video
Supported File Types and Limits
Wisecut accepts the most common video formats including MP4, MOV, AVI, and WMV files, with maximum file size limits varying by subscription tier: Free plan (2GB), Starter plan (4GB), and Professional plan (5GB). Video duration limits also differ, with the Free plan capping uploads at shorter durations while paid plans accommodate videos up to 90+ minutes.
The platform performs best with high-quality source material recorded at 1080p or 4K resolution. Audio quality significantly impacts both transcription accuracy and AI highlight detection, so videos recorded with external microphones in controlled environments yield superior results compared to built-in laptop microphones in noisy settings.
How to Upload Your First Project
Wisecut’s 2025 version offers three convenient upload methods to accommodate different workflow preferences and file storage locations:
Direct File Upload: Click the central “Drop a video link” box or drag-and-drop video files directly from your computer’s file system. The platform displays real-time upload progress with estimated time remaining based on file size and internet connection speed.
Cloud Storage Integration: Paste direct links from Google Drive or Dropbox by clicking the upload box and selecting “Paste Link.” Enter the shareable URL and ensure cloud files have appropriate sharing permissions set to “Anyone with the link can view” to avoid access errors.
YouTube Link Import: Copy the URL of any YouTube video (your own content or videos you have permission to edit) and paste it into the upload box. Wisecut automatically fetches the video without requiring manual download, streamlining the workflow for creators repurposing existing YouTube content. Simply click the three dots next to any YouTube video, select “Share,” copy the link, and paste into Wisecut.
Wisecut 2025 dashboard interface
Pro Tip: For fastest processing with YouTube links, use videos from your own channel or ensure you have proper permissions. The AI works best with speech-heavy content like interviews, vlogs, podcasts, and educational videos rather than music videos or highly cinematic content.
After selecting your upload method and pasting or uploading the video, click “Get Clips” to initiate the AI processing workflow.
AI Processing Workflow: Let Wisecut Work Its Magic
What Happens During Processing
Once you click “Get Clips,” Wisecut’s AI begins automated analysis that typically completes in just a few minutes (not seconds as previously marketed, but still dramatically faster than manual editing). The platform performs multiple simultaneous operations:
Speech Recognition and Transcription: The AI converts all spoken audio into text transcripts, identifying individual words, sentences, and conversational segments with 95%+ accuracy for clear audio in supported languages.
Silence Detection and Removal: The system analyzes audio waveforms to identify and automatically remove pauses, silent gaps, and low-volume segments that disrupt video flow. The AI distinguishes between natural conversational breathing and awkward dead air.
Engagement Prediction Analysis: Wisecut’s proprietary highlight detection algorithm evaluates emotional peaks based on vocal emphasis, speaking pace variations, keyword density, and tonal energy to predict which segments will resonate most with audiences. This system achieves 85-90% accuracy in identifying viral-worthy moments.
Auto-Captioning: The platform generates accurate subtitles for the entire video, recognizing that 69% of viewers watch videos on mute in public spaces. Captions increase engagement by an average of 12%.
Smart Background Music Selection: The AI automatically picks royalty-free background music matched to the video’s mood and applies audio ducking that lowers music volume during speech and raises it during pauses.
Wisecut AI Processing: From Upload to Clips in Minutes
Timeline for Processing: What to Expect
Processing duration varies based on source video length, resolution, and server load. Based on 2025 performance testing, average processing times are:
10-minute video: 2-4 minutes processing time
30-minute video: 6-10 minutes processing time
60-minute video: 12-18 minutes processing time
90-minute video: 18-25 minutes processing time
Users can monitor progress on screen or close the browser tab and receive email notifications when processing completes, allowing work on other tasks without constant monitoring.
Once processing completes, Wisecut automatically creates three main sections that form the foundation of the 2025 workflow. This represents a significant change from earlier versions that required manual project settings configuration.
Section 1: Highlights (AI-Selected Best Clips)
The Highlights section displays the best clips automatically selected by Wisecut’s AI, each optimized to be under 59 seconds—the maximum duration for YouTube Shorts. These clips represent the highest-engagement moments predicted by the algorithm and work perfectly for TikTok, Instagram Reels, YouTube Shorts, and other short-form platforms.
wisecut clip section
Each highlight clip includes an automatically generated title, thumbnail preview, duration label, and quick access to editing options. Simply click any clip to preview, edit, or export immediately.
The AI analyzes factors like vocal enthusiasm, topic relevance, conversation flow, and emotional peaks to determine which segments deserve “Highlight” status. While accuracy is typically 85-90%, users can always override selections by promoting clips from the “All Clips” section.
Section 2: All Clips (Complete Generated Library)
The All Clips section contains every segment Wisecut generated from the long-form video, typically ranging from 5-50+ clips depending on source video length and conversation structure. This comprehensive library gives users complete control over content selection beyond the AI’s top three picks.
Keyword Search Feature: Use the search bar to find specific segments by typing relevant keywords, topics, or phrases. Wisecut searches the transcribed text to locate exact mentions, dramatically reducing time spent manually browsing through dozens of clips.
Length Filtering: Filter clips by duration using the dropdown menu with options like “Under 30 seconds,” “30-59 seconds,” “1-2 minutes,” or custom ranges. This targeting helps creators quickly find clips that meet specific platform requirements.
Clip Preview: Hover over any clip thumbnail to preview the content without opening the full editor. This quick-scan capability accelerates content selection when working with large clip libraries from lengthy source videos.
Section 3: Full Content (Enhanced Complete Video)
The Full Content section presents the entire original video with all AI enhancements applied: silence removal, smart background music, auto-generated captions, and audio ducking. This option is ideal for creators who want a polished, complete version of their content rather than short clips.
Use Full Content when repurposing webinars for on-demand viewing, creating cleaned-up podcast video versions, producing enhanced lecture recordings, or preparing long-form YouTube videos with professional audio and captions.
The Full Content maintains the original narrative structure while eliminating technical imperfections, offering an alternative workflow for creators who don’t need clip extraction.
Editing Individual Clips With Storyboard
After identifying a clip to edit from either Highlights or All Clips sections, click “Edit” to access Wisecut’s storyboard interface—a text-based editing environment that eliminates the need for traditional timeline manipulation.
Understanding the Storyboard Interface
The 2025 storyboard editor displays your clip as a series of text blocks corresponding to spoken sentences or phrases. Each block represents a segment of video footage synced with the transcript, allowing editing by simply manipulating text rather than adjusting timeline markers.
Wisecut storyboard editing interface showing text-based video editing with transcript blocks
The interface consists of three primary areas:
Left Panel – Video Preview: Displays real-time video playback synced with the transcript. Click any text block to jump immediately to that moment in the video.
Center Panel – Transcript Blocks: Shows all clip content as editable text segments. Each block represents a complete spoken sentence or thought, and editing these blocks automatically adjusts the video.
Right Panel – Enhancement Controls: Provides toggle switches for subtitles, background music, audio enhancement, auto punch in/out zoom, and background noise removal.
Automatic Enhancements and Title Generation
Wisecut automatically generates a suggested title, meta description, and hashtags for each clip based on content analysis. These AI-generated elements appear at the top of the editor and can be customized or replaced entirely.
The platform also automatically transcribes all dialogue, saving significant time compared to manual caption creation. Transcription accuracy typically exceeds 95% for clear audio, though technical jargon, proper nouns, and heavy accents may require minor corrections.
Editing Transcript Text Blocks
Rearranging Segments: Click and drag any text block up or down to reorder the chronological sequence. This allows creative restructuring without touching the video timeline.
Deleting Segments: Click the trash icon or “X” button on any text block to remove that segment from the clip. The video automatically adjusts, creating seamless cuts.
Splitting Blocks: Position the playhead at the desired split point within a text block, then use the split tool to divide one segment into two independent blocks that can be edited separately.
Text Editing: Click directly on any text within a block to correct transcription errors, adjust phrasing, or fix misspelled names. These changes update the subtitle display but don’t alter the actual spoken audio.
Enhancing Your Clip
Editing and Styling Captions
Click the “Subtitles” toggle in the right panel to enable or disable burned-in captions. When enabled, additional styling options appear allowing customization of subtitle appearance.
Wisecut dashboard setting
Font and Size: Select from multiple font families including Arial, Helvetica, Montserrat, Roboto, and Impact. Adjust font size to ensure readability on mobile devices (recommended 24-32pt for vertical videos).
Note: Free users can only modify the font color.
Color Customization: Choose text color and background color/opacity to match brand guidelines or ensure readability against video backgrounds. High contrast combinations (white text on black background or yellow text on dark backgrounds) perform best.
Position and Alignment: Place subtitles at the top, center, or bottom of the frame. For vertical videos (TikTok/Reels), center or upper positioning prevents captions from being obscured by platform UI elements.
Animation Effects: Add entrance animations like fade-in, slide-up, or typewriter effects to make captions more engaging and attention-grabbing.
Adding and Adjusting Background Music
Toggle the “Music” switch in the right panel to enable or disable background music. When enabled, Wisecut’s AI automatically selects a royalty-free track matched to the video’s mood from its library of 500+ pre-cleared songs.
Changing Music Selection: Click the music icon to browse alternative tracks. Preview each option before applying to ensure proper mood alignment. All tracks are copyright-free and safe for YouTube monetization.
Volume Control: Adjust the music volume slider (recommended 15-25% to avoid overwhelming dialogue). The AI applies automatic audio ducking that lowers music during speech regardless of volume setting.
Removing Music: Toggle the music switch off to export silent clips. This is useful when planning to add custom licensed music in post-production or when platform algorithms favor native audio.
Audio Enhancement Options
Background Noise Removal: Toggle this option to eliminate ambient sounds like air conditioning hum, traffic noise, or room echo. The AI preserves vocal clarity while suppressing unwanted audio.
Audio Enhancement: Enable this setting to apply professional-grade audio processing that makes dialogue sound like it was recorded in a broadcast studio. The enhancement normalizes volume levels, adds warmth, and improves overall audio quality.
Audio Ducking: This feature automatically lowers background music volume when speech is detected and raises it during pauses, creating professional audio balance without manual keyframe editing.
Auto Punch In/Out Zoom
Enable “Auto Punch In and Out” to have Wisecut automatically detect your face and apply dynamic zooming that creates visual interest and maintains viewer engagement. The AI zooms in during active speaking and zooms out during pauses or scene transitions.
This feature works best with single-speaker talking-head videos shot in 16:9 format. Multi-person content or videos without clear facial recognition may produce inconsistent results.
Previewing and Exporting Your Clip
Preview Before Export
Before committing to final export (which consumes processing minutes from subscription limits), thoroughly preview the edited clip using the built-in player. Click the play button in the video preview panel to watch the complete clip with all enhancements applied.
Full Playback Review: Watch the entire clip start to finish, checking for unintended cuts, caption accuracy, music volume balance, and overall pacing.
Mobile Preview Mode: If targeting mobile platforms (TikTok, Instagram Reels), view how content displays on smartphone screens to catch text legibility issues and framing problems invisible on desktop monitors.
Export Settings and Options
When satisfied with the preview, click the “Export” button to access final export settings with multiple format and quality options.
Wisecut export settings
Aspect Ratio Selection:
Vertical (9:16): Optimized for TikTok, Instagram Reels, YouTube Shorts, and Facebook Stories
Horizontal (16:9): Standard YouTube videos, website embeds, and traditional platforms
Square (1:1): Instagram feed posts, Facebook posts, and LinkedIn video content
Resolution Options:
360p (HD): Available on Free plan with watermark, suitable for testing
720p , 1080p (Full HD): Available on Starter+ and Professional plans, recommended standard for professional use
4K (Ultra HD): Available on Professional+ plan only, required for premium quality
Final Toggles:
Burned-in Captions: Enable to permanently embed subtitles into the video file
Background Music: Confirm whether to include the selected soundtrack
Watermark: Free plan exports include Wisecut branding; paid plans export clean videos
Downloading and Sharing
After clicking “Export,” Wisecut adds the clip to the processing queue. Export processing typically takes 1-3 minutes depending on clip length and selected quality.
Direct Download: Once processing completes, click “Download” to save the MP4 file to your local device. Organize downloads into project-specific folders for easy retrieval.
Direct Sharing: Professional+ plans offer one-click sharing to connected social media accounts including YouTube, Instagram, Twitter, and Facebook without downloading locally first.
Project Storage: Downloaded videos are permanently saved, but the ability to re-edit clips within Wisecut expires after 30 days on most plans. Download final exports promptly or maintain active subscriptions for ongoing access.
Batch Processing Strategy: Upload and process multiple videos during off-hours (overnight or during lunch breaks) to maximize productivity. Queue several projects simultaneously and let email notifications alert you when all processing completes.
Content Optimization Before Upload: Record with Wisecut in mind: use external microphones for clear audio, maintain consistent speaking pace and energy, keep subjects centered in frame for auto-punch effectiveness, and avoid monotone delivery that makes all segments appear equally important to the AI.
Strategic Clip Selection: Review all generated clips in the “All Clips” section before settling on the AI’s Highlight selections. The algorithm is 85-90% accurate, but human judgment still adds value for brand-specific priorities.
Keyword Search Mastery: Use specific technical terms, product names, or topic keywords in the search function to instantly locate relevant segments in large clip libraries from lengthy source videos.
Template Consistency: After finding optimal settings (caption style, music preference, zoom effects), replicate these across all projects to maintain brand consistency and reduce decision fatigue.
Common Issues and Quick Fixes
Problem: Upload Fails or Freezes
Causes: File size exceeds plan limits, unsupported codec, unstable internet connection, or YouTube link permission issues.
Solutions: Verify file size is under plan cap (2GB Free, 4GB Starter, 5GB Professional). For YouTube links, ensure the video is public or unlisted (not private). Convert videos to H.264 MP4 format using free tools like HandBrake before uploading. Test internet connection stability and pause bandwidth-intensive applications during upload.
Problem: AI Highlights Miss Important Moments
Causes: Monotone delivery, technical content without emotional peaks, or quiet speaking segments.
Solutions: Don’t rely solely on the Highlights section. Browse the “All Clips” section using keyword search to find specific topics or segments. The AI optimizes for engagement patterns, but domain expertise beats algorithms for niche content.
Problem: Transcription Errors or Inaccurate Captions
Causes: Background noise, heavy accents, overlapping speakers, technical jargon, or poor audio quality.
Solutions: Edit captions directly in the storyboard by clicking text blocks and making corrections. Changes sync automatically to subtitle display. Re-record in quieter environments when possible for future projects.
Problem: Processing Takes Longer Than Expected
Causes: Server congestion during peak hours (weekday mornings 9-11 AM), very large files, or complex audio with multiple speakers.
Solutions: Processing typically completes within 2-4 minutes per 10 minutes of source video. If significantly delayed, processing continues server-side—close the browser and await email notification. Upload during off-peak hours (evenings, weekends) for faster processing.
Problem: Auto-Reframe Crops Faces Incorrectly
Causes: Multiple faces in frame, subjects moving outside center, or rapid camera movement.
Solutions: Disable Auto Punch In/Out for multi-person scenes. Record single-speaker content with subjects centered in frame for best results. Choose original 16:9 horizontal format for content with complex framing.
Pro Tip: Before processing a 60+ minute video, test Wisecut with a 5-10 minute segment first. This reveals transcription accuracy, AI selection preferences, and audio quality without investing full processing time or subscription minutes. Adjust recording practices based on results before processing complete content.
When to Use Wisecut vs Manual Editing
Use Wisecut When:
Content is primarily speech-based (interviews, podcasts, vlogs, webinars, testimonials)
Time efficiency is the top priority over frame-perfect creative control
Creating social media clips from long-form source material
Generating high volumes of content on consistent schedules
Working with straightforward talking-head footage
Switch to Manual Editors (Premiere, DaVinci, Descript) When:
For complex projects requiring more control, compare Wisecut vs Descript to determine which platform better suits your needs.
Frequently Asked Questions
How long does Wisecut take to process videos in 2025?
Processing averages 2-4 minutes per 10 minutes of source video in the updated 2025 workflow. A 60-minute video typically processes in 12-18 minutes, while a 20-minute video takes 4-8 minutes. Processing speed depends on video resolution, audio complexity, server load, and time of day.
Can I edit clips after initial export?
Yes, as long as the project hasn’t expired (30 days for most plans). Return to the project from your library, access the clip from All Clips or Highlights section, make additional edits, and re-export. However, this consumes additional processing minutes from your subscription allocation.
What’s the difference between Highlights, All Clips, and Full Content?
Highlights shows the AI’s top three clips under 59 seconds optimized for social media. All Clips displays every segment generated from your video (typically 5-50+ clips). Full Content is your complete original video with AI enhancements applied (silence removal, music, captions) but no clip extraction.
Does Wisecut work with non-English languages?
Yes, Wisecut supports transcription and caption generation in 40+ languages including Spanish, French, German, Portuguese, Italian, Mandarin, Japanese, Korean, Hindi, and Arabic. Caption accuracy varies by language, typically 85-95% for major languages with clear audio.
Can I use my own music instead of Wisecut’s library?
The 2025 version focuses on Wisecut’s 500+ royalty-free music library for copyright safety and YouTube monetization compliance. For custom music, disable the music toggle during export and add licensed tracks in post-production using traditional editors.
What happens if I run out of processing minutes?
Projects can be uploaded and queued but won’t process until the next billing cycle renews your minutes or after upgrading plans. Already-exported videos remain accessible permanently regardless of subscription status.
Does Wisecut have a mobile app?
Yes, Wisecut offers mobile apps for iOS and Android with basic functionality. However, the web browser version provides the complete feature set and better storyboard editing experience on larger screens.
Related Guides & Resources
For comprehensive mastery of Wisecut and AI video editing, explore these related resources:
Best AI Text-to-Video Tools in 2025 – Expert review of 7 best AI text-to-video tools in 2025. Compare Pictory, Synthesia, RunwayML, HeyGen and more with real testing.
Wisecut’s refined 2025 interface transforms video editing from a time-consuming technical challenge into a streamlined three-step process: upload your video, let AI generate clips automatically, and export the best segments—all in under 15 minutes for most projects. By following this step-by-step guide, beginners can achieve professional editing results 85-90% faster than traditional manual editing workflows.
The platform’s simplified workflow with automatic Highlights selection, comprehensive All Clips library, and enhanced Full Content option eliminates technical barriers while maintaining output quality suitable for professional use across social media platforms. The storyboard interface removes the need to understand complex timeline editing, making video production accessible to creators of all skill levels.
Success with Wisecut depends on understanding its core strength—automated clip generation from speech-heavy content—while working within its limitations through proper source material preparation (clear audio, centered subjects, dynamic delivery) and strategic manual refinement of AI-generated results when domain expertise demands human judgment.
Ready to compare Wisecut against alternatives? Read our comprehensive Wisecut AI review with pricing analysis, performance benchmarks, and competitor comparisons to make an informed decision.
Start your free Wisecut account today at wisecut.ai to experience the 2025 automated video editing workflow firsthand with 1 hour of complimentary processing time.